Our Farthest Frontier guides will help you learn how to play this Colony Sim and build your own thriving Settlement in the wilderness!
Quicklinks: Farthest Frontier Guides | Farthest Frontier Starter Guide | F.A.Q.
Farthest Frontier Guides
Farthest Frontier Starter Guide
Farthest Frontier can be a bit challenging as far as colony sims go. Our Farthest Frontier Starter Guide will help you learn the basics of the game and set you up for tackling some of the more difficult scenarios.
Starting a New Settlement
Naturally, your first step is to start a new settlement. You could just pick a name and hit «Start,» but this is a really bad idea for your very first game.
First, let’s break down the various parts of starting a new game:

Selecting Your Difficulty
There are three general options for selecting your difficulty:
- Pioneer – The easiest difficulty setting.
- Trailblazer – The equivalent of normal difficulty.
- Vanquisher – The hardest difficulty setting.
I recommend that you select «Trailblazer» for your first time playing the game. It will be a challenge, yes, but it will be far from insurmountable.
Advanced Settings
In addition to the basic settings, there’s also a lovely button called «Advanced Settings» that will allow you to fine-tune several aspects of the game.
We’re not going to mess with the Advanced Settings for your first playthrough, but here’s what they do just in case you’re curious:
- Map Seed – This is the code used to generate your map. It can be used to share maps with other players. If you’ve got a map seed from someone else, this is where you would input it. You can also see your Map Seed on the menu while in a game.
- Extra Resources – Determines how many Villagers, how much food, and what equipment you’ll start out with.
- Pioneer
- 12 Villagers
- 16 Months of Food
- 5 Weapons
- 4 Bows
- 150 Arrows
- 30 Tools
- Trailblazer
- 12 Villagers
- 9 Months of Food
- 5 Weapons
- 3 Bows
- 100 Arrows
- 20 Tools
- Vanquisher
- 10 VIllagers
- 4 Months of Food
- 4 Weapons
- 3 Bows
- 80 Arrows
- 15 Tools
- Pioneer
- Maladies – Determines how likely Disease will spread amongst Villagers.
- Pioneer – -60% chance for Disease to spread.
- Trailblazer – -30% chance for Disease to spread.
- Vanquisher – No reduction in chance of Disease spreading.
- Wildlife – Determines spawn rate of Animals and hostile Wildlife like Wolves and Bears.
- Pioneer
- Deer – Plentiful
- Boar – Rare
- Wolves – Rare
- Bear – Extremely Rare
- Trailblazer
- Deer – Average
- Boar – Average
- Wolves – Average
- Bear – Rare
- Vanquisher
- Deer – Rare
- Boar – Plentiful
- Wolves – Plentiful
- Bear – Average
- Pioneer
- Raiders – Affects how often Raiders and hostile armies attack.
- Pioneer
- «Raiders will occasionally invade your settlement, wreak havoc, and steal goods.»
- Trailblazer
- «Raiders will occasionally invade your settlement, wreak havoc, and steal goods.»
- «The invading Armies of local Lords may demand a payment for settling on their lands, lest your settlement be razed.»
- Vanquisher
- «Organized groups of elite raiders have been seen in the area, and have been known to attack with reckless abandon, seeking glory on the battlefield.»
- «The local Lords in the area are particularly brutal, and do not take kindly to those that would squat on their lands. Do not expect your presence to go unnoticed.»
- Pioneer
Terrain
«Terrain» selects your map type. There are five different options:
- Arid Highlands – «Dry, desolate highlands with infertile soil, sparse pine barrens, and wasteland[,] but rich in mineral deposits. Hard environment difficulty.»
- Alpine Valleys – «Northern mountain valleys, thick with conifer forests and interspersed with lakes and occasional meadows. Medium environmental difficulty.»
- Lowland Lakes – «An idyllic setting of dense forests, lush meadows[,] and lakes teaming with fish. Easy environmental difficulty.»
- Plains – «Expansive plainland with fertile meadows, dry grassland[,] and brush[,] but few forests and lower mineral resources. Medium environmental difficulty.»
- Random – «Generates a random map that can vary significantly between mountains and flat land, lakes or dry land, and various mixes of biomes. Variable environmental difficulty.»
This is where we’re going to deviate from the default: select Lowland Lakes for your map. It will be a much easier experience that will help you get acclimated to the game.
I strongly recommend that you don’t select any of the other map types until you have a few hours in the game and a good understanding of its mechanics. The additional challenge will make it much tougher to succeed!
Settlement Name
This is what your Settlement will be called. You can push the dice button to select from randomized options or you can input a custom name.
Map Size
You can choose between a Small, Medium, and Large map. Medium is the default, so we’ll go with that for now.
Pacifist Mode?
Turning on «Pacifist Mode» will disable Raiders, invading armies, Wolves, and Bears. Do not turn this option on for your first playthrough.
Starting the Game
Now that we’ve covered the settings, it’s time to start the game! Remember, this is what you should have picked:
- Trailblazer Difficulty
- Lowland Lakes Map
- Medium Map Size
- Pacifist Mode Off
Name your Settlement and click «Start.» You’ll get a loading screen and we’ll be in the game after a short while.

Placing Your Town Center (or Rerolling the Map)
Once you’re in the game, you’ll be presented with a large area of the map revealed and a prompt to place your Town Center.
Be very careful in selecting where you place your Town Center. While you can easily move most Buildings in the game, your Town Center is stuck wherever you place it. Furthermore, it serves as a defensive Building where your Villagers can garrison within and shoot arrows at invaders — you’ll want to ensure it’s in an important location, too.
I recommend placing your Town Center on relatively flat land and 20 or so blocks away from water. You’ll also want to check the fertility of land by pressing «F» — this will show you a good spot to build Farms.
You can place your Town Center anywhere within the circle of the scouted area. If it’s not to your liking, you can go into the options menu and «Reroll» the map, generating a new map of the same type but with a different seed. Don’t hesitate to reroll the map if you don’t like what you see — you’re going to be playing here for a good few hours at least!
Understanding the Farthest Frontier UI
You’ll need to know how the UI works in order to succeed in this game, so take a gander at this image.

Here’s a description of each of these items:
- Report for Last 12 Months – Provides graphs and other information showing how your Settlement did over the last 12 months including Food Production, Goods & Material Production, and Villager Stats.
- Sick Villager Counter – Shows you how many Villagers are ill (if any).
- Population Counter – How many Villagers you currently have vs. how many you have enough Housing for.
- Villager Happiness – Shows you how Happy your Villagers are overall.
- Food Stores – Shows you how many months of Food you have stored away. The second number in parenthesis shows you have many months worth of food will spoil within the next year.
- Calendar – Shows you the month and the season. Each block is a month, and the images behind the blocks represent the seasons.
- Resources – A tracker for your various resources. From left to right:
- Wood – Acquired from Trees.
- Firewood – Made at a Firewood Splitter.
- Planks – Made at a Saw Pit.
- Stone – Gathered from large stones in the world.
- Clay – Gathered from Clay Pits.
- Bricks – Produced at the Tier 3 building Brickyard.
- Gold – Produced through Taxes or Trade.
- Auto Upgrade and Settings Buttons
- Auto Upgrade – When turned on, Buildings will automatically be flagged to upgrade to the next Tier. On by default.
- Settings – Your mouse-driven access to the Settings menu.
Planning Your Settlement with the «Crossroads» System
Now that your Town Center is placed, we’ll have to figure out how we’re actually going to lay out the town.
If you’re like me, you may be occasionally stuck with «Blank Canvas» syndrome. You don’t really know what should go where when confronted with an abundance of open space.
That’s why I’ve developed the «Crossroads» system of Building a Settlement. It’s a simple way of determining what goes where:

In this image, you can see a road splits the Settlement into four Quarters.
- The top left is the «Commercial» Quarter. This is where Storage and non-polluting workshops like the Cobbler and Basket Shop go.
- The top right is the «Residential» Quarter. This is where Houses go and where you’ll put some key Buildings that improve Desirability such as the School and Healer’s House.
- The bottom right is the «Agricultural» Quarter. This is where your Farms and Orchards go.
- Finally, the bottom left is the «Industrial» Quarter. This is where we’ll place all of the Buildings that negatively impact Desirability such as the Firewood Splitter, Tanner, Compost Yard, etc. This is the same quadrant that holds the Town Center and will ensure there’s enough distance between these Buildings and your Houses, preventing any loss in Desirability.
The Commercial, Agricultural, and Industrial Quarters in this plan are fairly straightforward — simply place the Buildings however you think it would make sense.
The Residential Quarter, however, will need a little more planning:

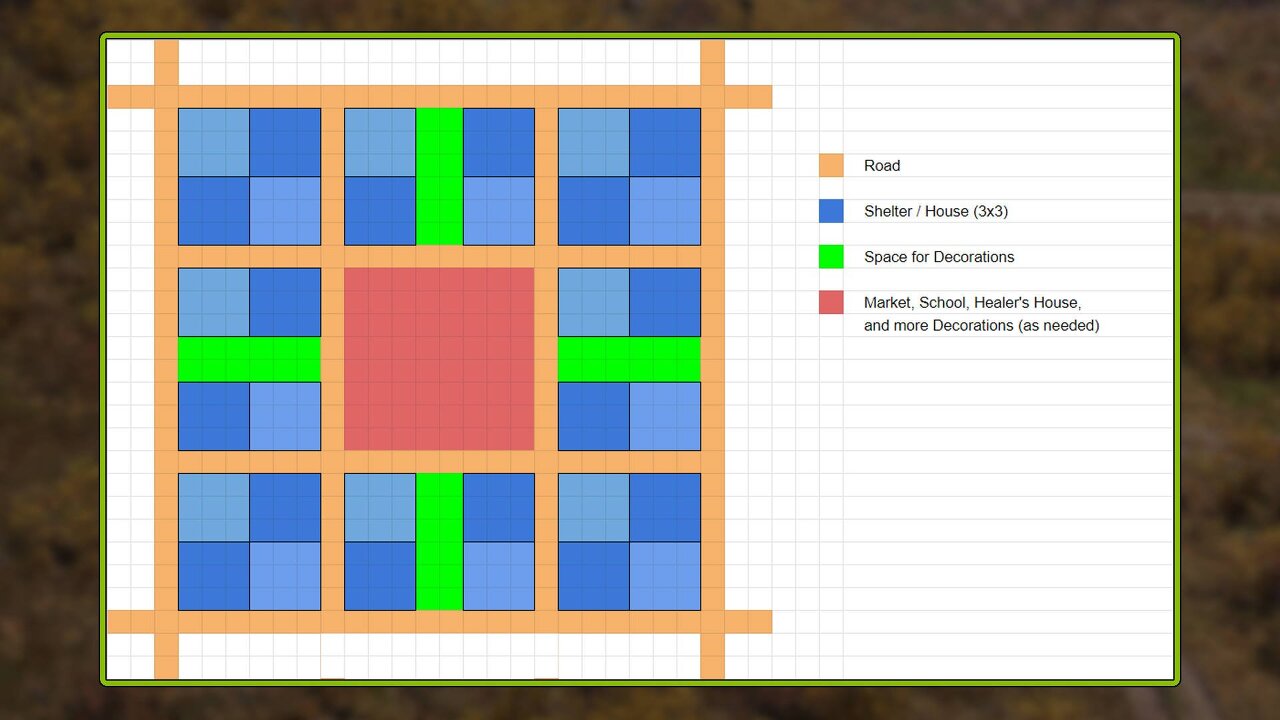
Our goal for this Farthest Frontier Starter Guide will be to get you up to Tier 2 with the ability to expand further. To make that happen, the Residential Quarter will be laid out with nine grids made with roads.
The central space is best used for key Buildings that will improve Desirability of most (if not all) of the surrounding Houses:
- Market
- Healer’s House
- School
- Shrine
- Parks, Gardens, etc.
Additionally, each of the squares in the cardinal directions (north, south, east, and west) have a little extra space between the houses. This will give you more room for Decorations which can improve Desirability.
Here’s a more specific layout:
This system can definitely be used to take you to Tier 2 and even Tier 3. Advancing to Tier 4 — which doesn’t have any Buildings as of Early Access Version 0.1.4 — will likely require a change in layout or a different strategy which this guide will not cover.
Why all the complexity with laying out Housing? It’s simple: High Desirability will allow you to upgrade your Houses. Upgraded Houses are required for advancing to higher Tiers and they also pay taxes which can offset any Guards, Soldiers, or Services you have that cost money to run every month (such as the Compost Yard).
The Crossroads system of planning will serve as the framework for this guide. Now that we got that covered, let’s move on to actually Building things out!
Clearing Land for your Town Center and Building the Crossroads
Trees and Rocks will be automatically flagged for removal once you pick your location for the Town Center. It will take a short time for the Villagers to actually do that. While they’re working, take a look at the immediate area around town.
You can clear additional land by pressing «H» and dragging the box over Trees and Rocks you’d like to flag for removal. Your Villagers will get to them eventually. You can, if you wish, increase or decrease the number of workers and Prioritize jobs by clicking on the individual Tree or Rock.
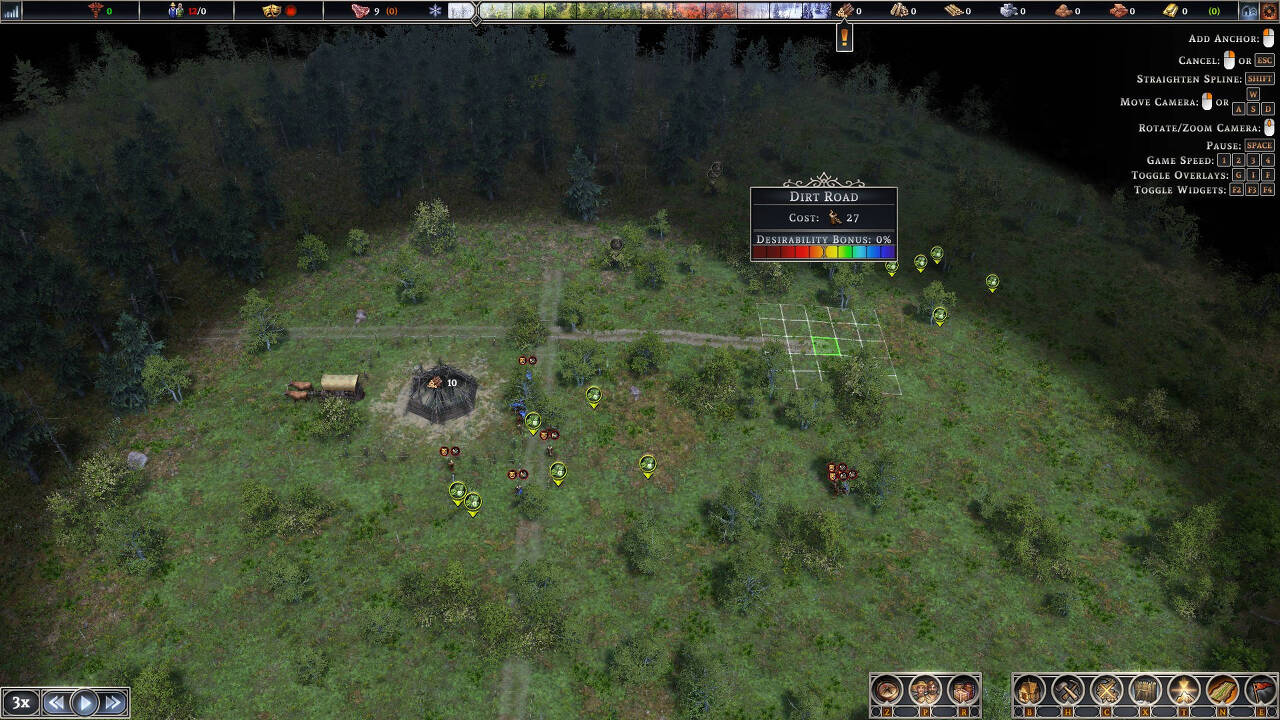
While they’re working, press «N» to bring up the interface for Building a Dirt Road. Drag out a Crossroads with your Town Hall on one of the corners. Remember, the Town Hall will be the quarter where your «polluting» Buildings will go.
Building Houses, a Well, and a Firewood Splitter
Our next step will be to Build the first grid square for the Residential Quarter.
Use a road to make a 6×6 Square in the quadrant opposite your Town Center:

Place three Shelters in the corners. Build a Well in the farthest corner as shown in the image above.
You’ll need Stone for the Well; if you don’t have any, designate a nearby Rock for removal to get it by pressing H and dragging a box over it or by selecting the Rock individually and selecting «Harvest Resource.» You’ll also likely need more Wood soon, so designate some trees in the immediate area for harvesting.
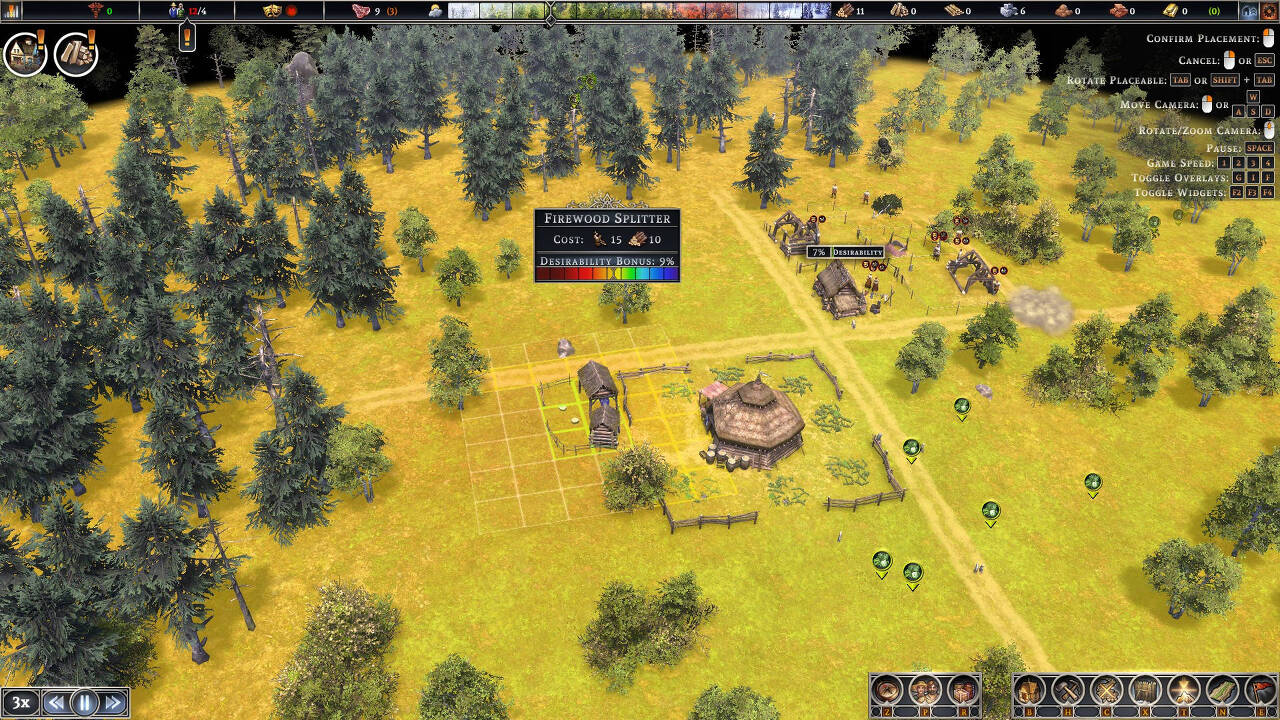
At the same time, we’ll want to place a Firewood Splitter:
'Farthest Frontier' 카테고리의 다른 글
| Farthest Frontier – Save Game Data & File Location (0) | 2022.10.18 |
|---|