December 24, 2019 (Updated as per latest Facebook Developer Portal)
This blog post was originally written in December 2017. Facebook has changed it's developer portal user interfaces since then. We updated this blog post and included the steps as per latest developer portal steps.
If you ever need to integrate Facebook Login or use Facebook graph API, you can hire asp.net developers from us at affordable rate.
To use the Facebook API, like the Login with Facebook or Facebook Graph API, you need to create a Facebook App. When you make a Facebook App, that app will have an App ID and an App Secret. You need these credentials to do almost anything with Facebook, including going through the OAuth authorization flow and working with Facebook's Graph API.
With the App ID, you can send API requests to Facebook for data. The Facebook App Secret can be used to decode the encrypted data.
Please follow below steps to create Facebook application:
- Login to your Facebook account and navigate to https://developers.facebook.com
- if you were already registered for Facebook developer account, you can skip this step and go to step #3 of this post. If you are not registered on Facebook developer account, then you need to follow these steps:
-
Click on Get Started button from top right corner.

-
Click on next button from the popup

-
Enter your phone number and verify your account using text message or phone call.

- It may be needed to Re Verify your account by Facebook.

- Then enter verification code you got and click on the Verify button.

- On the next screen, after verifying your account, 3rd step is to tell about you. Select Developer option here.

-
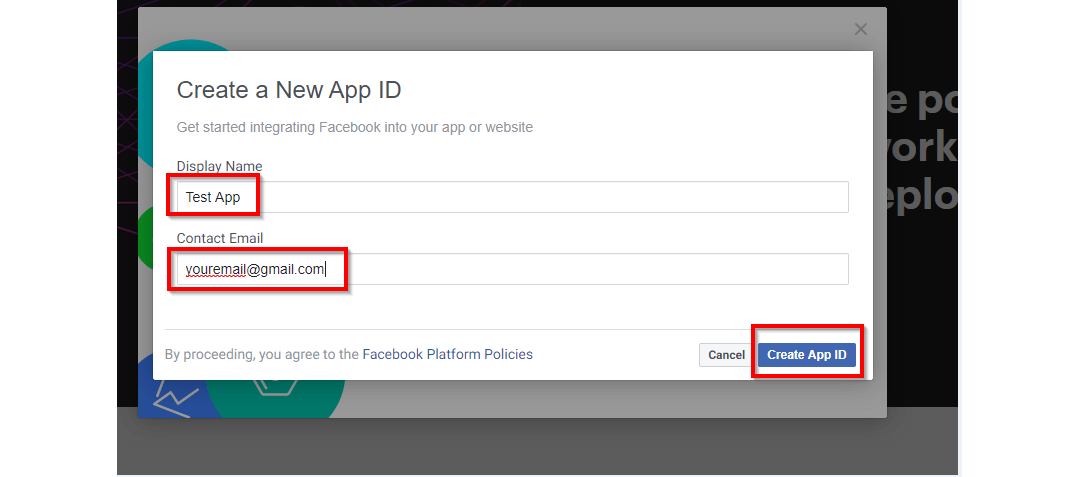
On welcome screen, click on Create First App button. Here you'll be asked for Display Name and Contact Email of your New App ID. This app name will be shown to end users when they will try to “Login with Facebook” and they are redirected to Facebook website for login permission. So, make sure you give a meaningful name here which can identify your website.

-
- If you are already registered with Facebook developer perform below steps:
-
Click on “My App” >> “Add a New App”

-
From the popup enter “Display Name” of your new application and“Contact Email”, then click on “Create App Id” Button.This app display name will be shown to end users when they will try to “Login with Facebook” and they are redirected to Facebook website for login permission. So, make sure you give a meaningful name here which can identify your website.

-
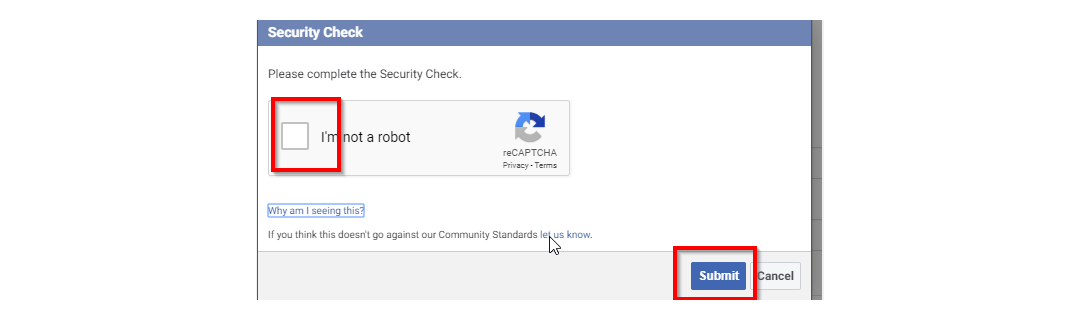
Complete the Security Check by checking I'm not a robot button and click on submit button and It will open product list page.
-
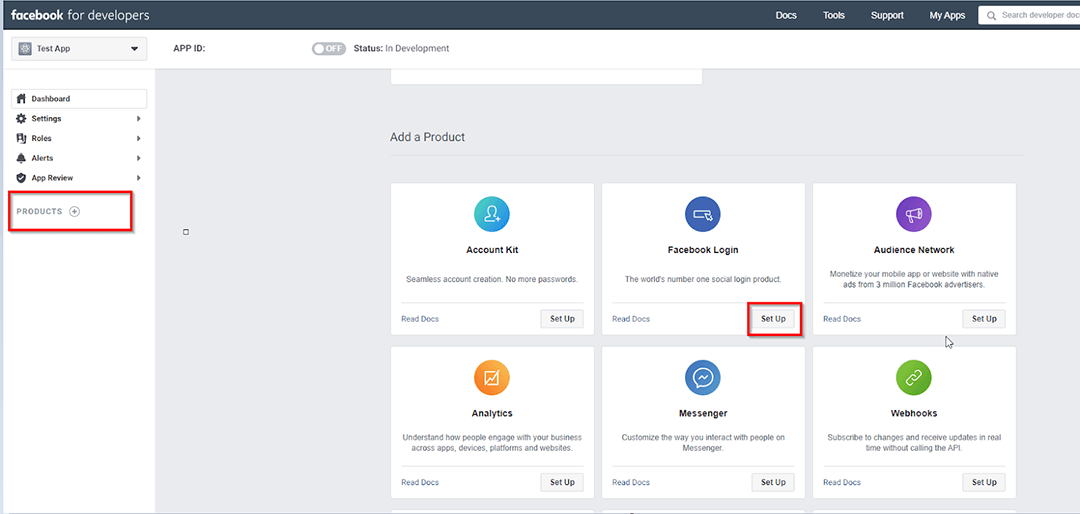
- From the product list page click on “Set Up” button from product with name “Facebook Login”.
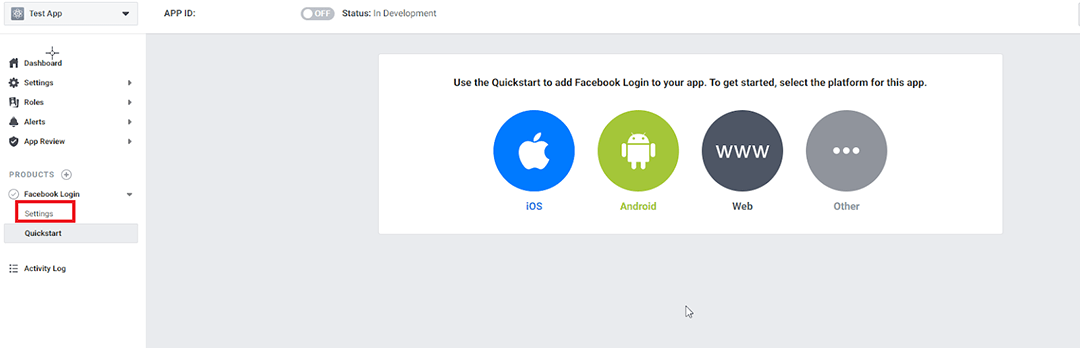
- In the left side menu, click on the “Facebook Login” link to expand the sub menu. Click on “Settings” from the sub menu.
- Enter your website URL in “Valid OAuth redirect URIs”. For example, my website domain is yourdomain.com so I entered https://yourdomain.com

-
Now expand the Setting menu and select Basic. Here you can find the App ID and App Secret.Then click on the “Show” button in the “App Secret” text box. You can copy the “App Id” and “App Secret” which you can use for your Facebook API calls.

- By default when you create Facebook application, it is private and available only to you for testing purpose. End users can only use it after you make the app live. For the live app you must enter a Privacy Policy URL at setting > Basic.

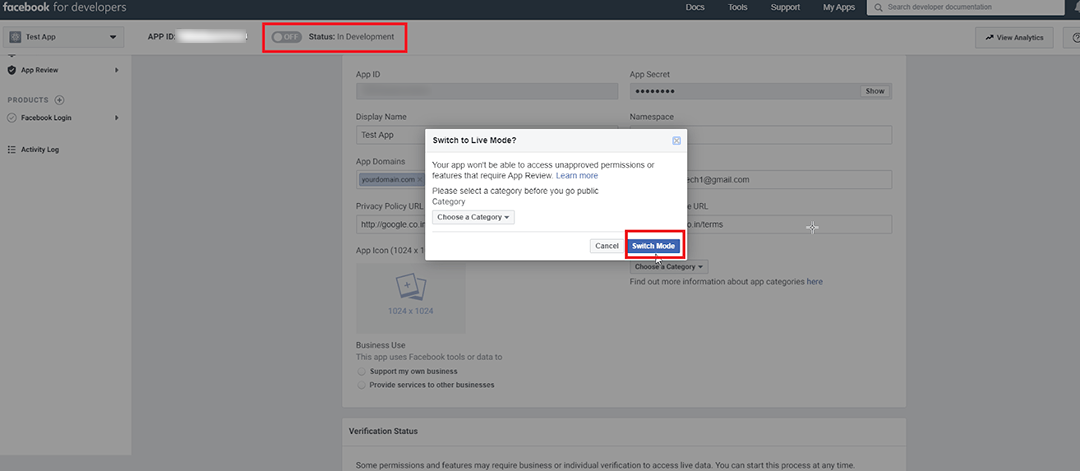
- For Switching the mode from Development to Live, click on the status switch. After that, it will show a popup to switch the mode. Please select the Category of your app and click on the “Switch Mode” button to make your app public.
'WEB' 카테고리의 다른 글
| PHP 기본 시간대(timezone) (0) | 2021.08.09 |
|---|---|
| [Facebook] Where can I find my Facebook application id and secret key? (0) | 2021.02.14 |
| [Facebook] Facebook Access Token for Pages (0) | 2021.02.14 |
| [JS] Declare multiple module.exports in Node.js (0) | 2020.12.25 |
| [JS] [번역] 자바스크립트 — 조건부 삼항 연산자(Conditional Operator)설명하다 (0) | 2020.12.25 |