728x90


A plugin is a piece of software containing a group of functions that can be added to a WordPress website.


Steps for creating a plugin for WooCommerce :

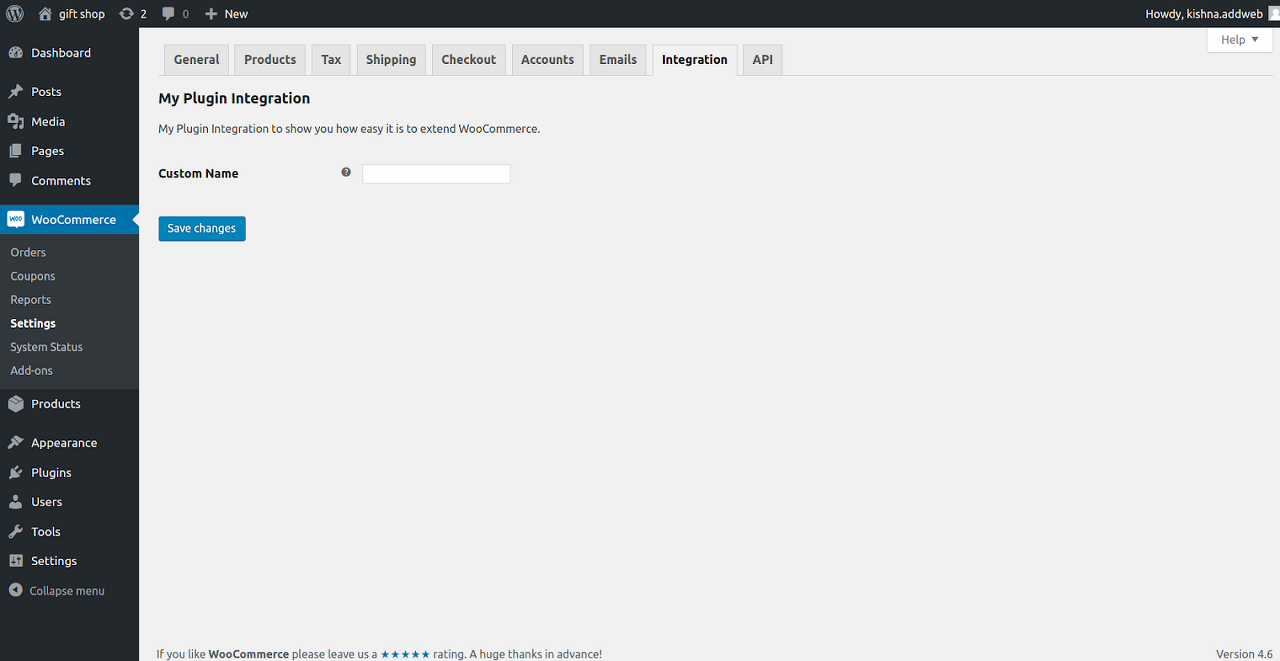
One of the easiest ways to create a settings page is by taking advantage of the WC_Integration class. Using the Integration class will automatically create a new settings page under WooCommerce > Settings > Integration and it will automatically save and sanitize your data for you.

1) Download and activate the latest version of WooCommerce from here: https://wordpress.org/plugins/woocommerce/


2) create new folder for our new plugin in wp-content/plugin/ directory.

e.g, wp-content/plugin/my-custom-plugin


3) WC_Integration class file. e.g, class-wc-integration-demo-integration.php.

/**
 * Integration Demo.
 *
 * @package   Woocommerce My plugin Integration
 * @category Integration
 * @author   Addweb Solution Pvt. Ltd.
 */
if ( ! class_exists( 'WC_My_plugin_Integration' ) ) :
class WC_My_plugin_Integration extends WC_Integration {
  /**
   * Init and hook in the integration.
   */
  public function __construct() {
    global $woocommerce;
    $this->id                 = 'my-plugin-integration';
    $this->method_title       = __( 'My Plugin Integration');
    $this->method_description = __( 'My Plugin Integration to show you how easy it is to extend WooCommerce.');
    // Load the settings.
    $this->init_form_fields();
    $this->init_settings();
    // Define user set variables.
    $this->custom_name          = $this->get_option( 'custom_name' );
    // Actions.
    add_action( 'woocommerce_update_options_integration_' .  $this->id, array( $this, 'process_admin_options' ) );
  }
  /**
   * Initialize integration settings form fields.
   */
  public function init_form_fields() {
    $this->form_fields = array(
      'custom_name' => array(
        'title'             => __( 'Custom Name'),
        'type'              => 'text',
        'description'       => __( 'Enter Custom Name'),
        'desc_tip'          => true,
        'default'           => '',
        'css'      => 'width:170px;',
      ),
    );
  }
}
endif; 


4) plugin file. e.g, woocommerce-my-custom-plugin.php

/**
 * Plugin Name: My custom plugin
 * Plugin URI: http://www.addwebsolution.com
 * Description: A plugin demonstrating how to add a new WooCommerce integration.
 * Author:  Addweb Solution Pvt. Ltd.
 * Author URI: http://www.addwebsolution.com
 * Version: 1.0
 */
if ( ! class_exists( 'WC_my_custom_plugin' ) ) :
class WC_my_custom_plugin {
  /**
  * Construct the plugin.
  */
  public function __construct() {
    add_action( 'plugins_loaded', array( $this, 'init' ) );
  }
  /**
  * Initialize the plugin.
  */
  public function init() {
    // Checks if WooCommerce is installed.
    if ( class_exists( 'WC_Integration' ) ) {
      // Include our integration class.
      include_once 'class-wc-integration-demo-integration.php';
      // Register the integration.
      add_filter( 'woocommerce_integrations', array( $this, 'add_integration' ) );
    }
  }
  /**
   * Add a new integration to WooCommerce.
   */
  public function add_integration( $integrations ) {
    $integrations[] = 'WC_My_plugin_Integration';
    return $integrations;
  }
}
$WC_my_custom_plugin = new WC_my_custom_plugin( __FILE__ );
endif;


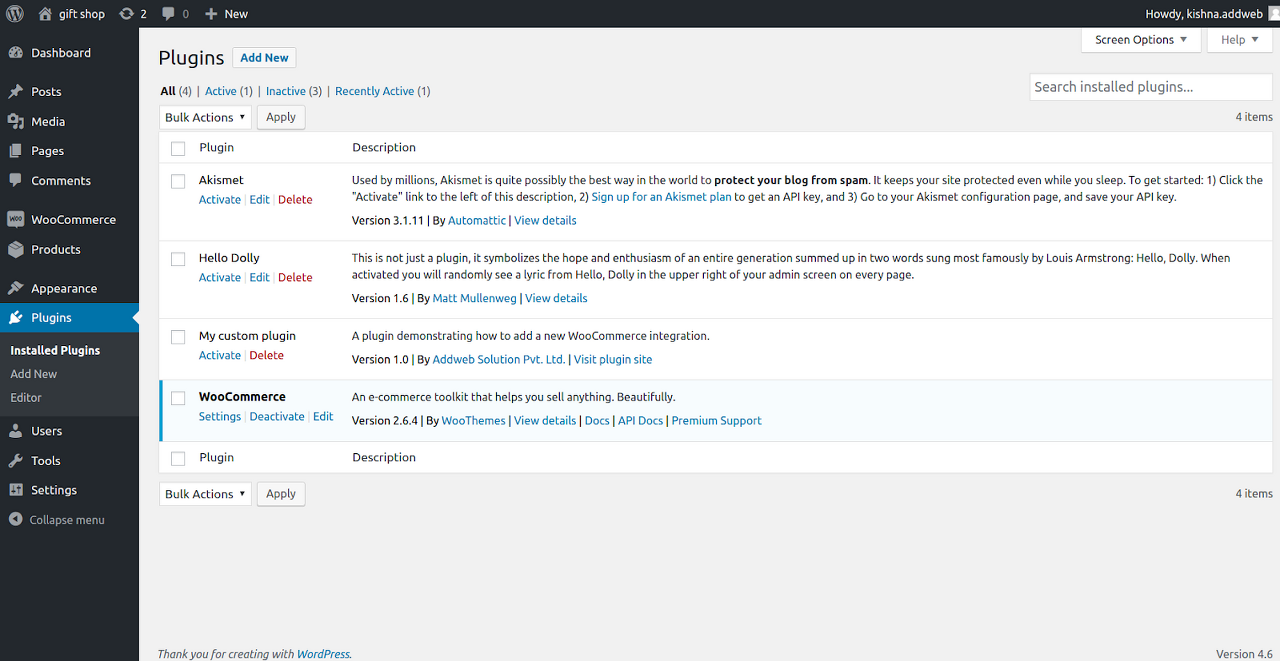
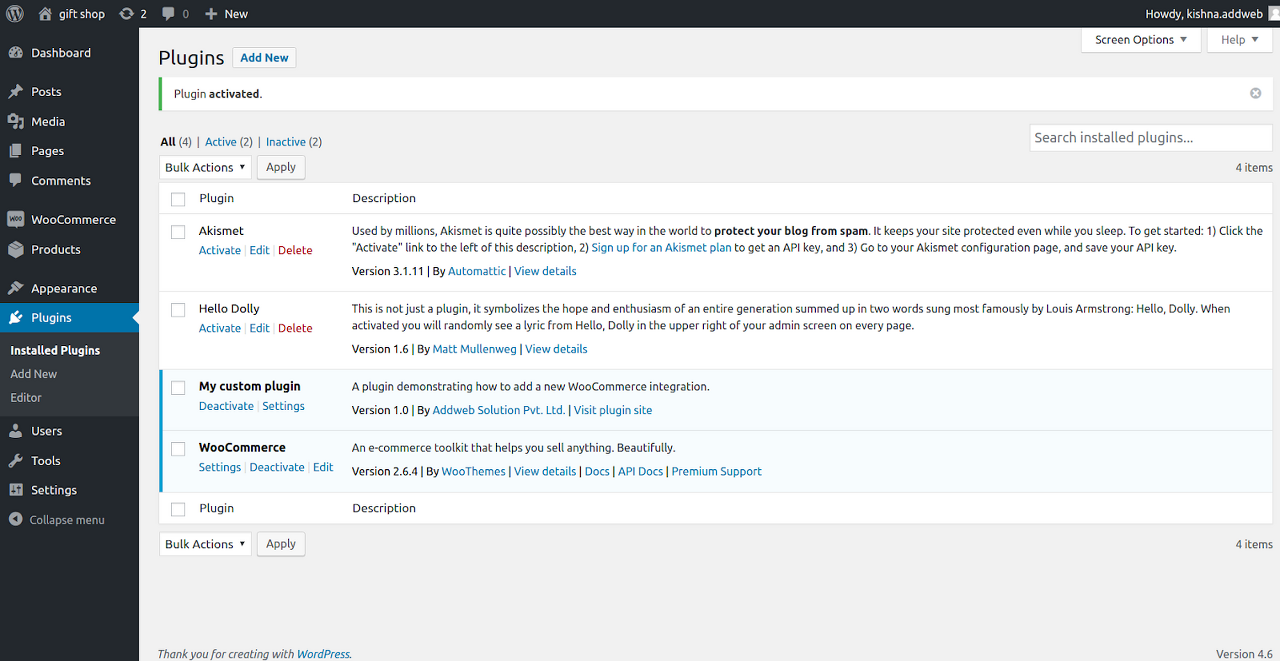
Now, you can see the My custom plugin in the list of all plugins.

5) create settings link for the plugin. Add this in init() method of your plugin.

// Set the plugin slug
 define( 'MY_PLUGIN_SLUG', 'wc-settings' );

// Setting action for plugin
add_filter( 'plugin_action_links_' . plugin_basename( __FILE__ ), 'WC_my_custom_plugin_action_links' );


Now add the function after object creation in the plugin file.

function WC_my_custom_plugin_action_links( $links ) {

    $links[] = '<a href="'. menu_page_url( MY_PLUGIN_SLUG, false ) .'&tab=integration">Settings</a>';
    return $links;
  }


Now you are able to see the settings link for the plugin. It is dependent on the WooCommerce plugin activation and deactivation.

6) Click on the settings link. You are now able to save data also.

Hope this blog helps you out. Feel free to share any questions, we are ready to help always :) If you need more assistance regarding WordPress Development Service then get in touch.


https://addwebsolution.com/blog/creating-custom-plugin-woocommerce-using-wcintegration-class

728x90

randomnerdtutorials.com/installing-the-esp32-board-in-arduino-ide-windows-instructions/


Installing ESP32 in Arduino IDE (Windows, Mac OS X, Linux) | Random Nerd Tutorials

Learn how to install the ESP32 board add-on in Arduino IDE in less than 1 minute. This guides works in any operating system: Windows PC, Mac OS X, and Linux.

randomnerdtutorials.com


There’s an add-on for the Arduino IDE that allows you to program the ESP32 using the Arduino IDE and its programming language. In this tutorial we’ll show you how to install the ESP32 board in Arduino IDE whether you’re using Windows, Mac OS X or Linux.

Watch the Video Tutorial

This tutorial is available in video format (watch below) and in written format (continue reading this page). 


If you have any problems during the installation procedure, take a look at the ESP32 Troubleshooting Guide.

If you like the ESP32, enroll in our course: Learn ESP32 with Arduino IDE.

Prerequisites: Arduino IDE Installed

Before starting this installation procedure, make sure you have the latest version of the Arduino IDE installed in your computer. If you don’t, uninstall it and install it again. Otherwise, it may not work.

Having the latest Arduino IDE software installed from arduino.cc/en/Main/Software, continue with this tutorial.

Do you need an ESP32 board? You can buy it here.

Installing ESP32 Add-on in Arduino IDE

To install the ESP32 board in your Arduino IDE, follow these next instructions:

  1. In your Arduino IDE, go to File> Preferences
  2. Enter https://dl.espressif.com/dl/package_esp32_index.json into the “Additional Board Manager URLs” field as shown in the figure below. Then, click the “OK” button:

    https://dl.espressif.com/dl/package_esp32_index.json, http://arduino.esp8266.com/stable/package_esp8266com_index.json
  3. Note: if you already have the ESP8266 boards URL, you can separate the URLs with a comma as follows:
  4.  
  5. Open the Boards Manager. Go to Tools > Board > Boards Manager…
  6. Search for ESP32 and press install button for the “ESP32 by Espressif Systems“:
  7. That’s it. It should be installed after a few seconds.


Testing the Installation

Plug the ESP32 board to your computer. With your Arduino IDE open, follow these steps:

1. Select your Board in Tools > Board menu (in my case it’s the DOIT ESP32 DEVKIT V1)


2. Select the Port (if you don’t see the COM Port in your Arduino IDE, you need to install the CP210x USB to UART Bridge VCP Drivers):

3. Open the following example under File > Examples > WiFi (ESP32) > WiFiScan


4. A new sketch opens in your Arduino IDE:


5. Press the Upload button in the Arduino IDE. Wait a few seconds while the code compiles and uploads to your board.

6. If everything went as expected, you should see a “Done uploading.” message.

7. Open the Arduino IDE Serial Monitor at a baud rate of 115200:


8. Press the ESP32 on-board Enable button and you should see the networks available near your ESP32:

Troubleshooting

If you try to upload a new sketch to your ESP32 and you get this error message “A fatal error occurred: Failed to connect to ESP32: Timed out… Connecting…“. It means that your ESP32 is not in flashing/uploading mode.

Having the right board name and COM por selected, follow these steps:

  • Hold-down the “BOOT” button in your ESP32 board


  • Press the “Upload” button in the Arduino IDE to upload your sketch:

  • After you see the  “Connecting….” message in your Arduino IDE, release the finger from the “BOOT” button:

  • After that, you should see the “Done uploading” message

That’s it. Your ESP32 should have the new sketch running. Press the “ENABLE” button to restart the ESP32 and run the new uploaded sketch.

You’ll also have to repeat that button sequence every time you want to upload a new sketch. But if you want to solve this issue once for all without the need to press the BOOT button, follow the suggestions in the next guide:

If you experience any problems or issues with your ESP32, take a look at our in-depth ESP32 Troubleshooting Guide.

Wrapping Up

This is a quick guide that illustrates how to prepare your Arduino IDE for the ESP32 on a Windows PC, Mac OS X, or Linux computer. If you encounter any issues during the installation procedure, take a look at the ESP32 troubleshooting guide.

Now, you can start building your own IoT projects with the ESP32!


Thanks for reading.

728x90
App threw an error during load
Error: The module '\\?\C:\Users\talon\OneDrive\Desktop\focus\node_modules\cap\build\Release\cap.node'
was compiled against a different Node.js version using
NODE_MODULE_VERSION 72. This version of Node.js requires
NODE_MODULE_VERSION 73. Please try re-compiling or re-installing
the module (for instance, using `npm rebuild` or `npm install`).
    at process.func (electron/js2c/asar.js:155:31)
    at process.func [as dlopen] (electron/js2c/asar.js:155:31)
    at Object.Module._extensions..node (internal/modules/cjs/loader.js:828:18)
    at Object.func (electron/js2c/asar.js:155:31)
    at Object.func [as .node] (electron/js2c/asar.js:155:31)
    at Module.load (internal/modules/cjs/loader.js:645:32)
    at Function.Module._load (internal/modules/cjs/loader.js:560:12)
    at Module.require (internal/modules/cjs/loader.js:685:19)
    at require (internal/modules/cjs/helpers.js:16:16)
    at Object.<anonymous> (C:\Users\talon\OneDrive\Desktop\focus\node_modules\cap\lib\Cap.js:3:13)


Thank you this helped! Just for reference if anyone is having the same issues, here are the commands you need to run that come from the link provided by @mscdex:

npm install --save-dev electron-rebuild


was compiled against a different Node.js version using
NODE_MODULE_VERSION 48. This version of Node.js requires
NODE_MODULE_VERSION 73. Please try re-compiling or re-installing
the module

I see, thanks for pointing that out!

I get it now: npm rebuild uses my local node (ABI 72), which isn't what electron has.

The question is, how can I get electron rebuild to work? I have the latest electron-rebuild, v 1.8.6.

This is what I've tried so far:

  • If I run npx electron-rebuild right now, then run Electron, I get the same 72 vs 73 error.
  • If I then remove node_modules and npm install, then the error becomes 48 vs 73.
  • If I then downgrade electron to ^5, re-install node_modules, error goes to 47 vs 70.
  • If I then run electron-rebuild, no change. 47 vs 70
  • If I then run npm rebuild, it goes to 72 vs 70 (seems to make sense, my node is v12, Electron v5 expects a lower ABI version).

Thanks for the help!

728x90

VSCode 환경에서 OpenCV 를 설치할 때 꼭 문제되는 사항이 있다.

 왠지 심리적인 느낌으로 반드시 에러가 날 거라고 생각하긴 했지만 진짜 날 줄은 몰랏다.


다음과 같은 문제가 발생할 수 있다.

python -m pip install --upgrade pip
python -m pip install opencv-python


위에서 python -m 이 없는 경우에, 즉 pip 만을 이용해서 Library Module 을 import 때리려고 하는데

인식을 못하는 것이다.


더 큰 문제는 위와같이 때려도 문제가 나는 경우가 있는데, 그 경우에는 머리털이 곤두서게 된다.


(venv) $ pip2 install opencv-python
DEPRECATION: Python 2.7 reached the end of its life on January 1st, 2020. Please upgrade your Python as Python 2.7 is no longer maintained. pip 21.0 will drop support for Python 2.7 in January 2021. More details about Python 2 support in pip can be found at https://pip.pypa.io/en/latest/development/release-process/#python-2-support
Collecting opencv-python
  Using cached opencv-python-4.3.0.38.tar.gz (88.0 MB)
  Installing build dependencies ... done
  Getting requirements to build wheel ... error
  ERROR: Command errored out with exit status 1:
   command: /home/pc_user/.venvs/venv/bin/python /home/pc_user/.venvs/venv/lib/python2.7/site-packages/pip/_vendor/pep517/_in_process.py get_requires_for_build_wheel /tmp/tmp7q7z4L
       cwd: /tmp/pip-install-C21PKF/opencv-python
  Complete output (22 lines):
  Traceback (most recent call last):
    File "/home/pc_user/.venvs/venv/lib/python2.7/site-packages/pip/_vendor/pep517/_in_process.py", line 280, in <module>
      main()
    File "/home/pc_user/.venvs/venv/lib/python2.7/site-packages/pip/_vendor/pep517/_in_process.py", line 263, in main
      json_out['return_val'] = hook(**hook_input['kwargs'])
    File "/home/pc_user/.venvs/venv/lib/python2.7/site-packages/pip/_vendor/pep517/_in_process.py", line 114, in get_requires_for_build_wheel
      return hook(config_settings)
    File "/tmp/pip-build-env-2FzygL/overlay/lib/python2.7/site-packages/setuptools/build_meta.py", line 146, in get_requires_for_build_wheel
      return self._get_build_requires(config_settings, requirements=['wheel'])
    File "/tmp/pip-build-env-2FzygL/overlay/lib/python2.7/site-packages/setuptools/build_meta.py", line 127, in _get_build_requires
      self.run_setup()
    File "/tmp/pip-build-env-2FzygL/overlay/lib/python2.7/site-packages/setuptools/build_meta.py", line 243, in run_setup
      self).run_setup(setup_script=setup_script)
    File "/tmp/pip-build-env-2FzygL/overlay/lib/python2.7/site-packages/setuptools/build_meta.py", line 142, in run_setup
      exec(compile(code, __file__, 'exec'), locals())
    File "setup.py", line 448, in <module>
      main()
    File "setup.py", line 99, in main
      % {"ext": re.escape(sysconfig.get_config_var("EXT_SUFFIX"))}
    File "/usr/lib/python2.7/re.py", line 210, in escape
      s = list(pattern)
  TypeError: 'NoneType' object is not iterable
  ----------------------------------------
ERROR: Command errored out with exit status 1: /home/pc_user/.venvs/venv/bin/python /home/pc_user/.venvs/venv/lib/python2.7/site-packages/pip/_vendor/pep517/_in_process.py get_requires_for_build_wheel /tmp/tmp7q7z4L Check the logs for full command output.


나랑 완전 100% 같은 경우는 아닌데, 이분은 path 가 root 부터 시작하는 걸 보니 리눅스의 냄새다


거기다 가장 큰 단서는 _in_process.py 에서 롤린하다가 에러가 낫다는건데, ㅇ ㅣ부분에서 답변을 살펴보면


Python 2.7 is not supported anymore in opencv-python-4.3.0.38. Support was dropped in 4.3.0.36; see this issue.

The workaround I found was to install opencv-python version 4.2.0.32 (which is the latest supported for Python 2.7, see this for all releases) like this:


버전이 맘에 안든다는 이야기다


python -m pip install opencv-python==4.2.0.32

이렇게 해줫더니 깔끔하게 됫다.


stackoverflow.com/questions/63346648/python-2-7-installing-opencv-via-pip-virtual-environment


아! 추가적으로 혹시 모르니까

setting.json 에서 한줄 추가해준다.

"python.linting.pylintArgs": ["--extension-pkg-whitelist=cv2"] 


+ Recent posts