Entity에서 참조할 때 No Argument Constructor 의 경우에 참조가능한 범위가 있다. 특히 이 경우에 AccessLevel 을 Package 단계로 설정해두면 빨간맛을 뱉는데, 물론 Compile 자체에는 문제가 없을지라도 빨간맛을 보기 싫다면 변경하면 된다.
@NoArgsConstructor
public class BookWithLombok {

    private Long id;
    private String isbn;
    private String name;
    private String author;
}
자바로 표현하면 다음과 같습니다.
public class BookWithOutLombok {

    private Long id;
    private String isbn;
    private String name;
    private String author;

    public BookWithOutLombok() {

    }
}
@AllArgsConstructor
기본 사용법은 다음과 같습니다.
@AllArgsConstructor
public class BookWithLombok {

    private Long id;
    private String isbn;
    private String name;
    private String author;
    private boolean useYn;
}
자바로 표현하면 다음과 같습니다.
public class BookWithLombok {
    private Long id;
    private String isbn;
    private String name;
    private String author;
    private boolean useYn;

    public BookWithLombok(final Long id, final String isbn, final String name, final String author, final boolean useYn) {
        this.id = id;
        this.isbn = isbn;
        this.name = name;
        this.author = author;
        this.useYn = useYn;
    }
}
@RequiredArgsConstructor
기본 사용법은 다음과 같습니다.
@RequiredArgsConstructor
public class BookWithLombok {

    private final Long id;
    private final String isbn;
    private final String name;
    private final String author;
    private boolean useYn;
}
자바로 표현하면 다음과 같습니다.
public class BookWithLombok {
    private final Long id;
    private final String isbn;
    private final String name;
    private final String author;
    private boolean useYn;

    public BookWithLombok(final Long id, final String isbn, final String name, final String author) {
        this.id = id;
        this.isbn = isbn;
        this.name = name;
        this.author = author;
    }
}
access - 접근제한자
생성자의 대해서 접근제한자를 지정할 수 있습니다. 기본 접근제한자는 public 입니다. 접근제한자 목록은 다음과 같습니다.
PUBLIC
모든 곳에서 접근 가능합니다. 다음과 같이 사용할 수 있습니다.
@NoArgsConstructor(access = AccessLevel.PUBLIC)
자바로 표현하면 다음과 같습니다.
public class BookWithLombok {
    private Long id;
    private String isbn;
    private String name;
    private String author;

    public BookWithLombok() {
    }
}
MODULE
같은 패키지내에서 접근 가능합니다. 다음과 같이 사용할 수 있습니다.
@NoArgsConstructor(access = AccessLevel.MODULE)
자바로 표현하면 다음과 같습니다. default 와 동일하며 같은 Lombok에서는 package 와 동일합니다.
public class BookWithLombok {
    private Long id;
    private String isbn;
    private String name;
    private String author;

    BookWithLombok() {
    }
}
At Intuit, we faced the challenge of migrating our 27TB Database from Oracle to Postgres which is used by our Monolithic Application consisting of around 600 complex business workflows. While migrating to Postgres, we discovered that Postgres does not support Global Indexes and since we had some partitioned tables, we were facing performance issues if we don’t give the Partition Key as part of the where clause for SQL queries.
In this blog post, we will explore how to use Hibernate Filters and Inspector to dynamically add partition keys to your queries, which can help in mitigating the performance issues.
Using Hibernate Filters
Hibernate filters are a powerful feature that allows you to define conditions that are automatically applied to all queries for a specific entity class. This can be useful in a variety of situations, including adding partition keys to your queries.
To use Hibernate filters, you need to define the filter using the@FilterDefand@Filterannotations in your entity classes. For example, to define a filter that adds acountrycolumn to the WHERE clause of all queries for aUsertable, you could use the following code:
@Entity
@Table(name = "user_table")
@FilterDef(name = "countryFilter", parameters = @ParamDef(name="country", type = String.class))
@Filter(name = "countryFilter", condition = "country = :country")
@Getter
@Setter
public class User {

    @Id
    @GeneratedValue(strategy = GenerationType.IDENTITY)
    private Long id;

    private String name;

    private String country;

    // Other fields
}
Once you have defined the Hibernate filters, you can enable them at session level in your application. To do this, you can use theenableFilter()method of theSessionclass and set the parameter values using thesetParameter()method. We can also create an Aspect to enable filter for all sessions. For example, to enable the "countryFilter" filter defined above and set thecountryparameter, you could use the following code:
This code enables the “countryFilter” filter for the current session and sets thecountryparameter. Any queries executed using thisSessionwill include thecountry = 'India'condition in the WHERE clause. This will ensure that only records for the specified country are returned by the query.
Problems with Hibernate Filter
Filters are not applied to Update/Delete queries. So to solve this problem we used Hibernate Statement Inspector to manually modify the Update and Delete queries.
Note: Hibernate team is discussing on a native solution for update/delete queries to include partition key, but looks like it is not implemented at the time of writing this blog. You can learn more about thathere.
Using Hibernate Statement Inspector
Hibernate Statement Inspector can be used to manually modify the SQL statements generated by Hibernate. This can be useful in situations where you need to modify the SQL statements generated by Hibernate, such as adding partition keys to the WHERE clause of update or delete queries.
For example, to modify the WHERE clause of update and delete queries for aUsertable to include thecountrycolumn as a partition key, you could use the following inspector class:
public class SQLStatementInspector implements StatementInspector {

    @Override
    public String inspect(String sql) {
        if (sql.startsWith("update user_table") || sql.startsWith("delete from user_table")) {
            sql = sql + " where country = '" + "India" + "'";
        }
        return sql;
    }
}
You can enable the inspector by adding this property:
아래와 같이 ThreadLocal에 정적으로 접근할 수 있는 Holder 클래스를 만든다.
public class DBContextHolder {
    private static final ThreadLocal<DbInfo> threadLocal = new ThreadLocal();

    public static void setDbInfo(String ip, String partition) {
        DbInfo dbInfo = new DbInfo(ip, partition);
        threadLocal.set(dbInfo);
    }

    public static DbInfo getDbInfo() {
        DbInfo dbInfo = threadLocal.get();
        if(dbInfo == null) {
            throw new IllegalStateException("DbInfo가 존재하지 않습니다.");
        }
        return dbInfo;
    }

    public static String getIp() {
        DbInfo dbInfo = getDbInfo();
        return dbInfo.ip();
    }

    public static String getPartition() {
        DbInfo dbInfo = getDbInfo();
        return dbInfo.partition();
    }

    public static void clear() {
        threadLocal.remove();
    }
}
DbInfo 클래스에는 host와 partition을 담는다.
public record DbInfo(String ip, String partition) {
}
지금까지샤딩된 DataSource를 선택하는 코드를 작성했다.
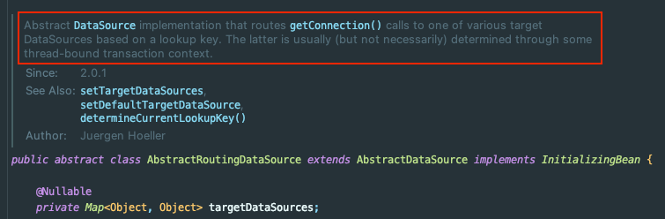
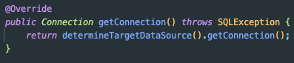
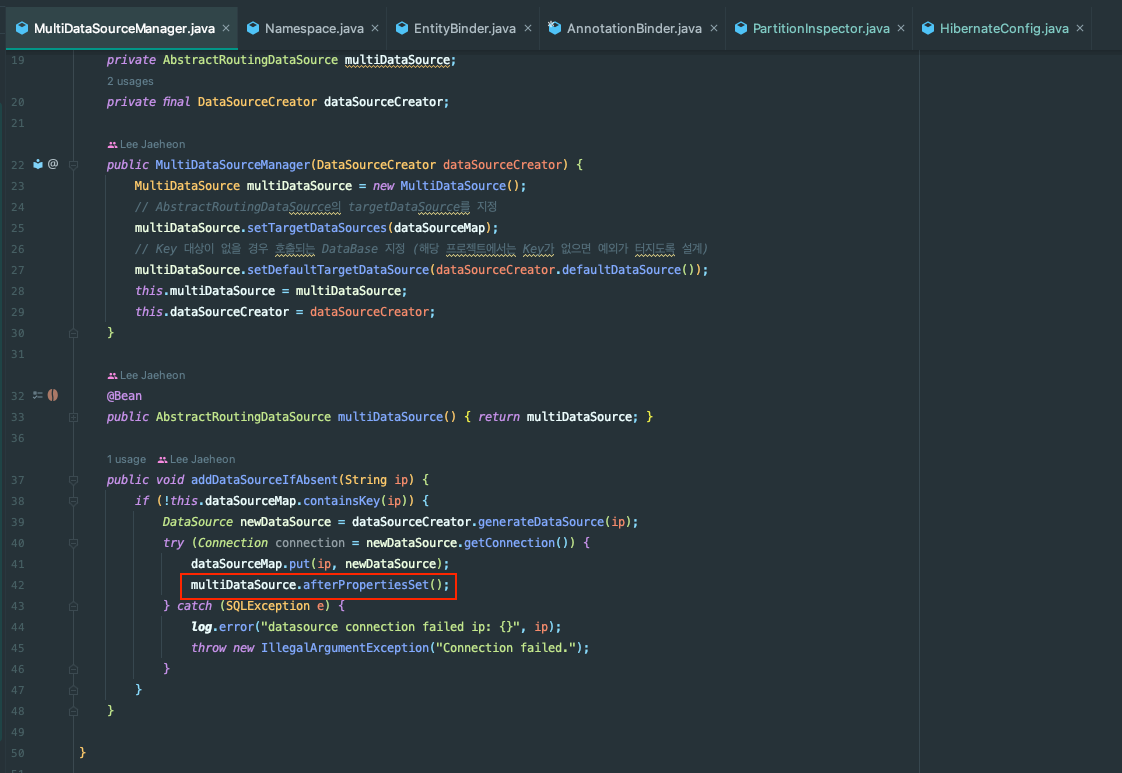
MultiDataSourceManager
런타임 중에 AbstractRoutingDataSource의 dataSource를 추가할 수 있어야 한다.
AbstractRoutingDataSource를 관리하는 클래스를 하나 만들자.
@Slf4j
@Configuration
public class MultiDataSourceManager {
// key = hostIp, value = DataSource
// 동시성을 보장해야 하므로 ConcurrentHashMap을 사용한다.
private final Map<Object, Object> dataSourceMap = new ConcurrentHashMap<>();
private final AbstractRoutingDataSource multiDataSource;
private final DataSourceCreator dataSourceCreator;
public MultiDataSourceManager(DataSourceCreator dataSourceCreator) {
MultiDataSource multiDataSource = new MultiDataSource();
// AbstractRoutingDataSource의 targetDataSources를 지정
multiDataSource.setTargetDataSources(dataSourceMap);
// Key 대상이 없을 경우 호출되는 DataSource 지정 (해당 프로젝트에서는 Key가 없으면 예외가 터지도록 설계)
multiDataSource.setDefaultTargetDataSource(dataSourceCreator.defaultDataSource());
this.multiDataSource = multiDataSource;
this.dataSourceCreator = dataSourceCreator;
}
@Bean
public AbstractRoutingDataSource multiDataSource() {
return multiDataSource;
}
public void addDataSourceIfAbsent(String ip) {
if (!this.dataSourceMap.containsKey(ip)) {
DataSource newDataSource = dataSourceCreator.generateDataSource(ip);
try (Connection connection = newDataSource.getConnection()) {
dataSourceMap.put(ip, newDataSource);
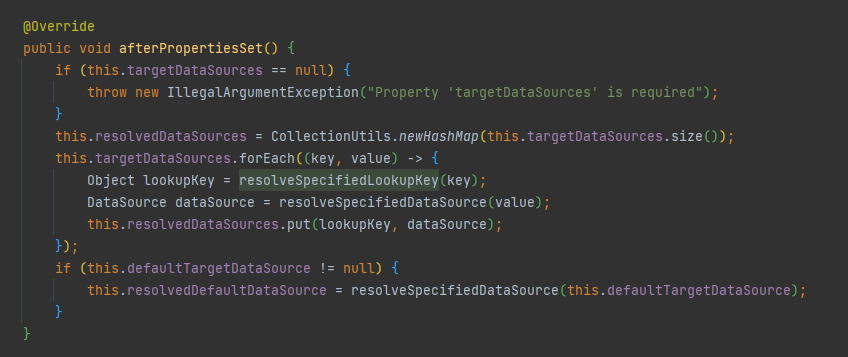
// 실제로 사용하는 resolvedTargetDataSource에 반영하는 코드
multiDataSource.afterPropertiesSet();
} catch (SQLException e) {
throw new IllegalArgumentException("Connection failed.");
}
}
}
}
이제최초 JPA EntityLoading시 필요한defaultDataSource를 만들어야 한다.
추가로hostIp를 입력받아서DataSource를 만드는 책임도 아래 클래스에서 수행한다.
@Configuration
@RequiredArgsConstructor
public class DataSourceCreator {
    private final DBProperties dbProperties;

    public DataSource generateDataSource(String ip) {
        HikariConfig hikariConfig = initConfig(ip);
        return new HikariDataSource(hikariConfig);
    }

    public DataSource defaultDataSource() {
        String defaultHostIp = dbProperties.getDefaultHostIp();
        String defaultHostPartition = dbProperties.getDefaultPartition();

        HikariConfig hikariConfig = initConfig(defaultHostIp);
        HikariDataSource datasource = new HikariDataSource(hikariConfig);
        // JPA 엔터티 최초 로딩 시 파티션 보관 필요
        DBContextHolder.setDbInfo(defaultHostIp, defaultHostPartition);
        return datasource;
    }

    private HikariConfig initConfig(String hostIp) {
        HikariConfig hikariConfig = new HikariConfig();
        hikariConfig.setJdbcUrl(getConnectionString(hostIp));
        hikariConfig.setUsername(dbProperties.getUsername());
        hikariConfig.setPassword(dbProperties.getPassword());
        hikariConfig.setDriverClassName(dbProperties.getDriver());
        return hikariConfig;
    }

    public String getConnectionString(String hostname) {
        StringBuilder sb = new StringBuilder()
            .append("jdbc:mysql://")
            .append(hostname)
            .append(":").append(dbProperties.getPort())
            .append("/").append(dbProperties.getDefaultSchema());
        return sb.toString();
    }
}
AbstractRoutingDataSource와 관련된 코드는 모두 작성했다.
Util 클래스 제공
이제 라이브러리의 사용처에서ThreadLocal에 DbInfo를 넣어주고,DataSource가 없는 경우 생성해줘야 한다.
그런데 사용처에서는 ThreadLocal에 대해 직접적으로 다루지 않게 하고 싶었고, 편의성을 위해 라이브러리의 개념에도 접근할 필요가 없게 하고 싶었다.
ThreadLocal은 다소 위험한 개념
ThreadPool을 사용하는 경우 이전 Thread의 정보를 가져와서 잘못 쿼리가 나갈 수 있음
라이브러리의 개념에 접근해야 한다면 매번 라이브러리를 설명해야 함
그래서 사용자 편의를 위해유틸성 클래스를 제공하기로 했다! 작성한 코드에서는 Filter, AOP 두 방식을 지원한다.
Filter로 처리
아래는Filter로 처리를 구현한 코드이다.
@RequiredArgsConstructor
public class ShardingFilter extends OncePerRequestFilter {
    private final MultiDataSourceManager multiDataSourceManager;

    protected void doFilterInternal(HttpServletRequest request, HttpServletResponse response, FilterChain filterChain) throws ServletException, IOException {
        DbInfo dbInfo = JwtParser.getDbInfoByRequest(request);
        DBContextHolder.setDbInfo(dbInfo);

        // DataSource가 존재하지 않을 경우에 새로 생성해준다.
        multiDataSourceManager.addDataSourceIfAbsent(dbInfo.ip());

        try {
            filterChain.doFilter(request, response);
        } finally {
            // ThreadPool을 사용하기 때문에 다른 요청에서 재사용할 수 없도록 반드시 clear()를 호출해야 한다.
            DBContextHolder.clear();
        }
    }
}
해당 필터를 사용해서 요청이 들어왔을 때ThreadLocal에 DBInfo를 세팅하고DataSource를 생성하는 로직을비즈니스 로직에서 분리할 수 있다.
AOP로 처리
Batch 서버와 같이 Web 요청이 없는 경우Filter로 처리가 불가능하다. 그래서AOP 방식도 지원한다.
특정 메서드에 아래 애노테이션만 붙이면 샤딩을 처리할 수 있도록 처리하자.
@Target(ElementType.METHOD)
@Retention(RetentionPolicy.RUNTIME)
public @interface Sharding {
}
아래와 같이 AOP 모듈을 구현한다.
@Aspect
@Component
@ConditionalOnBean(LoadDbInfoProcess.class)
@RequiredArgsConstructor
public class DataSourceAdditionAspect {
    private final LoadDbInfoProcess loadDbInfoProcess;
    private final MultiDataSourceManager multiDataSourceManager;

    @Around("@annotation(com.violetbeach.sharding.module.aop.Sharding)")
    public void execute(ProceedingJoinPoint joinPoint) throws Throwable {
        DbInfo dbInfo = loadDbInfoProcess.loadDbInfo();
        DBContextHolder.setDbInfo(dbInfo);
        try {
            // DataSource가 존재하지 않을 경우에 새로 생성해준다.
            multiDataSourceManager.addDataSourceIfAbsent(dbInfo.ip());
            joinPoint.proceed();
        } finally {
            DBContextHolder.clear();
        }
    }

}
아래는 DBInfo를 가져오는인터페이스이다.
public interface LoadDbInfoProcess {
    DbInfo loadDbInfo();
}
구현체는 사용자가 원하는 방식으로 구현할 수 있다.
ThreadLocal을 사용해도 되고,Security Context를 사용하거나 Spring Batch를 사용한다면JobScope에서 ip와 partition을 꺼내는 등원하는 방식으로 구현하면 된다.
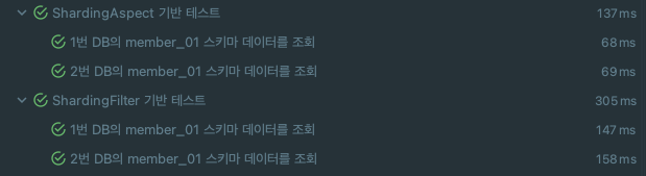
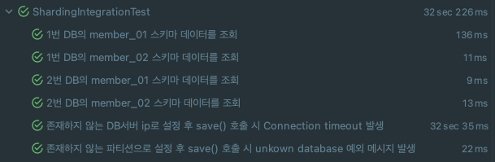
아래는 테스트 결과이다.
이렇게 해서샤딩 문제가 해결되었다!
2. Dynamic Schema Name
1가지 문제가 남아있다.스키마명을 jwt에 있는 partition을 사용해서 바꿔야 한다.
org.hibernate.resource.jdbc.spi.StatementInspector를 구현하면 된다.StatementInspector를 사용하면기존 sql의 일부를 변경하거나완전히 대체할 수 있다.
public class PartitionInspector implements StatementInspector {
    @Override
    public String inspect(String sql) {
        String partition = DBContextHolder.getPartition();
        return sql.replaceAll("@@partition_number", partition);
    }
}
이제HibernatePropertiesCustomizer를 빈으로 등록하면 된다.
@Configuration
@RequiredArgsConstructor
public class HibernateConfig {
    @Bean
    public HibernatePropertiesCustomizer hibernatePropertiesCustomizer() {
        return (properties) -> {
            properties.put(AvailableSettings.STATEMENT_INSPECTOR, new PartitionInspector());
        };
    }
}
Entity는 아래와 같이 설정한다.
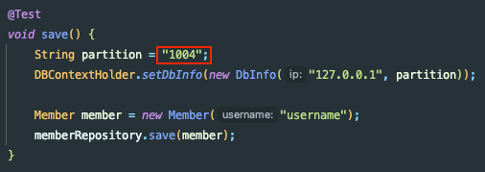
@Entity
@Table(schema = "member_@@partition_number", name = "member")
@NoArgsConstructor(access = AccessLevel.PROTECTED)
public class Member {
    @Id
    @GeneratedValue(strategy = GenerationType.IDENTITY)
    private Long id;
    private String username;

    public Member(String username) {
        this.username = username;
    }
}
MySQL에서는@Table애노테이션의schema옵션이 동작하지 않는다. 대신catalog옵션을 사용해야 한다.
전체 데이터베이스에 모든 데이터를 한 테이블 혹은 데이터베이스에서 관리하기가 어려워진다.데이터베이스 볼륨이 커지면 커질수록 데이터베이스 읽기/쓰기 성능은 감소할 것이고, 데이터베이스가병목 지점이 될 것이다. 따라서 이를 적절히 분할할 필요가 있다. 데이터베이스를 분할하는 방법은 크게샤딩(sharding)과파티셔닝(partitioning)이 있다. 이 두 가지 기술은 모두거대한 데이터셋을 서브셋으로 분리하여 관리하는 방법이다. 이번 포스팅에서는 이 둘의 개념과 차이점에 대해 알아본다.
파티셔닝이란?
MySQL 기준으로 기술되었다.
파티셔닝은 매우 큰 테이블을 여러개의 테이블로 분할하는 작업이다. 큰 데이터를 여러 테이블로 나눠 저장하기 때문에 쿼리 성능이 개선될 수 있다. 이때, 데이터는물리적으로 여러 테이블로 분산하여 저장되지만, 사용자는 마치하나의 테이블에 접근하는 것과 같이 사용할 수 있다는 점이 특징이다. 파티셔닝은 MySQL 단에서 자체적으로 지원하는 기능이다.
MySQL 에서 파티셔닝을 지원하는 스토리지 엔진은 InnoDB와 NDB이며, MyISAM은 파티셔닝을 지원하지 않는다.
파티셔닝 종류는 Oracle과 MySQL 공식문서에서 소개한 4가지 방식을 간단하게 설명하겠다.
List Partitioning
데이터 값이 특정 목록에 포함된 경우 데이터를 분리한다. 위 그림 처럼 특정 지역별로 데이터를 분할할 때 사용할 수 있겠다.
Range Partitioning
데이터를 특정 범위 기준으로 분할할 때 사용한다. 위 처럼 1~2월, 3~4월, 5~6월 … 으로 데이터를 분리할 때 사용할 수 있다.
Hash Partitioning
해시 함수를 사용하여 데이터를 분할할 때 사용한다. 특정 컬럼의 값을 해싱하여 저장할 파티션을 선택한다. MySQL 공식 문서에 따르면, 여러 컬럼으로 해싱하는 것은 크게 권장하지 않는다고 한다 (참고).
Composite Partitioning
위 파티셔닝 종류 중 두개 이상을 사용하는 방식이다.
샤딩이란?
샤딩은동일한 스키마를 가지고 있는 여러대의 데이터베이스 서버들에 데이터를작은 단위로 나누어 분산 저장하는 기법이다. 이때, 작은 단위를샤드(shard)라고 부른다.
어떻게 보면 샤딩은 수평 파티셔닝의 일종이다. 차이점은 파티셔닝은 모든 데이터를 동일한 컴퓨터에 저장하지만, 샤딩은 데이터를 서로 다른 컴퓨터에 분산한다는 점이다. 물리적으로 서로 다른 컴퓨터에 데이터를 저장하므로, 쿼리 성능 향상과 더불어부하가 분산되는 효과까지 얻을 수 있다. 즉, 샤딩은 데이터베이스 차원의 수평 확장(scale-out)인 셈이다.
샤딩은 위와 같이 물리적으로 분산된 환경에서 사용되는 기법으로 데이터베이스 차원이 아닌애플리케이션 레벨에서 구현하는 것이 일반적이다. 다만 샤딩을플랫폼 차원에서 제공하는 시도가 많다고 한다.Naver d2 포스팅에 따르면, Hibernate Shards와 같이 애플리케이션 서버에서 동작하는 형태, CUBRID SHARD, Spock Proxy, Gizzard 와 같이 미들 티어(middle tier)에서 동작하는 형태, nStore나 MongoDB와 같이 데이터베이스 자체에서 샤딩을 제공하는 형태로 나뉜다고 한다.
(고등학교 때 MERN stack 공부하면서, mongodb 샤딩이 대체 뭐지?… 하고 그냥 넘어갔는데 드디어 공부했다!)
주의점
데이터를 물리적으로 독립된 데이터베이스에 각각 분할하여 저장하므로, 여러 샤드에 걸친 데이터를 조인하는 것이 어렵다. 또한, 한 데이터베이스에 집중적으로 데이터가 몰리면 Hotspot이 되어 성능이 느려진다. 따라서 데이터를 여러 샤드로 고르게 분배하는 것이 중요하다. 또 Celebrity Problem 등 다양한 문제가 존재한다. 자세한 내용은 이전에 작성한[가상면접 사례로 배우는 대규모 시스템 설계 기초] Chap01. 사용자 수에 따른 규모 확장성포스팅을 참고하자.
샤딩 종류
샤딩의 종류는 다양하지만, 크게 Hash Sharding, Range Sharding 두 가지를 알아보겠다.
Hash Sharding 중 나머지 연산을 사용한Modular Sharding을 알아본다. Modular Sharding은 PK값의 모듈러 연산 결과를 통해 샤드를 결정하는 방식이다.총 데이터베이스 수가 정해져있을 때 유용하다. 데이터베이스 개수가 줄어들거나 늘어나면 해시 함수도 변경해야하고, 따라서데이터의 재 정렬이 필요하다.
PK 값을 범위로 지정하여 샤드를 지정하는 방식이다. 예를 들어 PK가 1~1,000 까지는 1번 샤드에, 1,001~2,000 까지는 2번 샤드에, 2,001~ 부터는 3번 샤드에 저장할 수 있다. Hash Sharding 대비 데이터베이스증설 작업에 큰 리소스가 소요되지 않는다. 따라서급격히 증가할 수 있는 성격의 데이터는 Range Sharding 을 사용함이 좋아보인다. 이런 특징으로 Range Sharding은 Dynamic Sharding 으로도 불린다.
다만, 이렇게 기껏 분산을 시켜놨는데특정한 데이터베이스에만 부하가 몰릴 수 있다. 예를 들어 페이스북 게시물을 Range Sharding 했다고 가정해보자. 대부분의 트래픽은 최근에 작성한 게시물에서 발생할 것이다. 위 그림에서는 2, 3번 샤드에만 부하가 몰리는 것이다. 부하 분산을 위해 데이터가 몰리는 DB는 다시 재 샤딩(re-sharding)하고, 트래픽이 저조한 데이터베이스는 다시 통합하는 작업이 필요할 것이다.