728x90

1.BIOS(Basic Input/Output System)

  1. When we power on, BIOS performs a Power-OSelf-Test (POST) for all of the different hardware components in the system to make sure everything is working properly.
  2. Also it checks for whether the computer is being started from an off position (cold boot) or from a restart (warm boot) is stored at this location.
  3. Retrieves information from CMOS (Complementary Metal-Oxide Semiconductor), a battery operated memory chip on the motherboard that stores time, date, and critical system information.
  4. Once BIOS sees everything is fine, it will begin searching for an operating system Boot Sector on a valid master boot sector on all available drives like hard disks, CD-ROM drive etc.
  5. Once BIOS finds a valid MBR, it will give the instructions to boot and executes the first 512-byte boot sector that is the first sector (“Sector 0″) of a partitioned data storage device such as hard disk or CD-ROM etc.
    BIOS find a valid MBR → boot and executes MBR

2.MBR(Master Boot Record)

  1. Normally we use multi-level boot loader. Here MBR means I am referencing to DOS MBR.
  2. Afer BIOS executes a valid DOS MBR, the DOS MBR will search for a valid primary partition marked as bootable on the hard disk.
    MBR → valid primary partition (Bootable)
  3. If MBR finds a valid bootable primary partition then it executes the first 512-bytes of that partition which is second level MBR.
    MBR → valid bootable primary partition → execute first 512 bytes (Boot Loader)
  4. In linux we have two types of the above mentioned second level MBR known as LILO and GRUB

3.LILO or GRUB

LILO - LInux LOader

  1. LILO is a linux boot loader which is too big to fit into single sector of 512-bytes.
  2. so it is divided into two parts an installer and a runtime module.
  3. The installer module places the runtime module on MBR. The runtime module has the info about all operating systems installed.
    (installer module → runtime module → MBR)
  4. When the runtime module is executed, it selects the operating system to load and transfers the control to kernel. (runtime module → select operating system to load → transfer control → kernel)
  5. LILO does not understand file systems and boot images to be loaded and treats them as raw disk offsets

GRUB - GRand Unified Bootloader

  1. GRUB MBR consists of 446 bytes of primary boot loader code and 64 bytes of the partition table.
  2. GRUB locates all the operating systems installed and gives a GUI to select the operating system need to be loaded.
  3. Once user selects the operating system, GRUB will pass control to the kernel of that operating system.see below what is the difference between LILO and GRUB

Select operating system → grub will pass control → the kernel that operating system


4.Kernel

  1. Once GRUB or LILO transfers the control to Kernel, the Kernels does the following tasks
  • initializes devices and loads initrd module
  • mounts root file system

5.init

  1. The kernel, once it is loaded, finds init in sbin(/sbin/init) and executes it.
  2. Hence the first process which is started in linux is init process.
  3. This init process reads /etc/inittab file and sets the path, starts swapping, checks the file systems, and so on.
  4. it runs all the boot scripts(/etc/rc.d/*, /etc/rc.boot/*)
  5. starts the system on specified run-level in the file /etc/inittab

6.Run Levels

  1. There are 7 run levels in which the linux OS runs and different run levels serves for different purpose. The descriptions are given below.
  • 0 – halt
  • 1 – Single user mode
  • 2 – Multi-user, without NFS (The same as 3, if you don’t have networking)
  • 3 – Full multi-user mode
  • 4 – unused
  • 5 – X11
  • 6 – Reboot
  1. We can set in which run-level we want to run our operating system by defining it on /etc/inittab file.
728x90

In ancient times, the kernel was hard coded to know the device major/minor number of the root fs and mounted that device after initializing all device drivers, which were built into the kernel. The rdev utility could be used to modify the root device number in the kernel image without having to recompile it.


Eventually boot loaders came along and could pass a command line to the kernel. If the root= argument was passed, that told the kernel where the root fs was instead of the built in value. The drivers needed to access that still had to be built into the kernel. While the argument looks like a normal device node in the /dev directory, there obviously is no /dev directory before the root fs is mounted, so the kernel can not look up a dev node there. Instead, certain well known device names are hard coded into the kernel so the string can be translated to the device number. Because of this, the kernel can recognize things like /dev/sda1, but not more exotic things like /dev/mapper/vg0-root or a volume UUID.


Summary

Boot Loader → pass root= argument → kernel → root fs location


Problem 1.

The driver needed to access that still had to be built into the kernel.


Transition Period

Later, the initrd came into the picture. Along with the kernel, the boot loader would load the initrd image, which was some kind of compressed filesystem image (gzipped ext2 image, gzipped romfs image, squashfs finally became dominant). The kernel would decompress this image into a ramdisk and mount the ramdisk as the root fs. This image contained some additional drivers and boot scripts instead of a real init. These boot scripts performed various tasks to recognize hardware, activate things like raid arrays and LVM, detect UUIDs, and parse the kernel command line to find the real root, which could now be specified by UUID, volume label and other advanced things. It then mounted the real root fs in /initrd, then executed the pivot_root system call to have the kernel swap / and /initrd, then exec /sbin/init on the real root, which would then unmount /initrd and free the ramdisk.


Kernel, Boot Loader load → initrd image (compressed image) → was decompressed into a ramdisk → mount root fs → mounted real root fs in /initrd → pivot system calll → swap / and /initrd → exec /sbin/init


Finally, today we have the initramfs. This is similar to the initrd, but instead of being a compressed filesystem image that is loaded into a ramdisk, it is a compressed cpio archive. A tmpfs is mounted as the root, and the archive is extracted there. Instead of using pivot_root, which was regarded as a dirty hack, the initramfs boot scripts mount the real root in /root, delete all files in the tmpfs root, then chroot into /root, and exec /sbin/init.

728x90

One of the most remarkable achievement in the history of mankind is computers. Another amazing fact about this remarkable achievement called computers is that its a collection of different electronic components, and they work together in coordination to give you a meaningful output. We in our day to day lives use this complex system in one or the other way. But not many of us know how these things work together.

In this tutorial, we will be discussing how a computer boots. I must say how a computer with Linux operating system boots. A couple of days back one of our reader requested us to put this up, as this is a common question asked in interviews. I hope this will be helpful to other readers as well.

Understanding the boot process, will help you understand how the hardware and software is working together, and also will give you the required information to begin troubleshooting a booting problem you have.

Linux booting process can be divided to multiple stages. The below shown diagram explains the different stages. We will be discussing each of these stages in detail, in their respective sections.

Step 1: Power Supply & SMPS

One of the main component of a computer is SMPS(Switching Mode Power Supply). The primary objective of this component is to provide the perfect required voltage level to the motherboard and other computer components. Computer internals work in DC, however the power supply we have at home and other places are AC. SMPS converts AC to DC and maintain the required voltage level so that the computer can work flawlessly.

But the main task performed by SMPS, is to inform about the good power supply. As I told if the voltage is more/ or is less, in both the conditions a computer cannot work. As soon as you supply power to the computer, the SMPS checks the voltage level's its providing to the motherboard. If the power signal level is perfect, then SMPS will send a POWER GOOD signal to the motherboard timer.

On receiving this POWER GOOD signal from SMPS, the motherboard timer will stop sending reset signal to the CPU. Which means the power level is good and the computer can boot.


SMPS (Switching Mode Power Supply) → Convert AC to DC → maintain voltage level → request Signal as Good → Motherboard receiving → Reset signal to CPU → Boot Possible stage


Step 2: Bootstrapping

Something has to be programmed by default, so that the CPU knows where to search for instructions. → an address in the ROM

This is an address location in the ROM. This address location is almost always constant in X86 based computers. The address location is FFFF:0000h.

This address location is the last region of the ROM. It only contains one instruction. The instruction is to jump to another memory address location. This JUMP command, will tell the location of the BIOS program in the ROM.

This is how the computer will come to know where the BIOS program is located.


CPU → instruction → an Address in the ROM → FFFF:0000h (last region of the ROM) → one instruction → JUMP → BIOS


Step 3: The Role of BIOS in booting process

The word booting comes from another word called bootstrapping. The computer knows how to bring itself up, when you press the start button, because of the instructions that are fed to a program called as BIOS. BIOS stands for Basic Input Output System. The most important use of BIOS during the booting process is POST. POST stands for Power on Self Test. Its a series of tests conducted by the bios, which confirms the proper functioning of different hardware components attached to the computer.

POST is very important thing to have before the Operating system is loaded. Just imagine if you have a faulty hard drive or faulty memory, sometimes these things can cause data loss. POST checks and confirms the integrity of the following hardware components.

  • Timer IC's
  • DMA controllers
  • CPU
  • Video ROM

A full POST check will confirm the integrity of the following devices as well.

  • Motherboard
  • Keyboard
  • Printer port
  • Hard Drive etc

If you are doing a warm start (which means you did a reset of a running machine, most of the times reset button is the small one near the power button on the CPU), a full POST check will not be conducted by the BIOS. However if you are doing a Cold Start, which means you have applied the power now, it will conduct a full POST.

Warm Start → a full POST check not be conducted

Cold Start → conduct a full POST

BIOS determines whether its a cold or warm start, by looking at a flag in a predefined memory location. Once the POST completes, the BIOS will inform you about any problems it found with the help of beep codes (through system speaker). Different number of beep codes have different meaning.

There are two things that people often get confused with. Its CMOS & BIOS. CMOS & BIOS are two completely different things in the computer motherboard. CMOS is a small memory RAM chip that's present in the motherboard. This RAM is different from the computers main RAM chip (which are replaceable memory chips.

These days RAM chips are available in the range of Gigabytes.). Unlike the main RAM chip, CMOS RAM does not flush its memory when a computer is turned off. It remembers all the configuration with the help of a battery called CMOS battery.

Removing a CMOS battery will make the CMOS to forget all the configuration you have saved previously.

  • This is the reason you can unlock a computer that's protected with a CMOS password, by simply removing the CMOS battery.
  • Also removing the CMOS battery will make the operating system to show you wrong time. Because system time consistency is maintained in CMOS settings.

So its always advisable to replace your CMOS battery at regular intervals, for proper functioning of the computer.

Normally people say that we have modified BIOS settings. But its completely wrong. What they modified is in fact CMOS settings. CMOS settings is the place where you modify the boot order etc.

Bios settings cannot be altered by the user. It requires a flash program provided by the manufacturer.

So Let's get back to our booting process. Once the POST check is completed successfully, BIOS will look CMOS settings to know what is the boot order. Boot order is nothing but a user defined order which tells where to look for the operating system.

The order will be something like the below.

  1. CD ROM
  2. HARD DISK
  3. USB
  4. Floppy DISK

The above shown order means that the BIOS will look at CD ROM first to check whether an OS can be loaded from there, if it does not find a bootable disk in the CD ROM, it will look check whether a bootable OS is there in the hard disk, then USB and then Floppy disk.

Let's assume that you don’t have a bootable CD in your CD ROM drive, then the BIOS will turn to HARD disk.


CMOS → CMOS Ram not flush, remember all the configuration with help of a battery called CMOS battery

BIOS → Basic Input Ouput System, POST(Power on Self Test) → a full POST Check or POST Check


Step 4: MBR and GRUB

Now as you don't have any bootable CD in your CD ROM Drive, the bios will look at the second device from the boot order settings. The second device is your Hard Disk.

BIOS is programmed to look at a permanent location on the hard disk to complete its task. This location is called a Boot sector. This is nothing but the first sector of your hard disk. This area is sometimes called as MBR (Master Boot Record). This is the location that contains the program that will help our computer to load the operating system. As soon as bios finds a valid MBR, it will load the entire content of MBR to RAM, and then further execution is done by the content of MBR.


BIOS →

Boot Sector (MBR) → help our computer to load the operating system

→ MBR → RAM → futher content is done by the content of MBR


This first sector of the hard disk is only of 512 bytes. Yeah its too small an area for an entire boot loader program to fit in. Hence most of the operating system store only the first stage of their boot loader program in here. Only the first 440 bytes from the total of 512 bytes is used by the first stage boot loader, the remaining part is used to store partition table information.

Read: What is MBR and GPT Partition Table

As the title of this article says "Linux Booting process", we will be having grub stage one in the first 440 bytes of the MBR. I would suggest to read the below artcle to understand grub and its details.

Read: Grub tutorial

You can take an entire dump/backup of your MBR in linux with the help of the following command.

root@ubuntu-dev:~# dd if=/dev/sda of=mbr bs=512 count=1
1+0 records in
1+0 records out
512 bytes (512 B) copied, 0.000134061 s, 3.8 MB/s

What the above command does is to simply dump the contents of your first sector which of 512 bytes to a file named mbr. bs in the above command stands for block size. And count means to dump only the first sector (the dump will start from the beginning of the hard disk, and the size is 512 bytes)

The MBR contains the first stage of the grub, and partition table information. You can see the partition table information from our MBR backup file as shown below.

root@ubuntu-dev:~# file mbr.bin
mbr.bin: x86 boot sector; partition 1: ID=0x83, active, starthead 32, startsector 2048, 19451904 sectors; partition 2: ID=0x5, starthead 254, startsector 19455998, 2093058 sectors, code offset 0x63

I have only two partition on the system, that's why its showing partition 1 & partition 2. The MBR contains of the following things to summarize. From the partition table shown in the above mbr dump output, Grub stage 1 in the MBR will look for a partition with active flag set on it. Please remember the fact that there can only be one active partition from the 4. If you see my partition table output above, partition 1 is having an active flag.

  1. First stage grub
  2. Partition table information
  3. Error messages
  4. Magic Number

The fourth point is a Magic Number of 2 bytes. This magic number serves as a method of verification for the MBR. This 2 byte magic number will contain values that will be something like AA55. A different magic number indicates a corrupted MBR or invalid MBR.

The primary job of the stage 1 bootloader is to load the second stage boot loader. The second stage boot loader is the stage 2 grub, that actually does the job of loading the kernel and other initrd image files (we will come to that part in some time). GRUB (Grand Unified Boot Loader) is the combined name given to different stages of grub.

Now there is a little surprise that am going to reveal. There are not two stages of grub. But there are three stages of grub in total. I will explain you the reason behind this. The three stages are mentioned below.

  1. GRUB Stage 1 (MBR)
  2. GRUB Stage 1.5 (MBR GAP, contains file system drivers)
  3. Grub Stage 2 (First Partition)

Now from where does this stage 1.5 came. The hard disk sectors are counted form 0 to the last sector. As explained previously the first sector (sector 0) contains the GRUB stage 1. Normally partititons will not start before sector 63. So partitions will start form sector number 63. Hence we have sectors form 1-63 free. This space is used for storing GRUB stage 1.5. This free space between MBR and the beginning of the partitions is called as MBR GAP.

Now you might think what is the requirement of an additional stage in grub. If you are a linux guy, you might have already configured grub configuration file. If you remember the configuration, it contains the kernel file location and name, its partition. Now how will the grub access those kernel files without the file system drivers?

Grub Stage 1.5 located in the MBR GAP (sector 1 to 63 before the beginning of the first partition) basically contains the drivers for reading file systems. So grub stage 1 will load grub stage 1.5 to the RAM, and will pass the control to it.

Now grub stage 1.5 will load the file system drivers and once the file system drivers are loaded, it can now access /boot/grub/grub.conf file which contains other details about kernel path and initrd path etc.

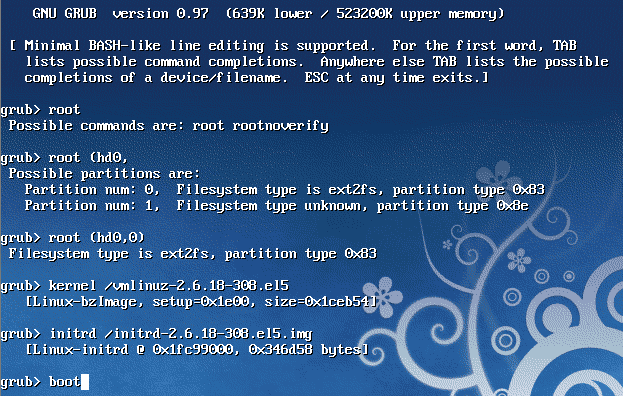
Now this is the point where you are presented with a beautiful TUI (Terminal user interface), where you can select your operating system kernal and press enter to boot it.

Step 5 Loading The kernel Image

Similar to GRUB, kernel is also loaded in stages. A linux kernel is responsible for handling Process management, Memory Management, Users, Inter process communication etc. I must say kernel is never used by a user. What the kernel does is to maintain a good environment for programs to run. Yeah we use kernel thrugh different programs.

Kernel is a compressed image file. The location of this compressed kernel image is specified in the grub 2 configuration file. Its basically an executable bzImage file.

Now you need to have a lot of drivers and modules to access underlying hardware and other stuff. For example, if you have RAID configured on your / partition how will you mount it without knowing the programs, or think how will you include a kernal module or how to remove a kernel module. All these things required different set of programs and code. Including all these codes inside the kernel will make it a larger file image.

But our kernel image file needs to be smaller, that's the reason its compressed image file. So most of these drivers and tools along with a small similar root file system feel is given by initrd. Initrd is sometimes called as initial root file system. This is used by the kernel before the real root file system is mounted.  Initrd is available in the form of an image similar to the kernel image file. Let's see what's the content of this initrd image file. You can find the initrd image file and the kernel image file in the /boot directory.

[root@localhost initrd]# mv initramfs-2.6.32-358.14.1.el6.x86_64.img initramfs-2.6.32-358.14.1.el6.x86_64.gz
 
[root@localhost initrd]# gunzip initramfs-2.6.32-358.14.1.el6.x86_64.gz
 
[root@localhost initrd]# cpio -id < initramfs-2.6.32-358.14.1.el6.x86_64
90587 blocks
[root@localhost initrd]# ls
bin                 initqueue                             mount        sysroot
cmdline             initqueue-finished                    pre-pivot    tmp
dev                 initqueue-settled                     pre-trigger  usr
dracut-004-303.el6  initqueue-timeout                     pre-udev     var
emergency           initramfs-2.6.32-358.14.1.el6.x86_64  proc
etc                 lib                                   sbin
init                lib64                                 sys

If you see the above commands, we have first uncompressed the initrd image file, then we can view the contents of that file with the help of cpio command.

Now you can see the contents of initrd image file. There are folders that are very much similar to our linux directory strucutre. There is /etc/, /lib, and some necessary commands in /sbin etc. Its a small root file system that the kernel loads as a temporary root file system before the real root file system is loaded.

Temporary root file system (initrd, initial root file system) → load real root file system


Loading and unloading of kernel modules is done with the help of programs like insmod, and rmmod present in the initrd image.

Now as the kernel is loaded into the memory, the execution begins by checking the processor family and architecture. The kernel conducts a lot of hard ware specific operations and the first user space program it executes is /sbin/init.

Kernel → conducts a lot of hardware specific operation and first user space program (init) → got process id 1 → /etc/inittab (run level)


As this is the first program executed by the kernel, it has got a process id number of 1. The process id number 1 for init was not kept intentionally, but it was  due to the fact that it is the first process executed by the kernel. Now as soon as the kernel executes the init process, it will look at the /etc/inittab configuration file to see the default run level.

There are different run level's in linux.

Run-Level Usage

0 System Halt/Shut Down
1 Single User Mode
2 Multiuser Mode Without Networking
3 Full Multiuser Mode
4 Unused
5 GUI/X11
6 Reboot

The /etc/inittab file contains the default run level like the one shown below.

id:3:initdefault:

Now that means, we have a run level 3 as the default run level. Once this is identified, then run level specific programs are started by the kernel. This is the reason you have the following directories.

[root@localhost]# cd /etc/rc.d/
[root@localhost rc.d]# ll
drwxr-xr-x. 2 root root  4096 Oct  8 00:50 init.d
-rwxr-xr-x. 1 root root  2617 Jul 24 08:53 rc
drwxr-xr-x. 2 root root  4096 Oct  8 00:50 rc0.d
drwxr-xr-x. 2 root root  4096 Oct  8 00:50 rc1.d
drwxr-xr-x. 2 root root  4096 Oct  8 00:50 rc2.d
drwxr-xr-x. 2 root root  4096 Oct  8 00:50 rc3.d
drwxr-xr-x. 2 root root  4096 Oct  8 00:50 rc4.d
drwxr-xr-x. 2 root root  4096 Oct  8 00:50 rc5.d
drwxr-xr-x. 2 root root  4096 Oct  8 00:50 rc6.d
-rwxr-xr-x. 1 root root   499 Aug 13 10:55 rc.local
-rwxr-xr-x. 1 root root 19216 Jul 24 08:53 rc.sysinit

The folders rc0.d, rc1.d, rc2.d etc contains run level specific programs that will be executed depending upon the default run level you have in your inittab configuration file.

Let's see what are the contents inside these run level folders.

[root@localhost rc3.d]# ls
K01numad       K80kdump               S13cpuspeed          S28autofs
K01smartd      K84wpa_supplicant      S13irqbalance        S50choose_repo
K02oddjobd     K86cgred               S13rpcbind           S50cloud-init-local
K10psacct      K87restorecond         S15mdmonitor         S50mcelogd

If you see the files inside these run level specific folders, they either begin with S or they begin with K. The files are also numbered. Now files with an S at starting will be executed during the startup process, and files that begins with K, will be killed during shutdown process.

The number after either S or K is the sequence with which these will be executed.

Once the kernel has started all programs in your desired run level directory. You will get a login screen to log inside your booted system. Hope this article was helpful and easy to understand. Please let us know in case anybody finds a mistake in this article, so that we can correct it.

728x90

It will be impossible to boot/start a Linux, or any other operating system, without the help of a boot loader. Boot loader plays a major role in bring up the system into running state. Infact the boot loader is the first program, that run's, when a computer is switched on.

Boot loader is the one, who transfers' control to an operating system kernel. Linux booting process requires special attention, and will be doing a dedicated post on that. In this post, we will be concentrating on GRUB(Grand Unified Boot loader), the default boot loader, for many Linux distributions.

GRUB was the result of a troubleshooting done by Erich Boleyn, to boot GNU Hurd(the operating system which was designed by GNU, as a free replacement of UNIX), with a micro kernel. Yoshinori K. Okuji, carried further work to advance the initial GRUB, and is called GRUB2.

The older version of GRUB(before grub2), is now called as GRUB-Legacy.

Why is GNU grub, the default boot loader for many Linux distributions?

Grub has got several added advantages, compared to previous boot loaders, and also many "Proprietary boot loader's".

  • Grub can be used to load, almost all operating system's available, with the help of a function called chain-loading.
  • Grub does not require the exact physical location of the operating system kernel in the hard disk. It just requires the hard disk number(like the first hard disk,second hard disk), and the partition number, along with the file name of the kernel. Because, GRUB understands the format in which kernel is made.
  • You can modify, the booting options, like kernel parameter's and its location while booting, through GRUB command line.

How does GRUB command and graphical interface work together?

Grub has got a wonderful graphical interface where a user can select, the desired operating system from the menu.

The graphical interface also works in exactly the same way as command line interface. The only difference is that, a pre-configured configuration file contains the command which specifies the hard disk and kernel location(which otherwise have to be typed by hand, if you are using the command line interface.)

Learning Grub command's will be an added advantage, because it will help you to troubleshoot most of the booting problems etc.

What is the difference between Grub-Leagacy & GRUB-2?

There are some notable differences between the previous Grub-Leagacy and the new GRUB-2.

  • Previously in Grub-Legacy partition number's of a hard disk, used to start from 0,1,2,..etc. But in GRUB-2 it starts the partition naming convention from 1,2,3..etc.
  • It now recognizes many more new file system's like ext-4
  • There are no more stages like stage-1,stage-1.5 etc, in grub image files, like the Grub-Legacy
  • Grub-2 has started using modules which can be loaded as per requirement.
  • GRUB-2 is capable enough to determine a hard disk partition using UUID's(Universally Unique Identifier)
  • The configuration file name is grub.cfg(no more menu.lst & grub.config)
  • The new grub-2 configuration file is highly configurable, compared to grub-legacy config file.
  • GRUB-2 also supports EFI(Extensible Firmware Interface)

Grub Device Naming Convention

Grub device naming convention is totally different from the operating system partition naming convention. Its an important thing to keep in mind while working with grub.

The below table will be helpful in remembring the grub device naming convention.

(hd0) First hard disk installed in the computer

(hd1) Second Hard disk installed in the computer
(hd0,1) First partition of first hard disk, in GRUB2
(fd0) Floppy disk
(hd1,2) third partition of the second hard disk in grub-legacy

hard disk number, partition number

How to install grub on a floppy disk or a partition?

When you are working on an already installed linux distribution, the grub package will be bydefault installed on the system.

I will be showing you, the example's of working with grub-legacy. Because any grub version number thats in the form 0.9x is grub-legacy now.(Please note the fact that grub-legacy is no longer under active developement.)

For this example, i will be working on a Red hat enterprise linux 5.

[root@localhost ~]# rpm -qa | grep grub
grub-0.97-13.5
[root@localhost ~]#

the above shown package, will also provide you with a command called grub-install.

[root@localhost ~]# whereis grub-install
grub-install: /sbin/grub-install /usr/share/man/man8/grub-install.8.gz
[root@localhost ~]# rpm -qf /sbin/grub-install
grub-0.97-13.5

As you can clearly see from the above command results that the grub-install command comes from the package grub-0.97-13.5

You can simply install grub, on your desired partition, as shown below, with the help of grub-install command.

[root@localhost ~]# grub-install /dev/sda
Installation finished. No error reported.
This is the contents of the device map /boot/grub/device.map.
Check if this is correct or not. If any of the lines is incorrect,
fix it and re-run the script `grub-install'.
# this device map was generated by anaconda
(hd0)     /dev/sda
[root@localhost ~]#

In the above command, it will install grub in the MBR of the hard disk /dev/sda.

the above command result tells you an important fact to understand. It tells that, there is a device map file, and is asking us to check and confirm whether the file is correct or not.

Device map file is used by grub to identify the OS device names in a precise way. GRUB uses this file to map the device names of BIOS to operating system device names.This was devised, because there was inconstancies with, Linux operating system's device naming convention.

!http://www.slashroot.in/images/important note.gif

This file is configurable as per your requirement.

In the above example output of the /boot/grub/device.map tells that (hd0) in grub means /dev/sda in the operating system.

!http://www.slashroot.in/images/important note.gif

Whenever you install GRUB, on any of your partition, it gets installed and images are put under the directory "boot" in that partition.

If you want to install grub, under a directory other than the default "boot", you need to specify the boot directory with a command line argument to grub-install command.

Imagine that you want to install grub, on one of your external hard disk, and is currently mounted under /mydisk. lets see how to do it.

[root@localhost ~]# grub-install --root-directory=/mydisk/grub/ /dev/sdb

mount point = /mydisk/grub

default grub mounted point → boot directory

Booting an OS from grub command line

Booting an operating system from grub command line is quite simple. You just need to specify the partition where your kernel and initrd images are present before entering the boot command.

press "c" when you are in grub menu selection area. You will be presented with a grub> grub console, as shown below. This is not your Linux console, its a grub console, and will only accept grub specific commands.

!https://www.slashroot.in/sites/default/files/grub command line.png

fortunately this command line interface supports TAB-completion. So you dont need to remember the exact full name of the kernel,initrd & the partition numbers.

Infact whenever you are unable to boot, you can do a hit and trial method in multiple partition.

After entering the grub console by pressing "C", set the root partition and hard disk with the command "root"(always take help from tab completion)

press TAB after "root(",  and you will be shown the possible hard disk and partitions.

After selecting hard-disk and partition, you need to tell the name of the kernel(as i told before, grub understands kernel file formats, and will by default look @ /boot in the partition, and so tabing will work here also.)

type "kernel" followed by a / with vmlinuz(the default kernel package name, do tabing to complete the filename.)

Similarly you can give initrd file name and finally enter the command boot, to boot with the currently entered configuration.

!http://www.slashroot.in/images/important note.gif

you can use the same technique to boot a system, with a wrong or corrupted grub configuration.

What is chain loading in grub?

You might have noticed that grub is capable of loading different operating system. like for example, you can even load a windows operating system with the help of grub(Infact if you install Linux after windows, everything is done automatically by the installer for you).

Grub achieves this ability to load multiple or even proprietary operating system, with the help of chain loading.

chain loading is the method used by grub, in which it transfers' the control of booting that operating system to its native boot loader.


Grub → Control of booting that operating system → native boot loader


when Linux is installed after windows, GRUB stage-1 overwrites MBR(After removing the windows boot loader, and placing it in the volume boot record of the windows C partition).

!http://www.slashroot.in/images/important note.gif

Volume boot record is similar to MBR. its the first sector of a partition. However MBR is the first sector of a hard-disk(first 512 bytes of a hard disk).

the grub config file entry for windows chain loader looks like the below.

title Windows Operating System
        rootnoverify (hd0,0)
        chainloader +1

the first line "title" will be shown to you in the selection list at boot time in grub. the second line is similar to the "root" command, we previously used to boot the system using grub command line.

The only difference between "root" and "rootnoverify" is that, "rootnoverify" will not try to mount the file-system (because it will mostly be an unknown file system).

The third line tells to load the first sector of that partition, or say volume boot record(which will contain windows boot loader). Now windows will boot normally, because its being booted by windows boot loader.

Understanding GRUB stages

GRUB-legacy consists of three stages. They are as below.

  1. GRUB stage 1 (MBR Side, loading grub stage-1.5)
  2. GRUB stage 1.5 (MBR side - GRUB stage 1.5 - First partition)
  3. GRUB stage 2 (displaying GRUB menu)

In a hard-disk, if you are using MBR partition style, then the first sector of your hard disk(the first 512 bytes of your hard disk), will contain the boot loader & the partition table

440 bytes is for the boot loader and the remaining is for partition table(remember that, i am talking about MBR partition scheme).

GRUB stage 1 resides in the MBR of the hard disk.

Due to the extremely small size of the MBR(512 bytes), the grub stage-1 does the small job of loading grub stage-1.5, which resides in the blocks immediately after the MBR and before the first partition. This area, where grub-1.5 resides is roughly around 30kb.

Grub stage 1.5 is very much important, because it contains file system driver's to open the file system specific stage 2(which will open file from a known location in the partition, like /boot/). stage 2 is responsible for displaying the grub menu(because the menu is based on the config file grub.conf which is inside /boot)

How does the grub config file look like?

Grub config file looks like the below shown entries.

[root@localhost ~]# cat /boot/grub/grub.conf
# grub.conf generated by anaconda
#
# Note that you do not have to rerun grub after making changes to this file
# NOTICE:  You have a /boot partition.  This means that
#          all kernel and initrd paths are relative to /boot/, eg.
#          root (hd0,0)
#          kernel /vmlinuz-version ro root=/dev/sda2
#          initrd /initrd-version.img
#boot=/dev/sda
default=0
timeout=5
splashimage=(hd0,0)/grub/splash.xpm.gz
hiddenmenu
title CentOS (2.6.18-238.12.1.el5)
        root (hd0,0)
        kernel /vmlinuz-2.6.18-238.12.1.el5 ro root=LABEL=/ rhgb rhgb quiet
        initrd /initrd-2.6.18-238.12.1.el5.img

the original file is infact, is /etc/grub.conf, there is a symbolic link given from this /etc/grub.conf to /boot/grub/grub.conf file

[root@localhost etc]# ll /etc/grub.conf
lrwxrwxrwx 1 root root 22 Jan 28  2011 /etc/grub.conf -> ../boot/grub/grub.conf

"default=0" tell's the default operating system to boot, if nothing is selected within a specified timeout during boot, from the grub menu. 0 means the first entry(which in the above case is centos.) default=1 will boot the second title entry as the default operating system if nothing selected within the specified timeout during the boot.

"timeout=5", this specifies the time in seconds, to wait before the default option is selected to boot automatically by the grub.

"splashimage"

, specifies the location of the grub background image to show, behind the menu list(you can put your pic there

!http://www.slashroot.in/sites/all/libraries/ckeditor/plugins/smiley/images/regular_smile.gif

).

"hiddenmenu" will keep the menu hidden if no key is pressed during the grub boot screen(and will bydefault boot the default operating system without showing the menu)

+ Recent posts