
The Popup Settings -- Triggers option allows users to set a trigger and a cookie on a popup.
This article describes the 'Cookie' option in the popup editor. Refer to the related article below for information to set a popup trigger.
Related article: 'Triggers' options settings.
Article Contents
- Add a New Cookie
- 'Cookie Settings -- General' option settings box
- 'Cookie Settings -- Advanced' option settings box
- Options to Set and Link a Cookie to a Trigger
- Set and Link a Cookie When Adding a New Trigger
- Set and Link a Cookie When Editing an Existing Trigger
- Set A Browser Cookie When Submitting A Form
- Set a Browser Cookie 'On Click' Inside a Popup
Definition of Terms
Triggers -- These are 'events' that cause a popup to display in the browser. A popup requires at least one trigger in order to display, and may accept multiple triggers.
Cookies -- These control the repeated display of popups in the browser. To work, they must be set and linked to a popup trigger. Cookies are assigned an identification (ID) number formatted as 'pum-{integer}'. The use of one or more cookies with a trigger is optional, but often recommended.
By default, cookies are valid for a term of 1 month, which can be changed by plugin users to a different value. Popups controlled by a cookie can redisplay before they expire if the popup cookie is cleared from the visitor's browser.
[ Back to top ]
Add a New Cookie

When the button labeled 'Add New Cookie' is selected, a popup labeled 'When should your cookie be created?' will appear. Five (5) cookie setting options are provided with the base (free) version of Popup Maker. The plugin default is set to the first option value, 'On Popup Close'.
They include:
1. On Popup Close -- A cookie is set in the browser when the popup is closed (default);
2. On Popup Open -- A cookie is set in the browser when the popup is opened;
3. Subscription Form: Successful -- This cookie option is intended for use with our MailChimp Integration plugin extension to Popup Maker. It is also available for use with the Popup Maker 'Subscription Form' shortcode integrated with a 3rd party email marketing plugin or application registered with Popup Maker.
Plugin users of either Ninja Forms, GravityForms, or Contact Form 7 should continue to use either of the first 2 cookie options above, plus their respective Popup Maker 'form submit success' cookies (see 'related article' links below).
Related article: Ninja Forms Submit Success integration cookie
Related article: GravityForms Submit Success integration cookie
Related article: Contact Form 7 Submit Success integration cookie
4. Subscription Form: Already Subscribed -- This cookie option is intended for use with our MailChimp Integration plugin extension to Popup Maker. It is also available for use with the Popup Maker 'Subscription Form' shortcode integrated with a 3rd party email marketing plugin or application registered with Popup Maker.
5. Manual Javascript -- Select this option when using form plugins for which Popup Maker does not have a specific integration:
a) All other WordPress form plugins.
This cookie option setting is also available to set a browser cookie when selecting content inside a popup 'on click'. See the section 'Set a Browser Cookie 'On Click' Inside a Popup' below for details.
Each of the 5 cookie options listed above is described at length in the related article link below.
Related article: 'Cookie Settings and Features'.
[ Back to top ]
'Cookie Settings -- General' option settings
Upon adding a cookie option, the 'Cookie Settings -- General' option settings box will appear.
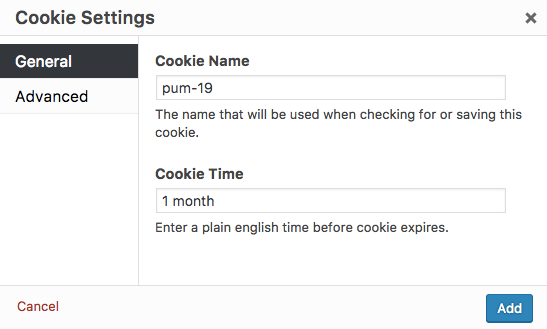
The custom fields shown include:
Cookie Name -- Popup Maker automatically assigns a cookie an ID number formatted as 'pum-{integer}'. This ID is used to link a cookie to a trigger.
Cookie Time -- By default, cookies are valid for a term of 1 month. This can be changed by plugin users to a different value. Acceptable units of time include:
- seconds,
- minute(s),
- hour(s),
- day(s),
- month(s), and
- year(s)
[ Back to top ]
'Cookie Settings -- Advanced' option settings
Popup Maker provides some 'advanced' option settings, whose defaults seldom need to be changed.
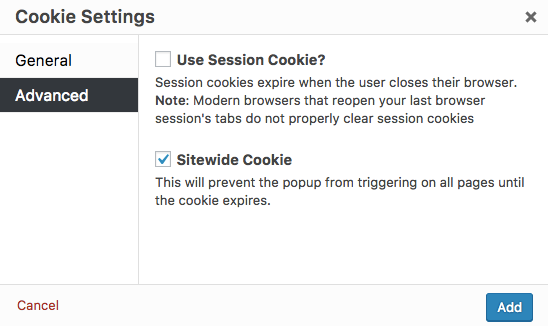
The custom fields shown include:
Use Session Cookie? -- By default, this option is turned 'off'. Modern browsers can keep web pages (and browser sessions) open indefinitely, even when browsers and devices are not in use. We maintain this option setting for plugin version backward compatibility. Most plugin users have no need to turn the option 'on'.
Sitewide Cookie -- By default, this option is turned 'on'. It applies Popup Maker cookies throughout a site, controlling the repeat display of popups on any site page.
[ Back to top ]
Options to Set and Link a Cookie to a Trigger
Cookies can be set and linked to a trigger either:
- when adding a new trigger, or
- by editing an existing trigger.
Set and Link a Cookie When Adding a New Trigger
- From the 'Trigger' option settings tab, select the button labeled 'Add New Trigger'.
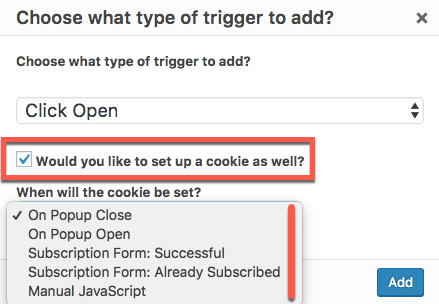
2. From the popup titled 'Choose what type of trigger to add?', select the checkbox labeled: 'Would you like to set up a cookie as well?'.
3. Choose from among the five (5) cookie options presented below, then select the 'Add' button to add the trigger and link the cookie. The plugin default selection is set to 'On Popup Close'.
4. Depending on which trigger is selected, the matching option setting box will appear:
'Click Trigger Settings -- General' option settings,
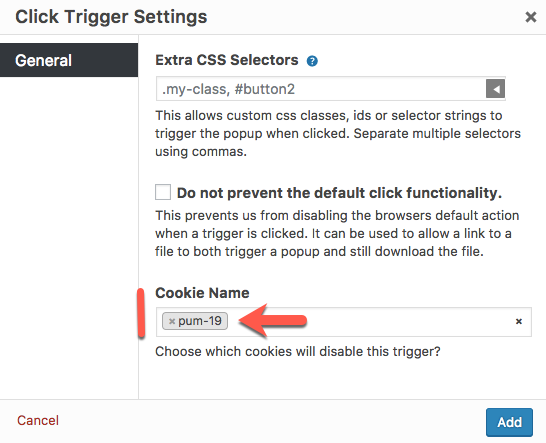
or Time Delay Settings -- General' option settings.

In the 'Cookie Name' custom field, Popup Maker automatically generates and assigns the trigger a new cookie with an ID of 'pum-{integer}'.

5. The trigger is set and linked to a new cookie. In the example above, a 'Click Open' trigger is set, and linked to a cookie set to launch 'On Popup Close'. The cookie has an ID of 'pum-40'.
[ Back to top ]
Set and Link a Cookie When Editing an Existing Trigger
1. To add and link a cookie to a trigger, edit an existing trigger. Select the 'pencil' icon from the 'Popup Settings -- Trigger' option settings tab.

2a. Edit an existing 'Click Open' trigger -- The 'Click Trigger Settings' option settings popup will appear. On the 'General' tab, select the custom field labeled 'Cookie Name'. An 'Add New Cookie' option will appear. Select the option to add it to the custom field, then select the 'Update' button.

2b. Edit an existing 'Time Delay / Auto Open' trigger -- The 'Time Delay Settings' option settings popup will appear. On the 'General' tab, select the custom field labeled 'Cookie Name'. An 'Add New Cookie' option will appear. Select the option to add it to the custom field, then select the 'Update' button.
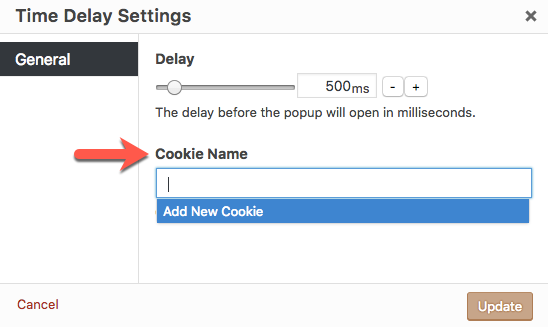
Note: The process described above in Step 2 for the 'Click Open' and 'Auto Open / Time Delay' triggers is the same for any premium trigger available as a plugin extension to Popup Maker.
3. The plugin will prompt with a popup labeled 'When should your popup be created?'. The plugin default option is set to 'On Popup Close', with four (4) additional option settings available.
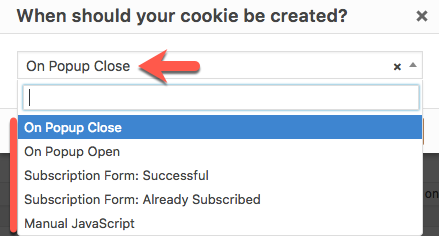
Either accept the plugin default option, or select a different option, and then click the button labeled 'Add' to move to the next step.

5. The 'Cookie Settings -- General' option settings box will appear displaying two (2) custom fields; 'Cookie Name' and 'Cookie Time'.
'Cookie Name' is a cookie with an identification (ID) format of 'pum-{integer}' (for example, 'pum-40').
'Cookie Time' is an expiration term for the cookie. The plugin default value is 1 month, which can be changed to a value that ranges from minutes to years.
To accept the values for 'Cookie Name' and 'Cookie Time', select the 'Update' button.

6. In the image above, a 'Time Delay / Auto Open' trigger is now linked to an 'On Popup Close' cookie via the cookie ID of 'pum-40'.
[ Back to top ]
Set A Browser Cookie When Submitting A Form
Popup Maker adds a 'form submit success' cookie option for any of the WordPress form plugins listed below when they are activated with our plugin.
Note: Popup Maker is a Ninja Forms affiliate. We provide support for each other’s products.
Any WordPress form plugin other than those listed above should set a 'form submit success' cookie via the 'Manual JavaScript' option setting. See the related article link below for details.
Related article: Close Popup and Create Cookie When a Form is Submitted
[ Back to top ]
Set a Browser Cookie 'On Click' Inside a Popup
The 'Manual JavaScript' cookie option was discussed previously in the section titled 'Add a New Cookie' (list item #5). It can be used to set a browser cookie on form submit success with any WordPress form plugin other than the 3 plugins with which Popup Maker directly integrates.
This cookie option can also be used to set a browser cookie 'on click' of any content displayed inside a popup. For example, a popup displays by a 'Time Delay / Auto Open' trigger. The popup contain 2 images, and the visitor is encouraged to click on one or the other image.
The 'Manual JavaScript' cookie option can be used to set a browser cookie 'on click' when either popup image is selected. See the related article link below for details, including cookie option setting and custom code.
Related article: Create Cookie On the Click of an Element Within Your Popup.
[ Back to top ]
Did this answer your question?
Yes
'WEB > WP(WordPress)' 카테고리의 다른 글
| Multi-currency support for WooCommerce (0) | 2019.08.23 |
|---|---|
| 워드프레스 우커머스 원화(KRW) 설정시에도 페이팔 사용하기 (0) | 2019.08.23 |
| Theme and Plugins Localization (0) | 2019.08.09 |
| Divi Theme & mangboard colision (0) | 2019.07.06 |
| How To Disable And Remove Old Post Revisions In WordPress (0) | 2019.05.28 |