Create product add-ons using Gravity Forms
With the Gravity Forms Product Add-Ons extension, advanced product configuration forms can be built and linked to any product in WooCommerce. Forms that contain conditional logic, pricing fields, user input prices, conditional-pricing fields, conditional submit button logic can all be created for your products.
Additionally, any product that contains a Gravity Form is tracked in the cart to ensure, no matter how complex your product form, only unique configurations are added to the cart and duplicates are incremented in quantity.
Gravity Forms Product Add-Ons gives you full control over the display of prices in the store. You can use the default price displays provided by WooCommerce, or set the price to ‘As Low as $1000’ in the case of a configurable product containing pricing fields.
You also have control over when the built-in automatic price calculation is displayed, if at all, and can configure each label individually.
This extension requires the Gravity Forms plugin.
Setup and Configuration
Required Configuration
The plugin does not require any manual configuration after activation.
Optional Configuration
A setting you might change is how HTML is formatted from specific Gravity Forms field types. A common request is to have HTML from the List type field show as HTML and not as a CSV list of data. To do this, you can use a filter to turn off HTML stripping in the plugin.
To turn off HTML stripping, add the following to the functions.php file in your theme:
| add_filter( 'woocommerce_gforms_strip_meta_html', 'configure_woocommerce_gforms_strip_meta_html' ); |
| function configure_woocommerce_gforms_strip_meta_html( $strip_html ) { |
| $strip_html = false; |
| return $strip_html; |
| } |
view raw
functions.php
hosted with

by GitHub
Getting Started
Build a Gravity Form that contains any of the supported field types. Be sure to leave the Confirmation settings as default text with an empty message. Configure any conditional logic, and optionally submit button logic.
Gravity Forms Product Add Ons does not change or add anything to the actual configuration of the form itself. The extension will use the form you have already built using the standard method to build a Gravity Form.
To configure the form, do so as though you were creating a form with no connection to WooCommerce.
- I recommend adding the form to a temporary post or page, or using the Form Preview to get it working properly.
- Make sure that you submit an entry so you can validate that a regular Gravity Forms submission creates the entry with the correct information
- Once you have the form configured as required, and after it is attached to a product it will be displayed as you require.
If you need additional assistance with setting up the Gravity Form itself you could check the Gravity Forms Documentation or contact their support team for further assistance on that part.
In the example below, the form is configured to use pricing fields. When using pricing fields, Gravity Forms requires a product and total field. Typically you add a hidden product field to the form and set its price to the price at which you require customizations.

Add a Product field (from the Pricing Fields section) to the form in order to configure the base customization price and set it to $0.00:

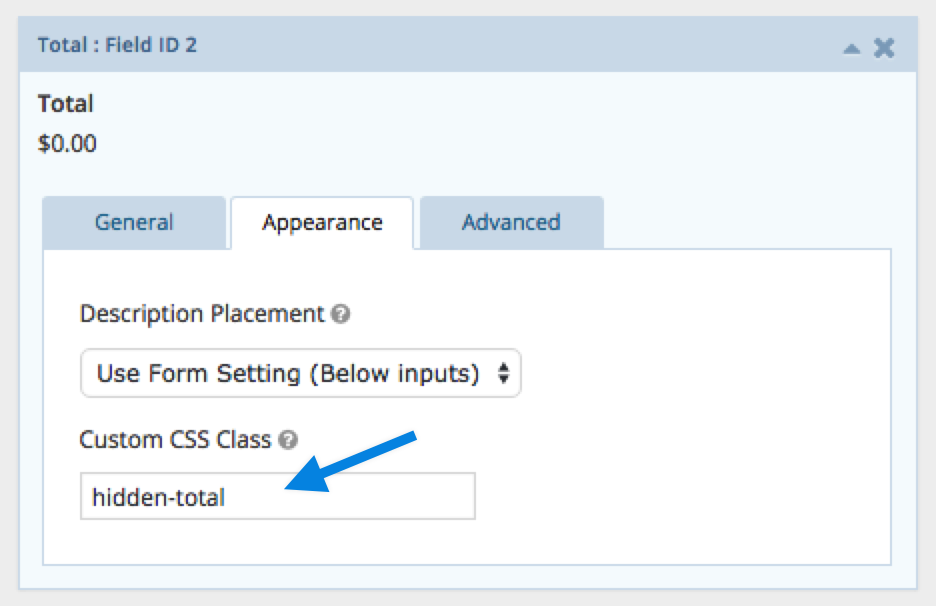
Gravity Forms Product Add-On requires that at least one Total field (from the Pricing Fields section) be present on the form. Add a total field to the form. In this example, we are using the built-in dynamic price calculations on our single product page. To prevent the customizations total from being displayed twice on the single product page (once in the dynamically calculated price area and once in the gravity form itself), add a class of “hidden-total” to CSS Class Name under the Appearance tab in the field configuration:
To add options to your form, use the Option field type from Gravity Forms. You can use other controls, such as the standard dropdown, but you must use the option field if your option has a cost associated.
Note: If you have options that have a cost associated, you must use the Product Option field type, not standard drop-down fields, radio buttons, checkboxes, etc. This is standard for how Gravity Forms works. If you have trouble creating the product form, Gravity Forms documentation has several good examples.
Once you have built your form and are satisfied with the functionality, create or edit an existing WooCommerce product. Please note that in order for the form to display on the front end, you will need to have either a price or a 0 in the Regular Price field (for more information, see FAQ below).
Select the form you wish to use.

With Gravity Forms Add-On enabled, you have options for linking the form, displaying the Gravity Form title and description, and displaying alternative price titles throughout the store. You also have the ability to control how the dynamically calculated price is displayed on the single product page.
Price Labels

Remove WooCommerce Price
This will remove the price html from the store when viewing the product. Use this option if you are doing all calculations in the form and do not want 0 or Free to display as the products regular price.
Price Before
A label which can be added before the price. Useful for adding information to the price section on the product letting your customers know the price is the base price, and additional form options will add to the total cost.
Price After
A label to display after the regular price in your store.
Total Calculations

Enable Dynamic Pricing
This option will be visible if you have the WooCommerce Dynamic Pricing plugin active. By setting this to Yes, the price visible to your customers will automatically update based on pricing rules and the cost of the customers selected options.
Disable Calculations
To completely remove the Subtotal, Options Total and Grand Total section from your products. Useful if you are not performing any calculations and have no fields on your form which add to the products cost.
Disable Subtotal
Will remove the Subtotal line from the totals section on your product page.
Subtotal Label
The label to display for the Subtotal line item.
Disable Options Total
Will remove the Options total, the price added to the product by your form options, line from the totals section on your product page.
Options Label
The label to display for the Options line item.
Disable Total Label
Will remove the Total, the price of your product plus the price added to the product by your form options, line from the totals section on your product page.
Total Label
The label to display for the Total line item.
Entries and Notifications

Keep Cart Entries
As of Gravity Forms 3.3, entries are only created when the order is placed. In previous versions entries were created as a side effect of creating the cart item. These entries are now removed by default automatically. If you would like to track both the entries created when someone is adding an item to their cart check Keep Cart Entries.

Note, normally this is not very useful since you have no link between the entry and the cart to which it was added.
The entries created during the actual checkout process are properly linked to their associated order items.
Update Payment and Transaction Details
Check this box to enable the transactional data link between the Gravity Form entry and the WooCommerce order. When enabled transaction information, such as payment status and order details, will be linked to the entry automatically. The information will update as the order and payment status change in WooCommerce.
Send Notifications
Gravity Forms Product Addons automatically disables any notifications from being sent when items are ordered and entries are created.
If you would like to process your notifications, enable this option. When orders are created you will receive the notifications you have configured for each cart item which has a form attached to it.
Advanced Options

Enable Cart Edit
Enable this to allow users to edit items they have added to their cart. The default would be the user would need to fill out a form and add it to the cart, and manually remove any items on which they want to change. If you enable cart edit users can click on the item in the cart to be taken back to the product page with their details pre-filled out.
Replace Modified Items
Choose to Replace the edited item or to add a new item to the cart. Normally you would want to replace the modified item, since the user is editing it, however the option now exists to append the modified item.
Quantity / Stock Options
If your form has the right type of fields you can enable the form to be linked to either the Cart Quantity or the final Order Item Quantity. This could be useful if you have quantity fields on your form itself and want to use that value when the customer adds the item to the cart.
If you would just like to reduce the stock quantity of your WooCommerce product based on a field on the form, choose Order Item Quantity. The cart quantity will remain 1 but when the order is placed the stock quantity of the product will be reduced by the value of the field you choose.
After your options have been configured, publish or update your product. Navigate to the product in the store and see how your form has been linked to the product:

When a customer purchases a product linked to a Gravity Form, here is how the add-on information displays:

Cart View

Order Confirmation

Admin Email – New Order Notification
WooCommerce Order Information
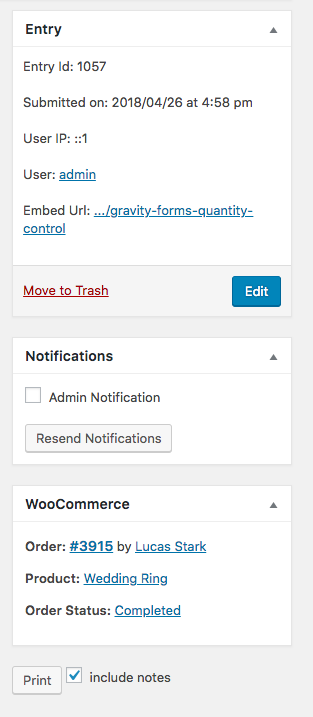
Gravity Forms Product Addons 3.3 now links each order item to the Gravity Form entry created during the checkout process. Once the order is placed you can quickly jump from the WooCommerce order to the associated entry.

Gravity Form Entry Information
Gravity Forms Product Addons 3.3 adds additional information to the entries inside of Gravity Forms itself. This allows you to quickly see the associated WooCommerce order information.
Each cart item ordered will have a 1-1 relationship to it’s entry.

The entries themselves will have additional data provided by the parent WooCommerce order.

Gravity Form Entry Transaction Information
The entries are linked to their respective WooCommerce order item and will update it’s status and transaction information as the order proceeds through the order and payment process. This is useful if you want to export your entries and only work with items with a specific order status.
Supported Gravity Form Fields and Features
Standard Fields
- Single Line Text
- Drop Down
- Number
- Radio Buttons
- HTML
- Paragraph Text
- Multi Select
- Checkboxes
- Hidden
- Section Break
Advanced Fields
- Name
- Time
- Address
- Date
- Phone
- Website
- File Upload
- List ( Partial support, the column values are stored in WooCommerce as a CSV list of data, not the raw HTML )
Pricing Fields
- Product
- Option – Drop Down
- Option – Check-boxes
- Option – Radio buttons
- Total
- Quantity
- Shipping
Forms that are AJAX-enabled are not currently supported with Gravity Forms Product Add-Ons
Quick Tips
- Any license level of Gravity Forms will work with this extension.
- If you are having trouble with a form, calculations or conditional logic, ensure that the form works as expected on a regular post or page. Often times, calculated fields or conditional logic is not configured as expected and it’s easier to track this down when using the gravity form alone and without an attached product.
- Ensure that you avoid using custom confirmation settings on the form. Leave the default confirmation set to text with an empty message.
FAQ
What is the best way to use these forms while keeping my website fast?
Make each individual product into a separate Gravity Form Page. Using conditional logic on each separate product page (rather than providing every variable possible on one page) will keep your website fast. Each field that has conditional logic requires an AJAX post back, so there will be only five rather than 25 fields with conditional logic. Using the multipage approach should take care of lag issues.
Why are duplicate entries created?
Gravity Form Add-Ons no longer creates duplicate entries. Entries are created during the add to cart process, however they are automatically removed. Once the actual order is completed an entry will be created and will be linked to the ordered item. When viewing the order you will see a link to the entry and when viewing the entry you will see a link to the WooCommerce Order.
Why won’t Gravity Forms show on the front end?
Products that have an empty ‘price’ field won’t display Gravity Forms Add-Ons. Enter a value as shown:

The Gravity Form will also not display if you have any fatal JavaScript errors on your site caused by your theme or other plugins. Gravity Forms itself uses JavaScript to display the form, and if there is a fatal script error before the form is completely rendered it won’t be displayed. You can check for this condition by using Google Chrome Developer Tools and checking the Console to see if there are any errors. If there are you should contact the Theme or Plugin Author to help resolve those.
Can I use Gravity Forms Add-Ons to send emails?
Gravity Forms will not send notifications you have configured once the order is completed. This is a recent change as of version 3.3. If you want to receive Admin Notifications you can enable those when configuring the form options on your WooCommerce product.
Why do my forms redirect to a page URL that ends with /:/?
Ensure that you are running the latest version of Gravity Forms and Gravity Forms Product Add-Ons. If this is still an issue, delete the problematic form and create it again from scratch. Use the new form.
Why are my Options and Totals not correctly adding costs?
There are a few possibilities. The first is that you must check that you are assigning each option field to a product field. Next ensure that you have Disable quantity field checked for the product field if this option is not used.
Why doesn’t this work with the Gravity Forms Partial Entries add-on?
Partial Entries is a 3rd party add-on for Gravity Forms, which collects data for partially completed, but not submitted, forms. Since the actual form entries for Gravity Forms are not important to the WooCommerce cart / order process (see FAQ re: duplicate entries), this add-on is not compatible with our Gravity Forms Product Add-ons extension.
Why are my calculations not showing?
In some cases it may be due Ajax being disabled. It may also be a plugin/theme conflict. More at: WooCommerce Self-Service Guide.
Can I use the form fields to change the product’s featured image like I do with product variations?
No, Gravity Forms does not allow to link fields and their values with product variations.
Where can I see Gravity Forms Product Add-Ons in action?
There is a demo showing:
Questions & Support
Have a question before you buy? Please fill out this pre-sales form.
Already purchased and need some assistance? Get in touch with the developer via the Help Desk.
docs.woocommerce.com/document/woocommerce-gravity-forms-product-addons/
'WEB > WP(WordPress)' 카테고리의 다른 글
| How To Customize Product Sorting in WooCommerce (0) | 2021.01.18 |
|---|---|
| CSS Ready Classes for Gravity Forms (0) | 2021.01.10 |
| [Gravity Forms] Exporting Gravity Forms Entries as a PDF (0) | 2020.12.25 |
| [Gravity Forms] Merge tags in multistep Gravity Form? (0) | 2020.12.25 |
| [Gravity Forms] Merge Tags (0) | 2020.12.25 |