JavaScript typed arrays are array-like objects that provide a mechanism for reading and writing raw binary data in memory buffers. As you may already know, Array objects grow and shrink dynamically and can have any JavaScript value. JavaScript engines perform optimizations so that these arrays are fast.
However, as web applications become more and more powerful, adding features such as audio and video manipulation, access to raw data using WebSockets, and so forth, it has become clear that there are times when it would be helpful for JavaScript code to be able to quickly and easily manipulate raw binary data. This is where typed arrays come in. Each entry in a JavaScript typed array is a raw binary value in one of a number of supported formats, from 8-bit integers to 64-bit floating-point numbers.
However, typed arrays are not to be confused with normal arrays, as calling Array.isArray() on a typed array returns false. Moreover, not all methods available for normal arrays are supported by typed arrays (e.g. push and pop).
Buffers and views: typed array architecture
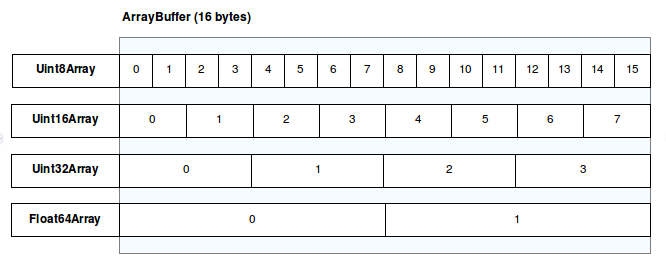
To achieve maximum flexibility and efficiency, JavaScript typed arrays split the implementation into buffers and views. A buffer (implemented by the ArrayBuffer object) is an object representing a chunk of data; it has no format to speak of and offers no mechanism for accessing its contents. In order to access the memory contained in a buffer, you need to use a view. A view provides a context — that is, a data type, starting offset, and the number of elements — that turns the data into a typed array.
ArrayBuffer
The ArrayBuffer is a data type that is used to represent a generic, fixed-length binary data buffer. You can't directly manipulate the contents of an ArrayBuffer; instead, you create a typed array view or a DataView which represents the buffer in a specific format, and use that to read and write the contents of the buffer.
Typed array views
Typed array views have self-descriptive names and provide views for all the usual numeric types like Int8, Uint32, Float64 and so forth. There is one special typed array view, the Uint8ClampedArray. It clamps the values between 0 and 255. This is useful for Canvas data processing, for example.
TypeValue RangeSize in bytesDescriptionWeb IDL typeEquivalent C type
| Int8Array | -128 to 127 | 1 | 8-bit two's complement signed integer | byte | int8_t |
| Uint8Array | 0 to 255 | 1 | 8-bit unsigned integer | octet | uint8_t |
| Uint8ClampedArray | 0 to 255 | 1 | 8-bit unsigned integer (clamped) | octet | uint8_t |
| Int16Array | -32768 to 32767 | 2 | 16-bit two's complement signed integer | short | int16_t |
| Uint16Array | 0 to 65535 | 2 | 16-bit unsigned integer | unsigned short | uint16_t |
| Int32Array | -2147483648 to 2147483647 | 4 | 32-bit two's complement signed integer | long | int32_t |
| Uint32Array | 0 to 4294967295 | 4 | 32-bit unsigned integer | unsigned long | uint32_t |
| Float32Array | 1.2×10-38 to 3.4×1038 | 4 | 32-bit IEEE floating point number (7 significant digits e.g., 1.123456) | unrestricted float | float |
| Float64Array | 5.0×10-324 to 1.8×10308 | 8 | 64-bit IEEE floating point number (16 significant digits e.g., 1.123...15) | unrestricted double | double |
| BigInt64Array | -263 to 263-1 | 8 | 64-bit two's complement signed integer | bigint | int64_t (signed long long) |
| BigUint64Array | 0 to 264-1 | 8 | 64-bit unsigned integer | bigint | uint64_t (unsigned long long) |
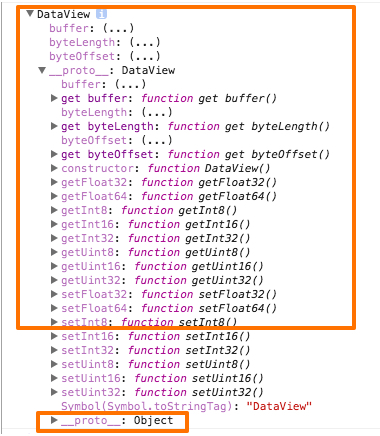
DataView
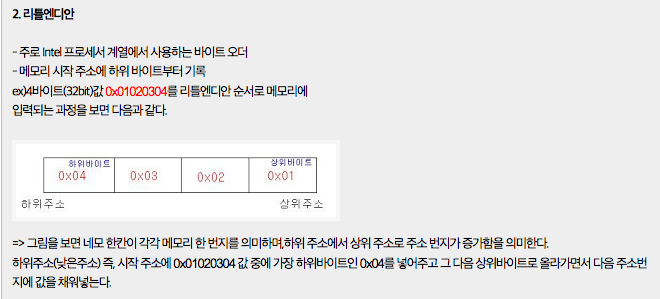
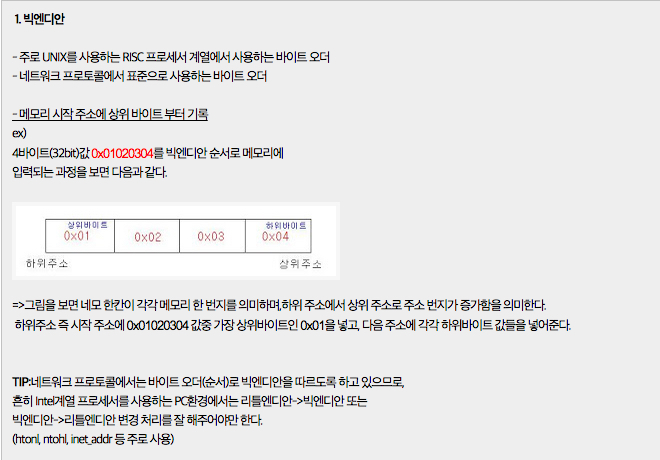
The DataView is a low-level interface that provides a getter/setter API to read and write arbitrary data to the buffer. This is useful when dealing with different types of data, for example. Typed array views are in the native byte-order (see Endianness) of your platform. With a DataView you are able to control the byte-order. It is big-endian by default and can be set to little-endian in the getter/setter methods.
Web APIs using typed arrays
These are some examples of APIs that make use of typed arrays; there are others, and more are being added all the time.
FileReader.prototype.readAsArrayBuffer()The FileReader.prototype.readAsArrayBuffer() method starts reading the contents of the specified Blob or File.XMLHttpRequest.prototype.send()XMLHttpRequest instances' send() method now supports typed arrays and ArrayBuffer objects as argument.ImageData.dataIs a Uint8ClampedArray representing a one-dimensional array containing the data in the RGBA order, with integer values between 0 and 255 inclusive.
Examples
Using views with buffers
First of all, we will need to create a buffer, here with a fixed length of 16-bytes:
let buffer = new ArrayBuffer(16);
At this point, we have a chunk of memory whose bytes are all pre-initialized to 0. There's not a lot we can do with it, though. We can confirm that it is indeed 16 bytes long, and that's about it:
if (buffer.byteLength === 16) { console.log("Yes, it's 16 bytes."); } else { console.log("Oh no, it's the wrong size!"); }
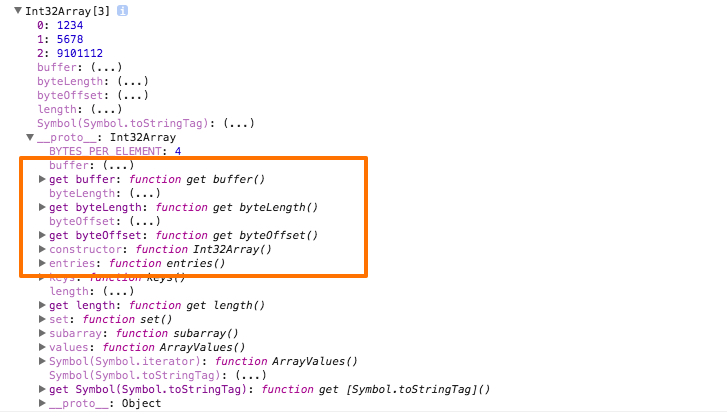
Before we can really work with this buffer, we need to create a view. Let's create a view that treats the data in the buffer as an array of 32-bit signed integers:
let int32View = new Int32Array(buffer);
Now we can access the fields in the array just like a normal array:
for (let i = 0; i < int32View.length; i++) { int32View[i] = i * 2; }
This fills out the 4 entries in the array (4 entries at 4 bytes each makes 16 total bytes) with the values 0, 2, 4, and 6.
Multiple views on the same data
Things start to get really interesting when you consider that you can create multiple views onto the same data. For example, given the code above, we can continue like this:
let int16View = new Int16Array(buffer); for (let i = 0; i < int16View.length; i++) { console.log('Entry ' + i + ': ' + int16View[i]); }
Here we create a 16-bit integer view that shares the same buffer as the existing 32-bit view and we output all the values in the buffer as 16-bit integers. Now we get the output 0, 0, 2, 0, 4, 0, 6, 0.
You can go a step farther, though. Consider this:
int16View[0] = 32; console.log('Entry 0 in the 32-bit array is now ' + int32View[0]);
The output from this is "Entry 0 in the 32-bit array is now 32".
In other words, the two arrays are indeed simply viewed on the same data buffer, treating it as different formats. You can do this with any view types.
Working with complex data structures
By combining a single buffer with multiple views of different types, starting at different offsets into the buffer, you can interact with data objects containing multiple data types. This lets you, for example, interact with complex data structures from WebGL, data files, or C structures you need to use while using js-ctypes.
Consider this C structure:
struct someStruct { unsigned long id; char username[16]; float amountDue; };
You can access a buffer containing data in this format like this:
let buffer = new ArrayBuffer(24); // ... read the data into the buffer ... let idView = new Uint32Array(buffer, 0, 1); let usernameView = new Uint8Array(buffer, 4, 16); let amountDueView = new Float32Array(buffer, 20, 1);
Then you can access, for example, the amount due with amountDueView[0].
Note: The data structure alignment in a C structure is platform-dependent. Take precautions and considerations for these padding differences.
Conversion to normal arrays
After processing a typed array, it is sometimes useful to convert it back to a normal array in order to benefit from the Array prototype. This can be done using Array.from(), or using the following code where Array.from() is unsupported.
let typedArray = new Uint8Array([1, 2, 3, 4]), normalArray = Array.prototype.slice.call(typedArray); normalArray.length === 4; normalArray.constructor === Array;
Specifications
Specification
| ECMAScript (ECMA-262) The definition of 'TypedArray Objects' in that specification. |
Browser compatibility
Update compatibility data on GitHub
DesktopMobileServerChromeEdgeFirefoxInternet ExplorerOperaSafariAndroid webviewChrome for AndroidFirefox for AndroidOpera for AndroidSafari on iOSSamsung InternetNode.jsInt8ArrayInt8Array() constructor
| Full support7 | Full support12 | Full support4 | Full support10 | Full support11.6 | Full support5.1 | Full support4 | Full support18 | Full support4 | Full support12 | Full support4.2 | Full support1.0 | Full support0.10 |
| Full support7 | Full support12 | Full support4 | Full support10 | Full support11.6 | Full support5.1 | Full support4 | Full support18 | Full support4 | Full support12 | Full support4.2 | Full support1.0 | Full support0.10 |
Legend
Full support Full support
See also
- Getting ArrayBuffers or typed arrays from Base64-encoded strings
- StringView – a C-like representation of strings based on typed arrays
- Faster Canvas Pixel Manipulation with Typed Arrays
- Typed Arrays: Binary Data in the Browser
- Endianness
Metadata
- Last modified: Mar 13, 2020, by MDN contributors
Related Topics
- JavaScript
- Tutorials:
- Complete beginners
- JavaScript Guide
- Intermediate
- Advanced
- References:
- Built-in objects
- Expressions & operators
- Statements & declarations
- Functions
- Classes
- Errors
- Misc
Learn the best of web development
Get the latest and greatest from MDN delivered straight to your inbox.
Sign up now
Hide Newsletter Sign-up
MDN
Mozilla
© 2005-2020 Mozilla and individual contributors. Content is available under these licenses.
'홍익인간 프로젝트 > 참조' 카테고리의 다른 글
| Function overloading in Javascript - Best practices (0) | 2020.12.01 |
|---|---|
| F_CPU definition (0) | 2020.12.01 |
| 자바스크립트 (JavaScript)에서 Unsigned 32-bit Integer로 변환하기 (0) | 2020.11.30 |
| 아두이노 헥사파일 위치와 해석 (0) | 2020.11.30 |
| JavaScript 를 통해 Binary Data 조작하기 (0) | 2020.11.29 |