728x90

JQuery에 다른 기능을 검색하다가 아래의 사이트를 발견하여 나중에 도움이 될 듯하여 정리해둔다.


1. jQuery로 선택된 값 읽기


$("#selectBox option:selected").val();

$("select[name=name]").val();


2. jQuery로 선택된 내용 읽기


$("#selectBox option:selected").text();


3. 선택된 위치


var index = $("#test option").index($("#test option:selected"));


4. Add options to the end of a select


$("#selectBox").append("<option value='1'>Apples</option>");

$("#selectBox").append("<option value='2'>After Apples</option>");


5. Add options to the start of a select


$("#selectBox").prepend("<option value='0'>Before Apples</option>");


6. Replace all the options with new options


$("#selectBox").html("<option value='1'>Some oranges</option><option value='2'>MoreOranges</option>");


7. Replace items at a certain index


$("#selectBox option:eq(1)").replaceWith("<option value='2'>Someapples</option>");

$("#selectBox option:eq(2)").replaceWith("<option value='3'>Somebananas</option>");


8. 지정된 index값으로 select 하기


$("#selectBox option:eq(2)").attr("selected", "selected");


9. text 값으로 select 하기


$("#selectBox").val("Someoranges").attr("selected", "selected");


10. value값으로 select 하기


$("#selectBox").val("2");


11. 지정된 인덱스값의 item 삭제


$("#selectBox option:eq(0)").remove();


12. 첫번째 item 삭제


$("#selectBox option:first").remove();


13. 마지막 item 삭제


$("#selectBox option:last").remove();


14. 선택된 옵션의 text 구하기


alert(!$("#selectBox option:selected").text());


15. 선택된 옵션의 value 구하기


alert(!$("#selectBox option:selected").val());


16. 선택된 옵션 index 구하기


alert(!$("#selectBox option").index($("#selectBox option:selected")));


17. SelecBox 아이템 갯수 구하기


alert(!$("#selectBox option").size());


18. 선택된 옵션 앞의 아이템 갯수


alert(!$("#selectBox option:selected").prevAl!l().size());


19. 선택된 옵션 후의 아이템 갯수


alert(!$("#selectBox option:selected").nextAll().size());


20. Insert an item in after a particular position


$("#selectBox option:eq(0)").after("<option value='4'>Somepears</option>");


21. Insert an item in before a particular position


$("#selectBox option:eq(3)").before("<option value='5'>Someapricots</option>");


22. Getting values when item is selected


$("#selectBox").change(function(){

           alert(!$(this).val());

           alert(!$(this).children("option:selected").text());

});


출처 : http://blog.daum.net/twinsnow/124

728x90
user-1
Neeraj Agarwal

WordPress Media Uploader provide an easy way for uploading images, or other graphic files in pages or posts. Therefore many WordPress themes or plugins developers want to integrate WP Uploader functionality under Theme Options Panel or plugins.

For that, I came up with this tutorial that make it easy for you to implement such functionality under theme options panel of your WP themes or plugins.

Under the tutorial, I have created a plugin named, WordPress Media Uploader that helps you to upload images.

So that you can understand how to integrate uploader functionality under your WordPress themes.

media uploader integration in wordpress

[dlv dl_url=”https://www.inkthemes.com/wp-content/uploads/2014/06/wordpress_media_uploader.zip” dl_text =”Download WP Media Uploader Files”]

1. PHP File – index.php

I have created a new folder named wordpress_media_uploader and stored it under the plugin folder of my WordPress.

(Eg wwwwordpressmy-contentpluginswordpress_media_uploader)

Now, create a new file named, index.php and save it under wordpress_media_uploader folder. Copy the below code under this file.

Code


<?php

/*
Plugin Name: WordPress Media Uploader
Plugin URI: https://inkthemes.com/
Description: This plugin is basically focused on uploading images with WordPress Media Uploader. This plugin will guide you on how to integrate WordPress Media Uploader in option panel whether it is of theme or plugin.
Version: 1.0.0
Author: InkThemes
Author URI: https://www.inkthemes.com/
*/

/*
* We enclose all our functions in a class.
* Main Class - WPMU stands for WordPress Media Uploader.
*/

Class WPMU {
/* --------------------------------------------*
* Attributes
* -------------------------------------------- */

/** Refers to a single instance of this class. */

private static $instance = null;

/* Saved options */
public $options;

/* --------------------------------------------*
* Constructor
* -------------------------------------------- */

/**
* Creates or returns an instance of this class.
*
* @return WPMU_Theme_Options A single instance of this class.
*/
public static function get_instance() {

if (null == self::$instance) {
self::$instance = new self;
}

return self::$instance;
}

// end get_instance;

/**
* Initialize the plugin by setting localization, filters, and administration functions.
*/
private function __construct() {
// Add the page to the admin menu.
add_action('admin_menu', array(&$this, 'ink_menu_page'));

// Register javascript.
add_action('admin_enqueue_scripts', array(&$this, 'enqueue_admin_js'));

// Add function on admin initalization.
add_action('admin_init', array(&$this, 'ink_options_setup'));

// Call Function to store value into database.
add_action('init', array(&$this, 'store_in_database'));

// Call Function to delete image.
add_action('init', array(&$this, 'delete_image'));

// Add CSS rule.
add_action('admin_enqueue_scripts', array(&$this, 'add_stylesheet'));
}

/* --------------------------------------------*
* Functions
* -------------------------------------------- */

/**
* Function will add option page under Appearance Menu.
*/
public function ink_menu_page() {
add_theme_page('media_uploader', 'Media Uploader', 'edit_theme_options', 'media_page', array($this, 'media_uploader'));
}

//Function that will display the options page.

public function media_uploader() {
global $wpdb;
$img_path = get_option('ink_image');
?>

<form class="ink_image" method="post" action="#">
<h2> <b>Upload your Image from here </b></h2>
<input type="text" name="path" class="image_path" value="<?php echo $img_path; ?>" id="image_path">
<input type="button" value="Upload Image" class="button-primary" id="upload_image"/> Upload your Image from here.
<div id="show_upload_preview">

<?php if(! empty($img_path)){
?>
<img src="<?php echo $img_path ; ?>">
<input type="submit" name="remove" value="Remove Image" class="button-secondary" id="remove_image"/>
<?php } ?>
</div>
<input type="submit" name="submit" class="save_path button-primary" id="submit_button" value="Save Setting">

</form>
<?php
}

//Call three JavaScript library (jquery, media-upload and thickbox) and one CSS for thickbox in the admin head.

public function enqueue_admin_js() {
wp_enqueue_script('media-upload'); //Provides all the functions needed to upload, validate and give format to files.
wp_enqueue_script('thickbox'); //Responsible for managing the modal window.
wp_enqueue_style('thickbox'); //Provides the styles needed for this window.
wp_enqueue_script('script', plugins_url('upload.js', __FILE__), array('jquery'), '', true); //It will initialize the parameters needed to show the window properly.
}

//Function that will add stylesheet file.
public function add_stylesheet(){
wp_enqueue_style( 'stylesheet', plugins_url( 'stylesheet.css', __FILE__ ));
}

// Here it check the pages that we are working on are the ones used by the Media Uploader.
public function ink_options_setup() {
global $pagenow;
if ('media-upload.php' == $pagenow || 'async-upload.php' == $pagenow) {
// Now we will replace the 'Insert into Post Button inside Thickbox'
add_filter('gettext', array($this, 'replace_window_text'), 1, 2);
// gettext filter and every sentence.
}
}

/*
* Referer parameter in our script file is for to know from which page we are launching the Media Uploader as we want to change the text "Insert into Post".
*/
function replace_window_text($translated_text, $text) {
if ('Insert into Post' == $text) {
$referer = strpos(wp_get_referer(), 'media_page');
if ($referer != '') {
return __('Upload Image', 'ink');
}
}
return $translated_text;
}

// The Function store image path in option table.
public function store_in_database(){
if(isset($_POST['submit'])){
$image_path = $_POST['path'];
update_option('ink_image', $image_path);
}
}

// Below Function will delete image.
function delete_image() {
if(isset($_POST['remove'])){
global $wpdb;
$img_path = $_POST['path'];

// We need to get the images meta ID.
$query = "SELECT ID FROM wp_posts where guid = '" . esc_url($img_path) . "' AND post_type = 'attachment'";
$results = $wpdb->get_results($query);

// And delete it
foreach ( $results as $row ) {
wp_delete_attachment( $row->ID ); //delete the image and also delete the attachment from the Media Library.
}
delete_option('ink_image'); //delete image path from database.
}
}

}
// End class

WPMU::get_instance();

?>

I have explained the code, so that you can customize it according to your requirement.

Explanation of Code :

This file contain code for the following functions-

Create a new plugin and enter its details like plugin name, plugin URI, description, version, author info etc.

Create a main class named, WPMU that encloses following functions-

Function get_instance() – create or return instance of the class.

Function function_construct() used to perform following actions –

Note: Functions called under add_action() defined below.

  • add_action(‘admin_menu’, array(&$this, ‘ink_menu_page’)) – call to a function ink_menu_page and add its content to the admin menu.
  • add_action(‘admin_enqueue_scripts’, array(&$this, ‘enqueue_admin_js’)) – call to a function enqueue_admin_js and enqueue script to the admin panel.
  • add_action(‘admin_init’, array(&$this, ‘ink_options_setup’)) – add function ink_options_setup on admin initialization.
  • add_action(‘init’, array(&$this, ‘store_in_database’)) – call to a function store_in_database to store value into the database.
  • add_action(‘init’, array(&$this, ‘delete_image’)) – call to a function delete_image to delete the image.
  • add_action(‘admin_enqueue_scripts’, array(&$this, ‘add_stylesheet’)); – call to a function add_stylesheet and add style to admin area.

Function ink_menu_page() – This function add option page under appearance menu and give a call to media_uploader function.

Function media_uploader() – This function consists of page contents like input fields, buttons that you want to display in front end, you will be clear from the below image.

media uploader option

Function enqueue_admin_js() – This function includes javascript library and one CSS in the admin area. It is compulsory to embed listed built-in scripts like thickbox and media upload

wp_enqueue_script(‘media-upload’) – provides all the functions needed to upload, validate and give format to files

wp_enqueue_script(‘thickbox’) – managing the modal window wp_enqueue_style (‘thickbox’) – provides the styles needed for this window

wp_enqueue_script (‘script’, plugins_url(‘upload.js’, __FILE__), array(‘jquery’), ”, true)– Initialize the parameters needed to show the window properly

Like plugins_url() – used to specify the URL of the javascript file

Function add_stylesheet() – This function helps to enqueue stylesheet file, named stylesheet.css

Function ink_options_setup() – This function check working pages are media uploader pages or not and give a call to function replace_window_text

Function replace_window_text() – This function helps to change the button text of the media uploader launching page. You will be clear from the below image

upload image button

Function store_in_database() – This function help to store image path in the option table of the WordPress database.

Function delete_image() – This function helps to delete the image and its URL from both media library as well as database.

2. JavaScript File – upload.js

Create a javascript file named, upload.js and save it under wordpress_media_uploader folder.

Code


$j = jQuery.noConflict();
$j(document).ready(function() {

/* user clicks button on custom field, runs below code that opens new window */
$j('#upload_image').click(function() {

/*Thickbox function aimed to show the media window. This function accepts three parameters:
*
* Name of the window: "In our case Upload a Image"
* URL : Executes a WordPress library that handles and validates files.
* ImageGroup : As we are not going to work with groups of images but just with one that why we set it false.
*/
tb_show('Upload a Image', 'media-upload.php?referer=media_page&type=image&TB_iframe=true&post_id=0', false);
return false;
});
// window.send_to_editor(html) is how WP would normally handle the received data. It will deliver image data in HTML format, so you can put them wherever you want.

window.send_to_editor = function(html) {
var image_url = $j('img', html).attr('src');
$j('#image_path').val(image_url);
tb_remove(); // calls the tb_remove() of the Thickbox plugin
$j('#submit_button').trigger('click');
}

});

Explanation of Code :

File contain code for the following-

When user click on upload image button then WordPress media uploader window opens.

On button click event launches a Thickbox function named tb_show() which accepts three parameters in it.

Let’s have a look to its parameters one by one.

function parameters

First parameter: name of the window : here it is named as Upload a Image

upload a image option

Second parameter: This parameter is divided into sub parameters –

WordPress uses a file named media-upload.php to manage window.

Media uploader launching page.

Type of the file, here it is image. You can also use audio, video, or file etc.

TB_iframe : always set this parameter as true, so that window shown in an iframe.

post_id : set id as 0 which means image will not be attached to any post.

Third parameter: Set this option as false when you are not going to work with group of images.

send_to_editor – This is an event which delivers image data in HTML format so that you can put them wherever you want.

tb_remove() – Close the thickbox window automatically after submitting image.

3. CSS File – stylesheet.css

Create a CSS file named, stylesheet.css and save it under wordpress_media_uploader folder.

This file contains code to set the margin and padding of the image and button that appear in the front end. Moreover, you can also customize the code according to you.

Code


/*
Created on : Jun 5, 2018, 12:58:19 PM
Author : InkThemes
*/
.ink_image{
margin: 50px 0px 0px 40px;
}

.image_path{
width: 280px;
margin: 20px 10px 20px 0px;
}

#upload_image{
margin: 20px 4px 20px 0px;
}

#show_upload_preview{
margin-bottom: 20px;
}

#remove_image{
margin-left: 15px;

}

Screenshots

1. Go to Dashboard -> Appearance -> Media Uploader and then click on Upload Image button.

upload functionality

2. Click on Select Files button.

learn media upload function in wordpress

3. Select the image that you want to upload from the folder .

wordpress images attachment coding

4. You can adjust the image size or fill respective fields and then go for final Upload Image option.

function code for images upload

5. Image is successfully uploaded and appear under your WordPress dashboard.

icon

6. You can also check the upload folder of your WordPress which consists of uploaded image in it.

learn media upload function in wordpress

Conclusion

I hope above code is clear to you and you can use it correctly to implement its functionality. Moreover, you can customize the code as per your requirement and in case you need any help, free to share in the comment section. I will definitely help you out.

Also, share your thoughts about the post and how much you find it helpful to you. I will be glad to know that :)

You might also be interested in:


728x90

SQL performance tuning can be an incredibly difficult task, particularly when working with large-scale data where even the most minor change can have a dramatic (positive or negative) impact on performance.

In mid-sized and large companies, most SQL performance tuning will be handled by a Database Administrator (DBA). But believe me, there are plenty of developers out there who have to perform DBA-like tasks. Further, in many of the companies I’ve seen that do have DBAs, they often struggle to work well with developers—the positions simply require different modes of problem solving, which can lead to disagreement among coworkers.

When working with large-scale data, even the most minor change can have a dramatic impact on performance.

On top of that, corporate structure can also play a role. Say the DBA team is placed on the 10th floor with all of their databases, while the devs are on the 15th floor, or even in a different building under a completely separate reporting structure—it’s certainly hard to work together smoothly under these conditions.  In this article, I’d like to accomplish two things:

  1. Provide developers with some developer-side SQL performance tuning techniques.
  2. Explain how developers and DBAs can work together effectively.

SQL Performance Tuning (in the Codebase): Indexes

If you’re a complete newcomer to databases and even asking yourself “What is SQL performance tuning?”, you should know that indexing is an effective way to tune your SQL database that is often neglected during development. In basic terms, an index is a data structure that improves the speed of data retrieval operations on a database table by providing rapid random lookups and efficient access of ordered records. This means that once you’ve created an index, you can select or sort your rows faster than before.

Indexes are also used to define a primary-key or unique index which will guarantee that no other columns have the same values. Of course, database indexing is a vast an interesting topic to which I can’t do justice with this brief description (but here’s a more detailed write-up).

If you’re new to indexes, I recommend using this diagram when structuring your queries: This diagram illustrates a few SQL performance tuning tips every developer should know.

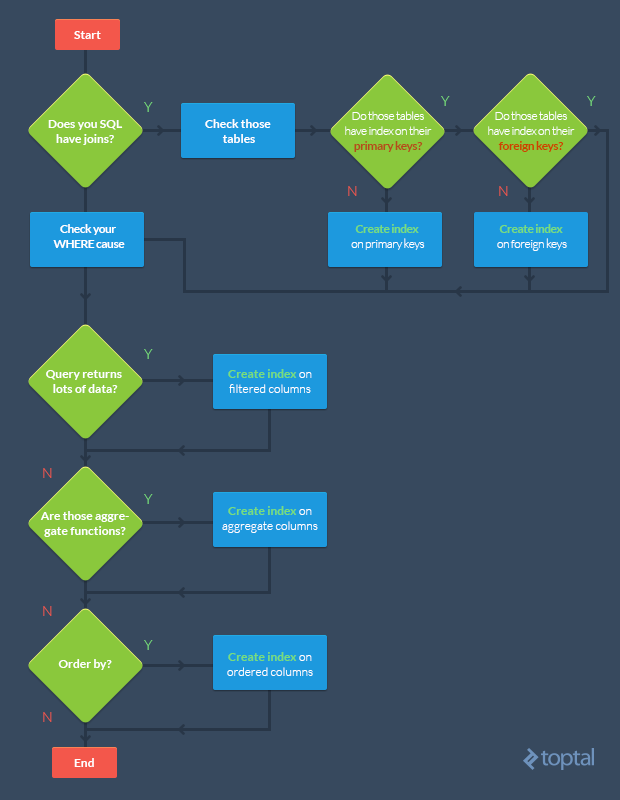
Basically, the goal is to index the major searching and ordering columns.

Note that if your tables are constantly hammered by INSERTUPDATE, and DELETE, you should be careful when indexing—you could end up decreasing performance as all indexes need to be modified after these operations.

Further, DBAs often drop their SQL indexes before performing batch inserts of million-plus rows to speed up the insertion process. After the batch is inserted, they then recreate the indexes. Remember, however, that dropping indexes will affect every query running in that table; so this approach is only recommended when working with a single, large insertion.

SQL Tuning: Execution Plans in SQL Server

By the way: the Execution Plan tool in SQL Server can be useful for creating indexes.

Its main function is to graphically display the data retrieval methods chosen by the SQL Server query optimizer. If you’ve never seen them before, there’s a detailed walkthrough.

To retrieve the execution plan (in SQL Server Management Studio), just click “Include Actual Execution Plan” (CTRL + M) before running your query.

Afterwards, a third tab named “Execution Plan” will appear. You might see a detected missing index. To create it, just right click in the execution plan and choose the “Missing Index Details…”. It’s as simple as that!

This screenshot demonstrates one of the performance tuning techniques for your SQL database.

(Click to zoom)

SQL Tuning: Avoid Coding Loops

Imagine a scenario in which 1000 queries hammer your database in sequence. Something like:

for (int i = 0; i < 1000; i++)
{
    SqlCommand cmd = new SqlCommand("INSERT INTO TBL (A,B,C) VALUES...");
    cmd.ExecuteNonQuery();
}

You should avoid such loops in your code. For example, we could transform the above snippet by using a unique INSERT or UPDATE statement with multiple rows and values:

INSERT INTO TableName (A,B,C) VALUES (1,2,3),(4,5,6),(7,8,9) -- SQL SERVER 2008

INSERT INTO TableName (A,B,C) SELECT 1,2,3 UNION ALL SELECT 4,5,6 -- SQL SERVER 2005

UPDATE TableName SET A = CASE B
        WHEN 1 THEN 'NEW VALUE'
        WHEN 2 THEN 'NEW VALUE 2'
        WHEN 3 THEN 'NEW VALUE 3'
    END
WHERE B in (1,2,3)

Make sure that your WHERE clause avoids updating the stored value if it matches the existing value. Such a trivial optimization can dramatically increase SQL query performance by updating only hundreds of rows instead thousands. For example:

UPDATE TableName
SET A = @VALUE
WHERE
      B = 'YOUR CONDITION'
            AND A <> @VALUE -- VALIDATION

SQL Tuning: Avoid Correlated SQL Subqueries

correlated subquery is one which uses values from the parent query. This kind of SQL query tends to run row-by-row, once for each row returned by the outer query, and thus decreases SQL query performance. New SQL developers are often caught structuring their queries in this way—because it’s usually the easy route.

Here’s an example of a correlated subquery:

SELECT c.Name, 
       c.City,
       (SELECT CompanyName FROM Company WHERE ID = c.CompanyID) AS CompanyName 
FROM Customer c

In particular, the problem is that the inner query (SELECT CompanyName…) is run for each row returned by the outer query (SELECT c.Name…). But why go over the Company again and again for every row processed by the outer query?

A more efficient SQL performance tuning technique would be to refactor the correlated subquery as a join:

SELECT c.Name, 
       c.City, 
       co.CompanyName 
FROM Customer c 
	LEFT JOIN Company co
		ON c.CompanyID = co.CompanyID

In this case, we go over the Company table just once, at the start, and JOIN it with the Customer table. From then on, we can select the values we need (co.CompanyName) more efficiently.

SQL Tuning: Select Sparingly

One of my favorite SQL optimization tips is to avoid SELECT *! Instead, you should individually include the specific columns that you need. Again, this sounds simple, but I see this error all over the place. Consider a table with hundreds of columns and millions of rows—if your application only really needs a few columns, there’s no sense in querying for all the data. It’s a massive waste of resources. (For more issues, see here.)

For example:

SELECT * FROM Employees

vs.

SELECT FirstName, City, Country FROM Employees

If you really need every column, explicitly list every column. This isn’t so much a rule, but rather, a means of preventing future system errors and additional SQL performance tuning. For example, if you’re using an INSERT... SELECT... and the source table has changed via the addition of a new column, you might run into issues, even if that column isn’t needed by the destination table, e.g.:

INSERT INTO Employees SELECT * FROM OldEmployees

Msg 213, Level 16, State 1, Line 1
Insert Error: Column name or number of supplied values does not match table definition.

To avoid this kind of error from SQL Server, you should declare each column individually:

INSERT INTO Employees (FirstName, City, Country)
SELECT Name, CityName, CountryName
FROM OldEmployees

Note, however, that there are some situations where the use of SELECT * could be appropriate. For example, with temp tables—which leads us to our next topic.

SQL Tuning: The Wise Use of Temporary Tables (#Temp)

Temporary tables usually increase a query’s complexity. If your code can be written in a simple, straightforward manner, I’d suggest avoiding temp tables.

But if you have a stored procedure with some data manipulation that cannot be handled with a single query, you can use temp tables as intermediaries to help you to generate a final result.

When you have to join a large table and there are conditions on said table, you can increase database performance by transferring your data in a temp table, and then making a join on that. Your temp table will have fewer rows than the original (large) table, so the join will finish faster!

The decision isn’t always straightforward, but this example will give you a sense for situations in which you might want to use temp tables:

Imagine a customer table with millions of records. You have to make a join on a specific region. You can achieve this by using a SELECT INTO statement and then joining with the temp table:

SELECT * INTO #Temp FROM Customer WHERE RegionID = 5
SELECT r.RegionName, t.Name FROM Region r JOIN #Temp t ON t.RegionID = r.RegionID

(Note: some SQL developers also avoid using SELECT INTO to create temp tables, saying that this command locks the tempdb database, disallowing other users from creating temp tables. Fortunately, this is fixed in 7.0 and later.)

As an alternative to temp tables, you might consider using a subquery as a table:

SELECT r.RegionName, t.Name FROM Region r 
JOIN (SELECT * FROM Customer WHERE RegionID = 5) AS t 
ON t.RegionID = r.RegionID

But wait! There’s a problem with this second query. As described above, we should only be including the columns we need in our subquery (i.e., not using SELECT *). Taking that into account:

SELECT r.RegionName, t.Name FROM Region r 
JOIN (SELECT Name, RegionID FROM Customer WHERE RegionID = 5) AS t 
ON t.RegionID = r.RegionID

All of these SQL snippets will return the same data. But with temp tables, we could, for example, create an index in the temp table to improve performance. There’s some good discussion here on the differences between temporary tables and subqueries.

Finally, when you’re done with your temp table, delete it to clear tempdb resources, rather than just wait for it to be automatically deleted (as it will be when your connection to the database is terminated):

DROP TABLE #temp

SQL Tuning: “Does My Record Exist?”

This SQL optimization technique concerns the use of EXISTS(). If you want to check if a record exists, use EXISTS() instead of COUNT(). While COUNT() scans the entire table, counting up all entries matching your condition, EXISTS() will exit as soon as it sees the result it needs. This will give you better performance and clearer code.

IF (SELECT COUNT(1) FROM EMPLOYEES WHERE FIRSTNAME LIKE '%JOHN%') > 0
    PRINT 'YES' 

vs.

IF EXISTS(SELECT FIRSTNAME FROM EMPLOYEES WHERE FIRSTNAME LIKE '%JOHN%')
    PRINT 'YES'

SQL Performance Tuning With SQL Server 2016

As DBAs working with SQL Server 2016 are likely aware, the version marked an important shift in defaults and compatibility management. As a major version, it of course comes with new query optimizations, but control over whether they’re used is now streamlined via sys.databases.compatibility_level.

SQL Performance Tuning (in the Office)

SQL database administrators (DBAs) and developers often clash over data- and non-data-related issues. Drawn from my experience, here are some tips (for both parties) on how to get along and work together effectively.

SQL performance tuning goes beyond the codebase when DBAs and developers have to work together effectively.

Like what you're reading?
Get the latest updates first.
No spam. Just great engineering posts.

Database Optimization for Developers:

  1. If your application stops working suddenly, it may not be a database issue. For example, maybe you have a network problem. Investigate a bit before you accuse a DBA!

  2. Even if you’re a ninja SQL data modeler, ask a DBA to help you with your relational diagram. They have a lot to share and offer.

  3. DBAs don’t like rapid changes. This is natural: they need to analyze the database as a whole and examine the impact of any changes from all angles. A simple change in a column can take a week to be implemented—but that’s because an error could materialize as huge losses for the company. Be patient!

  4. Do not ask SQL DBAs to make data changes in a production environment. If you want access to the production database, you have to be responsible for all your own changes.

Database Optimization for SQL Server DBAs:

  1. If you don’t like people asking you about the database, give them a real-time status panel. Developers are always suspicious of a database’s status, and such a panel could save everyone time and energy.

  2. Help developers in a test/quality assurance environment. Make it easy to simulate a production server with simple tests on real-world data. This will be a significant time-saver for others as well as yourself.

  3. Developers spend all day on systems with frequently-changed business logic. Try to understand this world being more flexible, and be able to break some rules in a critical moment.

  4. SQL databases evolve. The day will come when you have to migrate your data to a new version. Developers count on significant new functionality with each new version. Instead of refusing to accept their changes, plan ahead and be ready for the migration.

UNDERSTANDING THE BASICS

What is query processing in a DBMS?

Database management systems like SQL Server have to translate the SQL queries you give them into the actual instructions they have to perform to read or change the data in the database. After processing, the database engine then also attempts to automatically optimize the query where possible.


'DB' 카테고리의 다른 글

두 날짜 사이의 날짜를 선택하는 SQL 쿼리sql  (0) 2018.04.26
PATH=$PATH:/usr/local/mysql/bin;  (0) 2018.04.19
[MSSQL]sqlsrv_fetch_array  (0) 2018.02.05
[MSSQL]sqlsrv_execute  (0) 2018.02.05
jQuery mouseleave()  (0) 2018.01.14
728x90
$name="Kumkum";
$email="kumkum@gmail.com";
$phone="3456734567";
$country="India";
$course="Database";
$message="hello i want to read db";
$now = new DateTime();
$datesent=$now->format('Y-m-d H:i:s');    
global $wpdb;
$sql = $wpdb->prepare(
 "INSERT INTO `wp_submitted_form`      (`name`,`email`,`phone`,`country`,`course`,`message`,`datesent`) values ("
 $name, $email, $phone, $country, $course, $message, $datesent. ')")';

$wpdb->query($sql);

It's not working... It throws error... Please help me in correcting it.

    Use $wpdb->insert().

    $wpdb->insert('wp_submitted_form', array(
        'name' => 'Kumkum',
        'email' => 'kumkum@gmail.com',
        'phone' => '3456734567', // ... and so on
    ));

      Just use wpdb->insert(tablename, coloumn, format) and wp will prepare that's query

      <?php
      global $wpdb;
      $wpdb->insert("wp_submitted_form", array(
         "name" => $name,
         "email" => $email,
         "phone" => $phone,
         "country" => $country,
         "course" => $course,
         "message" => $message,
         "datesent" => $now ,
      ));
      ?>

        You have to check your quotes properly,

        $sql = $wpdb->prepare(
            "INSERT INTO `wp_submitted_form`      
               (`name`,`email`,`phone`,`country`,`course`,`message`,`datesent`) 
         values ($name, $email, $phone, $country, $course, $message, $datesent)");
        $wpdb->query($sql);

        OR you can use like,

        $sql = "INSERT INTO `wp_submitted_form`
                  (`name`,`email`,`phone`,`country`,`course`,`message`,`datesent`) 
           values ($name, $email, $phone, $country, $course, $message, $datesent)";
        
        $wpdb->query($sql);

        Read http://codex.wordpress.org/Class_Reference/wpdb

          Try this

          I recently leaned about $wpdb->prepare HERE and added into our Free Class Booking plugin, plugin approved on wordpress.org and will live soon:

          global $wpdb;
          $tablename = $wpdb->prefix . "submitted_form";
          
          $name     = "Kumkum"; //string value use: %s
          $email    = "kumkum@gmail.com"; //string value use: %s
          $phone    = "3456734567"; //numeric value use: %d
          $country  = "India"; //string value use: %s
          $course   = "Database"; //string value use: %s
          $message  = "hello i want to read db"; //string value use: %s
          $now      = new DateTime(); //string value use: %s
          $datesent = $now->format('Y-m-d H:i:s'); //string value use: %s
          
          $sql = $wpdb->prepare("INSERT INTO `$tablename` (`name`, `email`, `phone`, `country`, `course`, `message`, `datesent`) values (%s, %s, %d, %s, %s, %s, %s)", $name, $email, $phone, $country, $course, $message, $datesent);
          
          $wpdb->query($sql);


          + Recent posts