728x90

The ItemReader and ItemWriter interfaces are both very useful for their specific tasks, but what if you want to insert business logic before writing? One option for both reading and writing is to use the composite pattern: Create an ItemWriter that contains another ItemWriter or an ItemReader that contains another ItemReader. The following code shows an example:

public class CompositeItemWriter<T> implements ItemWriter<T> {

    ItemWriter<T> itemWriter;

    public CompositeItemWriter(ItemWriter<T> itemWriter) {
        this.itemWriter = itemWriter;
    }

    public void write(Chunk<? extends T> items) throws Exception {
        //Add business logic here
       itemWriter.write(items);
    }

    public void setDelegate(ItemWriter<T> itemWriter){
        this.itemWriter = itemWriter;
    }
}
Copied!

The preceding class contains another ItemWriter to which it delegates after having provided some business logic. This pattern could easily be used for an ItemReader as well, perhaps to obtain more reference data based on the input that was provided by the main ItemReader. It is also useful if you need to control the call to write yourself. However, if you only want to “transform” the item passed in for writing before it is actually written, you need not write yourself. You can just modify the item. For this scenario, Spring Batch provides the ItemProcessor interface, as the following interface definition shows:

public interface ItemProcessor<I, O> {

    O process(I item) throws Exception;
}
Copied!

An ItemProcessor is simple. Given one object, transform it and return another. The provided object may or may not be of the same type. The point is that business logic may be applied within the process, and it is completely up to the developer to create that logic. An ItemProcessor can be wired directly into a step. For example, assume an ItemReader provides a class of type Foo and that it needs to be converted to type Bar before being written out. The following example shows an ItemProcessor that performs the conversion:

public class Foo {}

public class Bar {
    public Bar(Foo foo) {}
}

public class FooProcessor implements ItemProcessor<Foo, Bar> {
    public Bar process(Foo foo) throws Exception {
        //Perform simple transformation, convert a Foo to a Bar
        return new Bar(foo);
    }
}

public class BarWriter implements ItemWriter<Bar> {
    public void write(Chunk<? extends Bar> bars) throws Exception {
        //write bars
    }
}
Copied!


In the preceding example, there is a class named Foo, a class named Bar, and a class named FooProcessor that adheres to the ItemProcessor interface. The transformation is simple, but any type of transformation could be done here. The BarWriter writes Bar objects, throwing an exception if any other type is provided. Similarly, the FooProcessor throws an exception if anything but a Foo is provided. The FooProcessor can then be injected into a Step, as the following example shows:

Java Configuration
@Bean
public Job ioSampleJob(JobRepository jobRepository, Step step1) {
	return new JobBuilder("ioSampleJob", jobRepository)
				.start(step1)
				.build();
}

@Bean
public Step step1(JobRepository jobRepository, PlatformTransactionManager transactionManager) {
	return new StepBuilder("step1", jobRepository)
				.<Foo, Bar>chunk(2, transactionManager)
				.reader(fooReader())
				.processor(fooProcessor())
				.writer(barWriter())
				.build();
}
Copied!

A difference between ItemProcessor and ItemReader or ItemWriter is that an ItemProcessor is optional for a Step.


A difference between ItemProcessor and ItemReader or ItemWriter is that an ItemProcessor is optional for a Step.

Chaining ItemProcessors

Performing a single transformation is useful in many scenarios, but what if you want to “chain” together multiple ItemProcessor implementations? You can do so by using the composite pattern mentioned previously. To update the previous, single transformation, example, Foo is transformed to Bar, which is transformed to Foobar and written out, as the following example shows:

public class Foo {}

public class Bar {
    public Bar(Foo foo) {}
}

public class Foobar {
    public Foobar(Bar bar) {}
}

public class FooProcessor implements ItemProcessor<Foo, Bar> {
    public Bar process(Foo foo) throws Exception {
        //Perform simple transformation, convert a Foo to a Bar
        return new Bar(foo);
    }
}

public class BarProcessor implements ItemProcessor<Bar, Foobar> {
    public Foobar process(Bar bar) throws Exception {
        return new Foobar(bar);
    }
}

public class FoobarWriter implements ItemWriter<Foobar>{
    public void write(Chunk<? extends Foobar> items) throws Exception {
        //write items
    }
}
Copied!


A FooProcessor and a BarProcessor can be 'chained' together to give the resultant Foobar, as shown in the following example:

CompositeItemProcessor<Foo,Foobar> compositeProcessor =
                                       CompositeItemProcessor<Foo,Foobar>();
List itemProcessors =  ArrayList();
itemProcessors.add( FooProcessor());
itemProcessors.add( BarProcessor());
compositeProcessor.setDelegates(itemProcessors);

Just as with the previous example, you can configure the composite processor into the Step:

@Bean
public Job ioSampleJob(JobRepository jobRepository, Step step1) {
	return new JobBuilder("ioSampleJob", jobRepository)
				.start(step1)
				.build();
}

@Bean
public Step step1(JobRepository jobRepository, PlatformTransactionManager transactionManager) {
	return new StepBuilder("step1", jobRepository)
				.<Foo, Foobar>chunk(2, transactionManager)
				.reader(fooReader())
				.processor(compositeProcessor())
				.writer(foobarWriter())
				.build();
}

@Bean
public CompositeItemProcessor compositeProcessor() {
	List<ItemProcessor> delegates = new ArrayList<>(2);
	delegates.add(new FooProcessor());
	delegates.add(new BarProcessor());

	CompositeItemProcessor processor = new CompositeItemProcessor();

	processor.setDelegates(delegates);

	return processor;
}
Copied!


Filtering Records

One typical use for an item processor is to filter out records before they are passed to the ItemWriter. Filtering is an action distinct from skipping. Skipping indicates that a record is invalid, while filtering indicates that a record should not be written.

For example, consider a batch job that reads a file containing three different types of records: records to insert, records to update, and records to delete. If record deletion is not supported by the system, we would not want to send any deletable records to the ItemWriter. However, since these records are not actually bad records, we would want to filter them out rather than skip them. As a result, the ItemWriter would receive only insertable and updatable records.

To filter a record, you can return null from the ItemProcessor. The framework detects that the result is null and avoids adding that item to the list of records delivered to the ItemWriter. An exception thrown from the ItemProcessor results in a skip.

* Core Part

Validating Input

The ItemReaders and ItemWriters chapter discusses multiple approaches to parsing input. Each major implementation throws an exception if it is not “well formed.” The FixedLengthTokenizer throws an exception if a range of data is missing. Similarly, attempting to access an index in a RowMapper or FieldSetMapper that does not exist or is in a different format than the one expected causes an exception to be thrown. All of these types of exceptions are thrown before read returns. However, they do not address the issue of whether or not the returned item is valid. For example, if one of the fields is an age, it cannot be negative. It may parse correctly, because it exists and is a number, but it does not cause an exception. Since there are already a plethora of validation frameworks, Spring Batch does not attempt to provide yet another. Rather, it provides a simple interface, called Validator, that you can implement by any number of frameworks, as the following interface definition shows:

 {

    ;

}

The contract is that the validate method throws an exception if the object is invalid and returns normally if it is valid. Spring Batch provides an ValidatingItemProcessor, as the following bean definition shows:

Java
XML

Java Configuration

{
	ValidatingItemProcessor processor =  ValidatingItemProcessor();

	processor.setValidator(validator());

	 processor;
}

{
	SpringValidator validator =  SpringValidator();

	validator.setValidator( TradeValidator());

	 validator;
}

You can also use the BeanValidatingItemProcessor to validate items annotated with the Bean Validation API (JSR-303) annotations. For example, consider the following type Person:

{

     String name;

    {
     .name = name;
    }

    {
      name;
    }

    {
     .name = name;
    }

}

You can validate items by declaring a BeanValidatingItemProcessor bean in your application context and register it as a processor in your chunk-oriented step:

{
    BeanValidatingItemProcessor<Person> beanValidatingItemProcessor =  BeanValidatingItemProcessor<>();
    beanValidatingItemProcessor.setFilter();

     beanValidatingItemProcessor;
}

Fault Tolerance

When a chunk is rolled back, items that have been cached during reading may be reprocessed. If a step is configured to be fault-tolerant (typically by using skip or retry processing), any ItemProcessor used should be implemented in a way that is idempotent. Typically that would consist of performing no changes on the input item for the ItemProcessor and updating only the instance that is the result.


https://docs.spring.io/spring-batch/reference/processor.html

728x90

All batch processing can be described in its most simple form as reading in large amounts of data, performing some type of calculation or transformation, and writing the result out. Spring Batch provides three key interfaces to help perform bulk reading and writing: ItemReader, ItemProcessor, and ItemWriter.

Section Summary

728x90

jobLauncher

- 배치 Job을 실행시키는 역할을 한다.

- jobLauncher.run(job, jobParameter); 로직으로 배치를 수행한다. job, jobParameter 를 인자로 받아서 jobExecution을 결과로 반환한다.

- 스프링 배치가 실행되면 jobLauncher 빈을 생성하고, jobLauncherApplicationRunner가 자동적으로 jobLauncher을 실행시킨다.


예제코드

  • JobLauncherConfiguration.java
package com.spring.batch.job;

import lombok.RequiredArgsConstructor;
import org.springframework.batch.core.Job;
import org.springframework.batch.core.Step;
import org.springframework.batch.core.StepContribution;
import org.springframework.batch.core.configuration.annotation.JobBuilderFactory;
import org.springframework.batch.core.configuration.annotation.StepBuilderFactory;
import org.springframework.batch.core.scope.context.ChunkContext;
import org.springframework.batch.core.step.tasklet.Tasklet;
import org.springframework.batch.repeat.RepeatStatus;
import org.springframework.context.annotation.Bean;
import org.springframework.context.annotation.Configuration;

/*
--job.name=launcherTestJob
 */
@Configuration
@RequiredArgsConstructor
public class JobLauncherConfiguration {

    // job 생성
    private final JobBuilderFactory jobBuilderFactory;
    private final StepBuilderFactory stepBuilderFactory;

    @Bean
    public Job launcherTestJob() {
        return this.jobBuilderFactory.get("launcherTestJob")
                /* step start */
                .start(launcherTestStep1())
                .next(launcherTestStep2())
                .build();
    }

    @Bean
    public Step launcherTestStep1() {
        return stepBuilderFactory.get("launcherTestStep1")
                .tasklet(new Tasklet() {
                    @Override
                    public RepeatStatus execute(StepContribution contribution, ChunkContext chunkContext) throws Exception {
                        System.out.println("launcherTestStep1");

                        // 동기 : 잡이 모두 끝난 후 결과 리턴
                        // 비동기 : 일단 결과를 내려주고, 내부적으로 배치 실행
                        Thread.sleep(3000);
                        return RepeatStatus.FINISHED;
                    }
                })
                .build();
    }

    @Bean
    public Step launcherTestStep2() {
        return stepBuilderFactory.get("launcherTestStep2")
                .tasklet(new Tasklet() {
                    @Override
                    public RepeatStatus execute(StepContribution contribution, ChunkContext chunkContext) throws Exception {
                        System.out.println("launcherTestStep2");
                        return RepeatStatus.FINISHED;
                    }
                })
                .build();
    }
}


동기 실행

동기로 실행되면, 배치 Job이 실행이 완료된 후에 결과값을 클라이언트에서 확인할 수 있다.


  • batch.http
POST http://localhost:8080/batch
Content-Type: application/json

{
  "id" : "seohae"
}


  • JobLauncherController.java
package com.spring.batch.web;

import lombok.RequiredArgsConstructor;
import org.springframework.batch.core.Job;
import org.springframework.batch.core.JobParameters;
import org.springframework.batch.core.JobParametersBuilder;
import org.springframework.batch.core.JobParametersInvalidException;
import org.springframework.batch.core.launch.JobLauncher;
import org.springframework.batch.core.launch.support.SimpleJobLauncher;
import org.springframework.batch.core.repository.JobExecutionAlreadyRunningException;
import org.springframework.batch.core.repository.JobInstanceAlreadyCompleteException;
import org.springframework.batch.core.repository.JobRestartException;
import org.springframework.boot.autoconfigure.batch.BasicBatchConfigurer;
import org.springframework.core.task.SimpleAsyncTaskExecutor;
import org.springframework.web.bind.annotation.PostMapping;
import org.springframework.web.bind.annotation.RequestBody;
import org.springframework.web.bind.annotation.RestController;

import java.util.Date;

@RestController
@RequiredArgsConstructor
public class JobLauncherController {
    private final Job job;
    private final JobLauncher jobLauncher; // proxy 객체

    /**
     * 동기 배치 수행
     * @param member
     * @return
     * @throws JobInstanceAlreadyCompleteException
     * @throws JobExecutionAlreadyRunningException
     * @throws JobParametersInvalidException
     * @throws JobRestartException
     */
    @PostMapping("/batch")
    public String launch(@RequestBody Member member) throws JobInstanceAlreadyCompleteException, JobExecutionAlreadyRunningException, JobParametersInvalidException, JobRestartException {
        JobParameters jobParameters = new JobParametersBuilder()
                .addString("id", member.getId())
                .addDate("date", new Date())
                .toJobParameters();

        /* batch 수행 */
        jobLauncher.run(job, jobParameters);

        // job 실행 시간이 3초일때, 3초가 지나야 아래 값이 리턴된다.
        return "batch completed";
    }
}


비동기 실행

  • asyncBatch.http
POST http://localhost:8080/async/batch
Content-Type: application/json

{
  "id" : "seohae"
}


  • JobLauncherController.java
package com.spring.batch.web;

import lombok.RequiredArgsConstructor;
import org.springframework.batch.core.Job;
import org.springframework.batch.core.JobParameters;
import org.springframework.batch.core.JobParametersBuilder;
import org.springframework.batch.core.JobParametersInvalidException;
import org.springframework.batch.core.launch.JobLauncher;
import org.springframework.batch.core.launch.support.SimpleJobLauncher;
import org.springframework.batch.core.repository.JobExecutionAlreadyRunningException;
import org.springframework.batch.core.repository.JobInstanceAlreadyCompleteException;
import org.springframework.batch.core.repository.JobRestartException;
import org.springframework.boot.autoconfigure.batch.BasicBatchConfigurer;
import org.springframework.core.task.SimpleAsyncTaskExecutor;
import org.springframework.web.bind.annotation.PostMapping;
import org.springframework.web.bind.annotation.RequestBody;
import org.springframework.web.bind.annotation.RestController;

import java.util.Date;

@RestController
@RequiredArgsConstructor
public class JobLauncherController {
    private final Job job;
    private final JobLauncher jobLauncher; // proxy 객체

    /* SimpleJobLauncher 는 빈 등록이 불가능
     * BasicBatchConfigurer 를 주입해야한다.
     */
    private final BasicBatchConfigurer basicBatchConfigurer;

    /**
     * 비동기는 직접 SimpleJobLauncher 의 setTaskExecutor 을 설정해줘야한다.
     * SimpleJobLauncher 는 빈 등록이 불가능
     * BasicBatchConfigurer 를 주입해야한다.
     */

    /**
     * 비동기 배치 수행
     * @param member
     * @return
     * @throws JobInstanceAlreadyCompleteException
     * @throws JobExecutionAlreadyRunningException
     * @throws JobParametersInvalidException
     * @throws JobRestartException
     */
    @PostMapping("/async/batch")
    public String asyncLaunch(@RequestBody Member member) throws JobInstanceAlreadyCompleteException, JobExecutionAlreadyRunningException, JobParametersInvalidException, JobRestartException {
        JobParameters jobParameters = new JobParametersBuilder()
                .addString("id", member.getId())
                .addDate("date", new Date())
                .toJobParameters();

        /* 비동기로 수행 */
        SimpleJobLauncher jobLauncher = (SimpleJobLauncher) basicBatchConfigurer.getJobLauncher();
        jobLauncher.setTaskExecutor(new SimpleAsyncTaskExecutor());

        /*
          만약, 위 주입에서 private final JobLauncher simpleJobLauncher; 로 할 경우
          - JobLauncher 을 생성할 경우는 프록시 객체로 생성됨
          - simpleJobLauncher : 실제 객체가 아니고, 타입을 상속해서 만들어진 proxy 객체이다.
         */
        // SimpleJobLauncher jobLauncher1 = (SimpleJobLauncher) simpleJobLauncher;

        /* batch 수행 */
        jobLauncher.run(job, jobParameters);

        // // job 실행 시간이 3초일때, 일단 결과가 보여지고, 실제로 내부적으로 3초동안 배치가 실행중이다.
        return "batch completed";
    }
}


주석에도 있듯이, 비동기 실행은 SimpleJobLauncher 인스턴스를 생성해서 setTaskExecutor()를 호출해줘야한다. SimpleJobLauncher 인스턴스 생성을 위해 아래와 같은 코드가 추가되었다.


  • JobLauncherController.java
/* 비동기로 수행 */
SimpleJobLauncher jobLauncher = (SimpleJobLauncher) basicBatchConfigurer.getJobLauncher();
jobLauncher.setTaskExecutor(new SimpleAsyncTaskExecutor());


의문점

  • JobLauncherController.java
@RestController
@RequiredArgsConstructor
public class JobLauncherController {
    private final Job job;
    private final JobLauncher jobLauncher;
    .
    .
    .
}


  • SimpleJobLauncher.java
public class SimpleJobLauncher implements JobLauncher, InitializingBean {
    protected static final Log logger = LogFactory.getLog(SimpleJobLauncher.class);
    private JobRepository jobRepository;
    private TaskExecutor taskExecutor;
    
    ...
}


아래의 코드처럼 jobLauncher 을 바로 타입캐스팅해서 사용이 불가능한가?


SimpleJobLauncher jobLauncher1 = (SimpleJobLauncher) simpleJobLauncher;


불가능하다. 우선 스프링 배치에서 JobLauncherController.java 에서 주입받은 jobLauncher 객체는 프록시 객체다. 따라서 프록시 객체는 실제 객체가 아니기 때문에 SimpleJobLauncher 객체로 타입캐스팅을 할 수 없다.


해결방안

BasicBatchConfigurer을 주입한 후, SimpleJobLauncher 로 타입캐스팅 해줘야한다.


  • JobLauncherController.java
package com.spring.batch.web;

import lombok.RequiredArgsConstructor;
import org.springframework.batch.core.Job;
import org.springframework.batch.core.JobParameters;
import org.springframework.batch.core.JobParametersBuilder;
import org.springframework.batch.core.JobParametersInvalidException;
import org.springframework.batch.core.launch.JobLauncher;
import org.springframework.batch.core.launch.support.SimpleJobLauncher;
import org.springframework.batch.core.repository.JobExecutionAlreadyRunningException;
import org.springframework.batch.core.repository.JobInstanceAlreadyCompleteException;
import org.springframework.batch.core.repository.JobRestartException;
import org.springframework.boot.autoconfigure.batch.BasicBatchConfigurer;
import org.springframework.core.task.SimpleAsyncTaskExecutor;
import org.springframework.web.bind.annotation.PostMapping;
import org.springframework.web.bind.annotation.RequestBody;
import org.springframework.web.bind.annotation.RestController;

import java.util.Date;

@RestController
@RequiredArgsConstructor
public class JobLauncherController {
    private final Job job;
    private final JobLauncher jobLauncher; // proxy 객체

    /* SimpleJobLauncher 는 빈 등록이 불가능
     * BasicBatchConfigurer 를 주입해야한다.
     */
    private final BasicBatchConfigurer basicBatchConfigurer;
	
    .
    .
    .

    // 타입캐스팅
    SimpleJobLauncher jobLauncher = (SimpleJobLauncher) basicBatchConfigurer.getJobLauncher();
    .
    .


정리

JobLauncherConfiguration 잡은 총 실행시간이 3초다. 동기 실행은 한 경우에는 클라이언트가 3초 후 배치 잡의 결과를 받을 수 있었다. 반면에 비동기 실행은 우선 결과를 받고, 내부적으로 배치가 3초동안 실행되었다.


https://devfunny.tistory.com/688


728x90

최근 셀러시스템팀에서는 하루 한 번 주기로 실행되는 배치를 최적화하는 과제를 진행했습니다.

작업 결과 좋은 성과를 얻었고 최적화를 검토하는 의사 결정 과정 자체로도 의미 있는 사례라고 생각해 경험을 공유하고자 합니다.

먼저 셀러시스템에서 관리하는 비운영 시간 데이터 설명부터 시작해 보겠습니다.

비운영 시간 데이터

셀러시스템에서는 가게와 업주에 대한 다양한 데이터를 관리합니다.

배달의민족에 입점한 사장님들이 가게의 요일별 휴무일, 임시 휴무일, 공휴일 휴무 여부, 임시 운영 중지 등 다양한 휴무 설정할 수 있는데요.

실제 가게가 노출되고 음식을 주문하는 과정에서는 ‘가게가 운영하는지 안하는지’만 중요하기 때문에

셀러시스템팀에서는 이러한 정보를 조합하여 계산된 결과만을 유관부서에 전달하기도 합니다.

이것이 바로 ‘비운영시간 데이터’입니다.

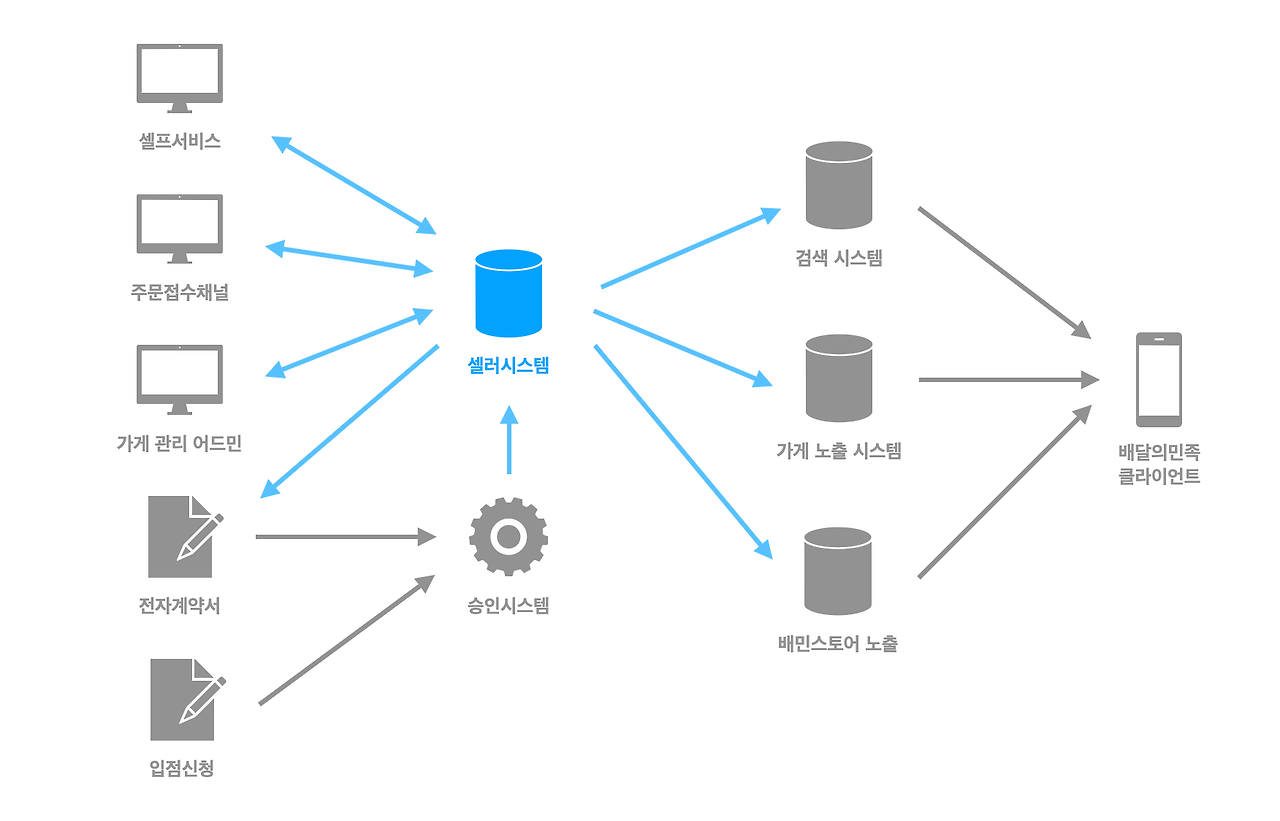
셀러시스템은 다양한 채널에서 입력되는 각종 운영과 휴무 데이터를 취합하고 비운영시간 데이터를 계산합니다.

그 후 이러한 데이터가 클라이언트까지 잘 전달될 수 있도록 각 지면에 적절한 형태로 가공하여 제공하는 역할을 합니다.

현재 연동 구조에서는 실시간으로 수정되는 정보를 반영하는 것뿐만 아니라

매일 새벽에 전체 데이터를 계산하고 그 결과를 미리 갱신해둔 후 유관부서에 전파하는 작업 또한 하고 있습니다.

운영시간 데이터에 대한 좀 더 자세한 정보가 궁금하시다면 아래 글도 참고하시기 바랍니다.
현실 타협은 후퇴다! 안 되는 일을 되게 만드는 PM이란?

문제 상황

새벽에 배치 작업을 할 때, 배달의민족에 등록된 수많은 가게의 데이터를 매일 갱신하기 때문에 배치 수행 시간이 상당히 오래 걸립니다.

이른 새벽에 배치가 실행되는 덕분에 일과 시간 이전에 배치가 모두 끝나고 DB 부하도 큰 수준은 아니어서 여태까지는 큰 문제없이 운영되고 있었습니다.

하지만 최근 배포를 새벽에 진행할 일이 여러 번 있었는데요.

배포를 할 때마다 배포 예정 시간과 배치 실행 시간이 겹치는 바람에, 배치가 없었다면 매끄럽게 진행될 배포가 여러 번 복잡한 절차를 밟아 진행할 필요가 생겼습니다.

팀에서는 이렇듯 새벽 시간까지 오래 실행되는 배치가 배포 및 운영에 영향을 끼치는 것은 잠재적인 리스크라고 판단하였습니다.

셀러시스템팀에서는 이러한 리스크가 발견되었을 때 당장 조치가 필요한 것이 아니라면 우선 백로그(개발을 기다리는 과제 목록)에 등록합니다.

배치 성능 개선 과제 또한 우선 백로그에 등록하였고 이후 정기적인 백로그 그루밍(백로그 항목을 살펴보고 유지 관리하는 프로세스) 회의에서 우선순위를 재평가하고, 팀원 사이에서 의견을 취합하였습니다.

그루밍 회의에서 배치 성능 개선이 필요하다는 것에 공감대가 있었고 우선순위를 높여 스프린트에서 과제를 진행하게 되었습니다.

I/O 최적화

배치 수행시간 개선을 위해 우선적으로 살펴본 부분은 I/O 병목이었습니다.

I/O (Input / Output) 병목이란?

컴퓨팅에서 부하를 설명할 때에는 크게 CPU 부하와 I/O 부하로 나뉩니다.

데이터를 계산하고 처리하는 과정인 CPU 부하와 달리, I/O 부하는 디스크에 파일을 읽고 쓰거나 DB 및 외부 컴포넌트와 통신하는 과정에서 발생합니다.

I/O 병목은 이러한 I/O 부하가 시스템의 전체적인 효율성을 떨어뜨리는 부분을 말합니다.

배치에서 사용하는 I/O 부하 중 가장 핵심은 DB 쿼리였기 때문에

코드 및 로컬 환경에서 실제 호출하는 DB 쿼리를 살펴보면서 I/O 병목 지점을 살펴보았는데요.

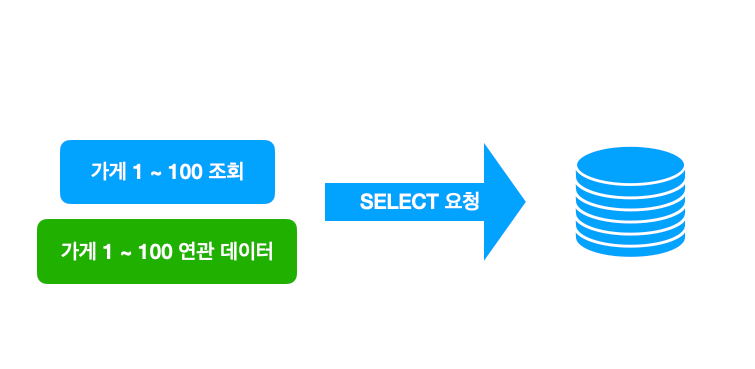
JPA 지연 로딩으로 설정된 연관 관계 엔티티를 가져오는 과정에서 N+1 문제가 발생하는 것을 확인하였습니다.

위에서 언급하였듯 비운영시간 데이터 계산을 위해서는 다양한 종류의 데이터를 가져와야 하는데요.

이러한 데이터가 모두 1 : N 구조의 연관관계로 설정되어 있어서 관련 데이터를 가져오는 데에 오랜 시간이 걸리는 것을 확인할 수 있었습니다.

N+1 문제의 해결방식은 다양한데요.

연관관계로 설정된 엔티티의 종류가 많고 실제 연관관계 데이터의 수정은 불필요하다는 점 등을 고려하여

각 엔티티 정보를 연관관계를 통해 가져오는 것이 아닌 별도 쿼리 호출을 통해 명시적으로 한 번에 읽어오게끔 수정했습니다.

수정 전

public List<LiveShopClose> generateLiveShopClose(Shop shop, LocalDate startDate, LocalDate endDate) {
    final List<ShopCalendar> shopCalendars = shopCalendarRepository.findAllByCalendarDateBetween(startDate, endDate);
    final List<ShopTemporaryClosed> shopTemporaryCloses = shop.getActiveShopTemporaryClosed();
    final List<ShopClosed> shopCloses = shop.getActiveShopClosed();
    final List<ShopOperationHour> operationHours = shop.getShopOperationHourIsType(OperationHourType.OPERATION);

    return /* LiveShopClose 데이터 생성 */
}

수정 후

List<LiveShopClose> generateLiveShopCloses(List<Long> shopNos, LocalDate startDate, LocalDate endDate) {
    List<ShopNo> shopNoEntities = shopNos.stream().map(ShopNo::new).collect(Collectors.toList());

    List<ShopCalendar> shopCalendars = shopCalendarRepository.findAllByCalendarDateBetween(startDate, endDate);
    Map<Long, List<ShopTemporaryClosed>> activeShopTemporaryClosedMap =
            shopTemporaryClosedRepository.findActiveByShopNos(shopNoEntities).stream()
                    .collect(groupingBy(ShopTemporaryClosed::getShopNo, Collectors.toList()));
    Map<Long, List<ShopClosed>> activeShopClosedMap =
            shopClosedRepository.findActiveByShopNos(shopNoEntities).stream()
                    .collect(groupingBy(ShopClosed::getShopNo, Collectors.toList()));
    Map<Long, List<ShopOperationHour>> operationHoursMap =
            shopOperationHoursRepository.findOperationHoursByShopNos(shopNoEntities).stream()
                    .collect(groupingBy(ShopOperationHour::getShopNo, Collectors.toList()));

    return shopNos.stream()
            .flatMap(shopNo -> generateLiveShopClose(
                    shopNo,
                    shopCalendars,
                    ListUtils.emptyIfNull(activeShopTemporaryClosedMap.get(shopNo)),
                    ListUtils.emptyIfNull(activeShopClosedMap.get(shopNo)),
                    ListUtils.emptyIfNull(operationHoursMap.get(shopNo))
            ).stream())
            .collect(Collectors.toList());
}

List<LiveShopClose> generateLiveShopClose(Long shopNo, List<ShopCalendar> shopCalendars,
                                          List<ShopTemporaryClosed> activeShopTemporaryCloses,
                                          List<ShopClosed> activeShopCloses,
                                          List<ShopOperationHour> operationHours) {

    return /* LiveShopClose 데이터 생성 */
}

도메인 로직 및 기타 최적화

그 다음으로는 도메인 로직을 고려해 더 최적화할 수 있는 부분이 있을지 살펴보았습니다.

현재 가게의 비운영시간 데이터가 업데이트될 경우, 변경된 가게에 대한 이벤트를 발행하고 있는데요.

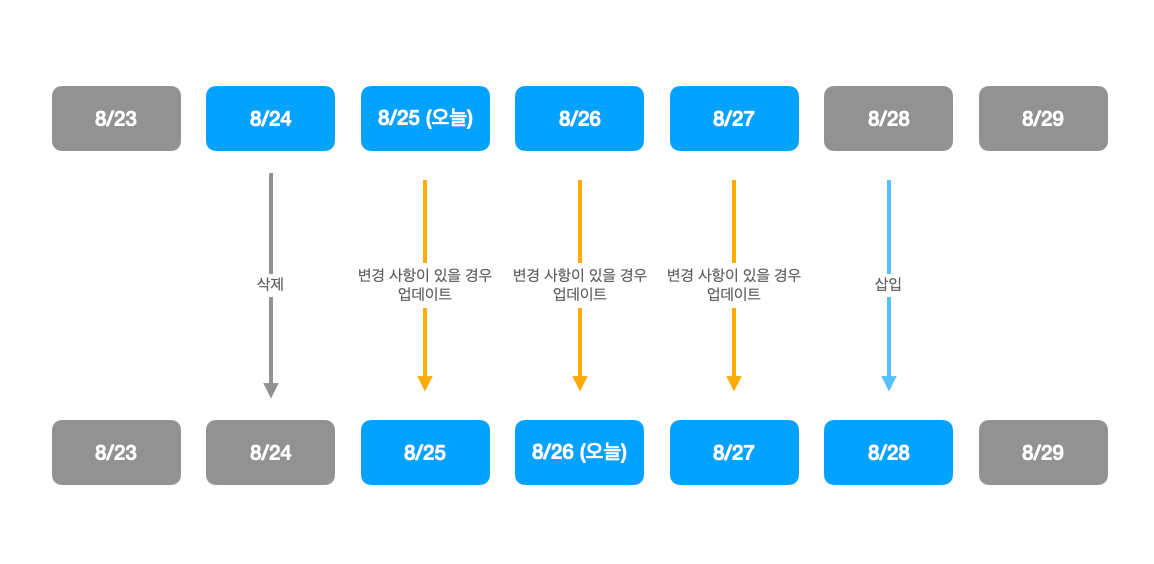
기존 로직에서는 실제 데이터의 변경 여부와는 관계없이 D-1~D+2 데이터를 무조건 재생성하기 때문에,

실제로는 데이터가 변경되지 않을 테지만 다시 데이터가 생성되어 변경 이벤트가 전송되는 케이스가 있었습니다.

이러한 케이스에 대응하여 데이터가 바뀌었는지 여부를 확인한 후 실제로 바뀐 경우에만 변경 사항을 적용하도록 개선하였습니다.

이를 통해 불필요한 DB 부하를 줄여 배치 수행시간을 줄일 수 있을 뿐만 아니라 변경 이벤트로 인한 간접적인 부하 또한 개선할 수 있었습니다.

최적화 검토

잠시 다른 얘기를 해보겠습니다.

유명한 개발 서적인 "Effective Java"(3rd ed, Joshua Bloch, 2017)에서는 아래와 같은 격언을 소개하고 있습니다.

성능 효율을 높이기 위해 컴퓨팅 업계에서는 많은 죄악이 저질러지는데(심지어 효율적이지조차 않을 때도 있다) 그 수는 그냥 멍청해서 저지르는 죄악보다 많다.

William A. Wulf (1972)

우리는 세세한 성능 효율에 대해서는 무시할 필요가 있다. 말하자면 97%가 이 경우에 해당한다. 섣부른 최적화는 만악의 근원이다.

Donald E. Knuth (1974)

우리는 최적화에 대해서 다음 두가지 규칙을 따른다.

첫째. 하지 마라.
둘째. (전문가 한정) 아직은 하지 마라. 최적화되지 않은 상태로도 완벽하게 깔끔한 해결책을 찾는 것이 먼저다.

M. A. Jackson (1975)

Java(1995년)는 물론이고 SQL(1978년)과 C++(1980년)이 등장하기도 전에 프로그래밍 대선배들은 위와 같은 발언들을 쏟아냈습니다.

최적화 얘기를 한참 하다가 최적화가 죄악이란 격언을 가져오다니 뜬금이 없으실 텐데요.

사실 이는 무작정 최적화하지 말란 것은 아니고 효율만 좇다가 득보다 실이 큰 경우를 경계하라는 뜻에 가깝다고 생각합니다.

최적화를 하기 전에 항상 아래 두가지를 검토해보면 좋을 것 같습니다.

최적화 이전에 먼저 좋은 코드를 작성하기

코드를 작성하는 데 있어서 성능을 염두에 두는 것은 물론 중요합니다.

하지만 많은 경우 대부분의 코드는 성능상 영향이 크지 않고 실제로 병목이 되는 부분은 극히 일부분입니다.

좋은 코드를 최적화하기는 쉽지만, 섣부르게 최적화된 코드를 좋은 코드로 만드는 건 어렵습니다.

빠른 코드보다는 좋은 코드를 짜는 데에 먼저 집중하고 최적화는 그 다음에 생각해야 합니다.

정량적으로 성능을 측정하면서 병목을 파악하기

정량화된 지표를 통해 실제로 병목이 되는 부분을 파악해야 합니다.

지엽적인 부분을 일일히 개선하는 마이크로 최적화는 많은 경우 100ms 를 99ms로 줄이는 것에 그칩니다.

마이크로 최적화 보다는 거시적인 관점에서 중요한 병목을 찾고 이를 구조적으로 해결하는 것이 중요합니다.

그리고 실질적으로 얼마나 빨라졌는지 정량적인 성과로 나타낼 수 있어야 합니다.

이번에 진행한 최적화는 유의미한 최적화였을까요?

우선 기존에 안정적으로 동작하며 비즈니스 로직이 명확한 코드가 있었습니다.

하지만 이러한 안정적인 코드의 수행시간이 오래 걸려 운영 및 유지보수에 있어서 잠재적인 큰 리스크라는 공감대가 있었습니다.

최적화를 위해 구조적인 병목을 찾았고 성능 테스트 결과 5배 이상 더 빨리 실행되는 것을 확인하였습니다.

베타 환경 테스트 결과, 특정 조건에서는 20배 이상 빨라지기도 하였습니다.

이 정도의 성능 개선이라면 최초 문제가 되었던 상황을 깔끔하게 해결함과 동시에

다소 복잡해진 코드를 고려해도 유의미한 최적화라는 결론을 내렸습니다.

빨라도 문제

근데 이거 빨라도 너무 빨라진 것 같습니다.

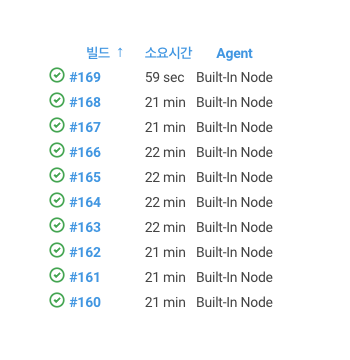
개발 환경에서의 지표를 통해 운영 환경 소요시간을 유추해 보면 6시간 걸리던 것이 1시간 조금 넘게 걸리는 것으로 나오는데요.

‘내가 뭘 놓친 게 있나?’ 아니면 ‘코드를 잘못 짰나?’ 생각이 들었지만…

설령 정상 동작하더라도 무작정 빠른 게 능사가 아니기 때문에 안정적인 서비스 제공이 가능한지 다시 검토해보았습니다.

MSA 구조에서는 애플리케이션과 직접적으로 연동되는 DB와 로드밸런서 등 뿐만 아니라

많은 모듈 및 유관부서들이 유기적으로 연결되어 있기 때문에 영향 범위를 면밀히 검토해야 합니다.

특히 위에서 한 번 간단하게 언급한 것처럼 현재는 다음과 같은 형태이기 때문에 이 부분에 문제가 없을지 주로 검토했습니다.

  • 데이터 변경이 발생하면
  • 변경 사항이 큐를 통해서 유관부서에 전달되고
  • 필요에 따라 유관부서가 추가적인 API 호출을 하는

구체적으로는 아래와 같은 사항들을 확인해보았습니다.

  • 개발 환경에서 테스트 당시 애플리케이션이 실행되는 서버의 CPU 및 I/O 지표
  • 개발 환경에서 테스트 당시 DB CPU, 쿼리 지연 시간 등 지표


  • 예상 트래픽을 산출, 현재 운영 환경에서의 피크 트래픽과 비교하여 문제가 없을지 검토
  • 변경 사항을 전달하는 큐에서 지연이 발생해도 문제가 없을지 검토

예상 트래픽 비교 및 도메인 로직 최적화 과정에서 변경이벤트 또한 상당히 많이 줄어든 점을 감안하여서

문제가 없을 것으로 확인하고 운영 환경에 배포하였습니다.

배포 이후

문제가 없을 것으로 예상하였지만 일들이 항상 마음처럼 굴러가던가요?

운영환경에서 추정했던 속도보다 더 빠르게 동작을 하는 바람에

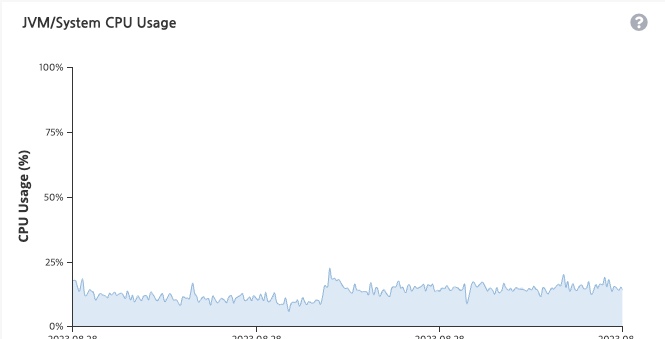
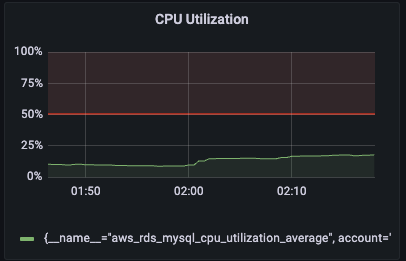
유관 부서 트래픽 또한 예상 이상으로 인입되어 DB CPU가 다소 높아지는 문제가 있었습니다.

그렇지만 너무 빨라서 발생하는 문제에 대해서 사전에 미리 검토를 해보았던 덕분에

당황하지 않고 빠르게 문제 원인을 좁히고 대응 방안을 도출할 수 있었습니다.

근본적으로는 실행 속도가 너무 빨라진 것이 문제이기 때문에

모순적이지만 우선 단기적인 대응 방안으로 의도적으로 지연 시간을 설정해 천천히 실행하도록 수정하였습니다.

@Bean(STEP_NAME)
@JobScope
public Step liveShopCloseCreateStep() {
    return stepBuilderFactory.get(STEP_NAME)
            .<Long, Long>chunk(CHUNK_SIZE)
            .reader(shopCloseScheduleReader(null))
            .writer(liveShopCloseWriter(null, null, null))
            .transactionManager(storeTransactionManager)
            .listener(new AfterChunkSleepListener(200))
            .build();
}
@Slf4j
public class AfterChunkSleepListener implements ChunkListener {
    private final long sleepMillis;

    public AfterChunkSleepListener(long sleepMillis) {
        this.sleepMillis = sleepMillis;
    }

    @Override
    public void afterChunk(ChunkContext context) {
        try {
            log.info("Chunk 실행 후 sleep {} millis. 현재 read Count : {}",
                    sleepMillis,
                    context.getStepContext().getStepExecution().getReadCount());
            TimeUnit.MILLISECONDS.sleep(sleepMillis);
        } catch (InterruptedException e) {
            log.error("Thread sleep interrupted.", e);
        }
    }

    @Override
    public void afterChunkError(ChunkContext context) {
        // 사용안함.
    }

    @Override
    public void beforeChunk(ChunkContext context) {
        // 사용안함.
    }
}

그리고 위와 같이 지연 시간을 설정해도 기존 390분이 소요되던 배치가 30분 소요되는 결과를 얻을 수 있었습니다.

마지막으로 이러한 변경이벤트를 유관부서에 전달하고 유관부서가 다시 우리 API를 호출하는 방식에 대해서

좀 더 효율적인 해결책은 없을지 고민하게 되는 계기가 되었습니다.

결론

이번 최적화 작업을 요약하면 다음과 같습니다.

  • 리스크를 확인하고 과제에 대한 우선순위를 조정하기
  • 문제 상황을 분석하고 병목을 확인하기
  • I/O의 경우 최대한 한번에 여러건을 읽고 쓰도록 하여 효율성 높이기
  • 도메인 로직을 검토하여 개선할 수 있는 부분이 있는지 살피기
  • 유의미한 최적화인가? 정량적인 지표로 다시 검토하기
  • 빨라도 문제일 수 있으니 최적화에 의한 영향 범위를 검토하고 운영 환경에서도 문제가 없을지 확인하기

대단한 알고리즘을 작성하지도, 유행하는 신규 프레임워크를 사용한 것도 아니지만

생각보다 좋은 결과를 얻었고 그 과정도 좋은 사례라고 생각되어 공유드립니다.

당연하게 생각되는 부분이라도 돌다리를 한 번 더 두드려보듯이

항상 한 번 더 고민해 본다면 누구라도 저보다 더 잘하실 수 있으리라고 생각합니다.


https://techblog.woowahan.com/13569/


누구나 할 수 있는 10배 더 빠른 배치 만들기 | 우아한형제들 기술블로그

{{item.name}} 최근 셀러시스템팀에서는 하루 한 번 주기로 실행되는 배치를 최적화하는 과제를 진행했습니다. 작업 결과 좋은 성과를 얻었고 최적화를 검토하는 의사 결정 과정 자체로도 의미 있

techblog.woowahan.com


+ Recent posts