728x90

HashiCorp develops an official VMware Fusion and VMware Workstation provider for Vagrant. This provider allows Vagrant to power VMware based machines and take advantage of the improved stability and performance that VMware software offers.

This provider allows Vagrant to power VMware based machines and take advantage of the improved stability and performance that VMware software offers. Source of an image: vagrantup.com
 

Vagrant is an open-source software product developed by Hasicorp for building and maintaining portable virtual software development environments; e.g., for VirtualBox, KVM, Hyper-V, Docker containers, VMware, and AWS. Vagrant can quickly spin up your virtual environment and tear it down after use.


Overview

  • Download and Install Vagrant
  • Install required plugins for Vagrant
  • Identify the right Vagrant boxes for & fusion environment
  • Deploy the virtual environment and connect to the server
 

We will show a small example of using Vagrant with VMware Fusion in a local environment. I use VMware Fusion Pro 13.5.

You can download VMware Fusion from: https://www.vmware.com/products/fusion/fusion-evaluation.html

https://customerconnect.vmware.com/downloads/info/slug/desktop_end_user_computing/vmware_fusion/13_0

Download and Install Vagrant

We go to the website: https://developer.hashicorp.com/vagrant/install

and download the appropriate version for the OS. In my case, I’m downloading AMD64 (Version: 2.4.0) and we will start a simple installation.


Okay, its time to validate the vagrant installation. Open the mac terminal and type “vagrant” command.

On the successful execution you can able to see all these command options and also there is a help option available to get more information abount the vagrant command line.

vagrant
Usage: vagrant [options] <command> [<args>]

    -h, --help                       Print this help.

Common commands:
     autocomplete    manages autocomplete installation on host
     box             manages boxes: installation, removal, etc.
     cloud           manages everything related to Vagrant Cloud
     destroy         stops and deletes all traces of the vagrant machine
     global-status   outputs status Vagrant environments for this user
     halt            stops the vagrant machine
     help            shows the help for a subcommand
     init            initializes a new Vagrant environment by creating a Vagrantfile
     login           
     package         packages a running vagrant environment into a box
     plugin          manages plugins: install, uninstall, update, etc.
     port            displays information about guest port mappings
     powershell      connects to machine via powershell remoting
     provision       provisions the vagrant machine
     push            deploys code in this environment to a configured destination
     rdp             connects to machine via RDP
     reload          restarts vagrant machine, loads new Vagrantfile configuration
     resume          resume a suspended vagrant machine
     serve           start Vagrant server
     snapshot        manages snapshots: saving, restoring, etc.
     ssh             connects to machine via SSH
     ssh-config      outputs OpenSSH valid configuration to connect to the machine
     status          outputs status of the vagrant machine
     suspend         suspends the machine
     up              starts and provisions the vagrant environment
     upload          upload to machine via communicator
     validate        validates the Vagrantfile
     version         prints current and latest Vagrant version
     winrm           executes commands on a machine via WinRM
     winrm-config    outputs WinRM configuration to connect to the machine

Install VMware Plugins for Vagrant

Make vagrant to communicate with VMware Fusion so we have to install VMware plugins so that vagrant can talk to VMware Fusion to create the virtual machines.

vagrant plugin install vagrant-vmware-desktop
Installing the 'vagrant-vmware-desktop' plugin. This can take a few minutes...
Fetching vagrant-vmware-desktop-3.0.3.gem
Installed the plugin 'vagrant-vmware-desktop (3.0.3)'!

See the available plugin using vagrant plugin list.

vagrant plugin list
vagrant-vmware-desktop (3.0.3, global)

To check the plugin agent you can use launch ctl command to list the vagrant vmware utility.

launchctl list | grep com.vagrant.vagrant-vmware-utility

Ref: Vagrant VMware Utility Installation and Install Vagrant VMware Utility


Install | Vagrant | HashiCorp Developer

Explore Vagrant product documentation, tutorials, and examples.

developer.hashicorp.com


이 경우에 git bash 에서 launchctl을 못찾게 되는 불상사가 생기는데..

그래서 다음 스텝으로 강제로 올려버리면


ubuntu를 사용할 경우

vagrant init bento/ubuntu-16.04
A `Vagrantfile` has been placed in this directory. You are now
ready to `vagrant up` your first virtual environment! Please read
the comments in the Vagrantfile as well as documentation on
`vagrantup.com` for more information on using Vagrant.


vagrant up
Bringing machine 'default' up with 'vmware_desktop' provider...
==> default: Box 'bento/ubuntu-16.04' could not be found. Attempting to find and install...
    default: Box Provider: vmware_desktop, vmware_fusion, vmware_workstation
    default: Box Version: >= 0
==> default: Loading metadata for box 'bento/ubuntu-16.04'
    default: URL: https://vagrantcloud.com/api/v2/vagrant/bento/ubuntu-16.04
==> default: Adding box 'bento/ubuntu-16.04' (v202112.19.0) for provider: vmware_desktop
    default: Downloading: https://vagrantcloud.com/bento/boxes/ubuntu-16.04/versions/202112.19.0/providers/vmware_desktop/unknown/vagrant.box
    default:
==> default: Successfully added box 'bento/ubuntu-16.04' (v202112.19.0) for 'vmware_desktop'!
==> default: Cloning VMware VM: 'bento/ubuntu-16.04'. This can take some time...
==> default: Checking if box 'bento/ubuntu-16.04' version '202112.19.0' is up to date...
==> default: Verifying vmnet devices are healthy...
==> default: Preparing network adapters...
==> default: Starting the VMware VM...
==> default: Waiting for the VM to receive an address...

이래도 4만년 걸리는 것은 마찬가지 

난 그래서 우분투 이미지 다운로드 받아서 쓰기로 했다. 


Identify the required Vagrant boxes

Lets identify the vagrant boxes you need to select carefully by choosing the right architecture to make the background up and running.
Go back to the vagrant portal again and look:

https://app.vagrantup.com/hashicorp/boxes/bionic64

as an example: hashicorp/bionic64

click on “new” and copy the command and paste it in the terminal window where you run the commands, i.e. locally.

vagrant init hashicorp/bionic64
A `Vagrantfile` has been placed in this directory. You are now
ready to `vagrant up` your first virtual environment! Please read
the comments in the Vagrantfile as well as documentation on
`vagrantup.com` for more information on using Vagrant.
lubomir@L-MAC ~ % vagrant box add hashicorp/bionic64
==> box: Loading metadata for box 'hashicorp/bionic64'
    box: URL: https://vagrantcloud.com/api/v2/vagrant/hashicorp/bionic64
This box can work with multiple providers! The providers that it
can work with are listed below. Please review the list and choose
the provider you will be working with.

1) hyperv
2) virtualbox
3) vmware_desktop

Enter your choice: 3
==> box: Adding box 'hashicorp/bionic64' (v1.0.282) for provider: vmware_desktop
    box: Downloading: https://vagrantcloud.com/hashicorp/boxes/bionic64/versions/1.0.282/providers/vmware_desktop/unknown/vagrant.box
==> box: Successfully added box 'hashicorp/bionic64' (v1.0.282) for 'vmware_desktop'!

So this command will create the vagrant file on the current directory and all you need to do is that just vagrant up in order to bring up this machine. The back end vagrant trying to communicate with the vmware fusion.

Deploy the virtual environment and connect to the server

vagrant up                                                   
Bringing machine 'default' up with 'vmware_desktop' provider...
==> default: Cloning VMware VM: 'hashicorp/bionic64'. This can take some time...
==> default: Checking if box 'hashicorp/bionic64' version '1.0.282' is up to date...
==> default: Verifying vmnet devices are healthy...
==> default: Preparing network adapters...
==> default: Starting the VMware VM...
==> default: Waiting for the VM to receive an address...
==> default: Forwarding ports...
    default: -- 22 => 2222
==> default: Waiting for machine to boot. This may take a few minutes...
    default: SSH address: 127.0.0.1:2222
    default: SSH username: vagrant
    default: SSH auth method: private key
    default: 
    default: Vagrant insecure key detected. Vagrant will automatically replace
    default: this with a newly generated keypair for better security.
    default: 
    default: Inserting generated public key within guest...
    default: Removing insecure key from the guest if it's present...
    default: Key inserted! Disconnecting and reconnecting using new SSH key...
==> default: Machine booted and ready!
==> default: Configuring network adapters within the VM...
==> default: Waiting for HGFS to become available...
==> default: Enabling and configuring shared folders...
    default: -- /Users/lubomir: /vagrant

Vagrant will create a virtual machine that will start when the mission starts, you should be able to login to the machine using ssh.

vagrant ssh
Welcome to Ubuntu 18.04.3 LTS (GNU/Linux 4.15.0-58-generic x86_64)

 * Documentation:  https://help.ubuntu.com
 * Management:     https://landscape.canonical.com
 * Support:        https://ubuntu.com/advantage

  System information as of Tue Jan  2 20:59:01 UTC 2024

  System load:  0.0               Processes:           95
  Usage of /:   2.6% of 61.80GB   Users logged in:     0
  Memory usage: 15%               IP address for eth0: 192.168.212.172
  Swap usage:   0%

 * Strictly confined Kubernetes makes edge and IoT secure. Learn how MicroK8s
   just raised the bar for easy, resilient and secure K8s cluster deployment.

   https://ubuntu.com/engage/secure-kubernetes-at-the-edge

0 packages can be updated.
0 updates are security updates.

Check the os version which you have deployed.

uname -a
Linux vagrant 4.15.0-58-generic #64-Ubuntu SMP Tue Aug 6 11:12:41 UTC 2019 x86_64 x86_64 x86_64 GNU/Linux

VM port forwarding to host

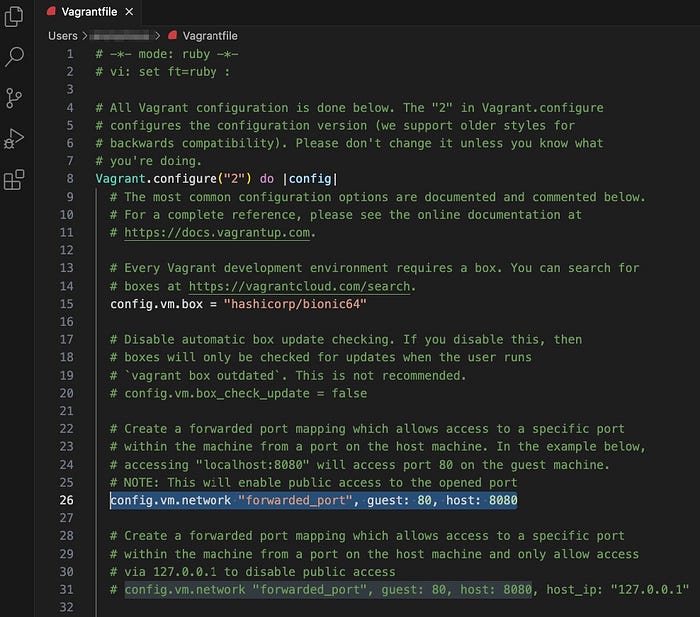
Open the vagrant file using a studio code so that we can make changes to the vagrant file easily. Here I have added a line in order to forward the port from guest to host.

vagrant reload 
==> default: Discarding suspended state...
==> default: Checking if box 'hashicorp/bionic64' version '1.0.282' is up to date...
==> default: Verifying vmnet devices are healthy...
==> default: Preparing network adapters...
WARNING: The VMX file for this box contains a setting that is automatically overwritten by Vagrant
WARNING: when started. Vagrant will stop overwriting this setting in an upcoming release which may
WARNING: prevent proper networking setup. Below is the detected VMX setting:
WARNING: 
WARNING:   ethernet0.pcislotnumber = "160"
WARNING: 
WARNING: If networking fails to properly configure, it may require this VMX setting. It can be manually
WARNING: applied via the Vagrantfile:
WARNING: 
WARNING:   Vagrant.configure(2) do |config|
WARNING:     config.vm.provider :vmware_desktop do |vmware|
WARNING:       vmware.vmx["ethernet0.pcislotnumber"] = "160"
WARNING:     end
WARNING:   end
WARNING: 
WARNING: For more information: https://www.vagrantup.com/docs/vmware/boxes.html#vmx-allowlisting
==> default: Starting the VMware VM...
==> default: Waiting for the VM to receive an address...
==> default: Forwarding ports...
    default: -- 80 => 8080
    default: -- 22 => 2222
==> default: Waiting for machine to boot. This may take a few minutes...
    default: SSH address: 127.0.0.1:2222
    default: SSH username: vagrant
    default: SSH auth method: private key
==> default: Machine booted and ready!
==> default: Configuring network adapters within the VM...
==> default: Waiting for HGFS to become available...
==> default: Enabling and configuring shared folders...
    default: -- /Users/anonymous: /vagrant
==> default: Machine already provisioned. Run `vagrant provision` or use the `--provision`
==> default: flag to force provisioning. Provisioners marked to run always will still run.
vagrant port
The forwarded ports for the machine are listed below. Please note that
these values may differ from values configured in the Vagrantfile if the
provider supports automatic port collision detection and resolution.

    80 (guest) => 8080 (host)
    22 (guest) => 2222 (host)
curl -4 192.168.212.173
<!DOCTYPE html>
<html>
<head>
<title>Welcome to nginx!</title>
<style>
    body {
        width: 35em;
        margin: 0 auto;
        font-family: Tahoma, Verdana, Arial, sans-serif;
    }
</style>
</head>
<body>
<h1>Welcome to nginx!</h1>
<p>If you see this page, the nginx web server is successfully installed and
working. Further configuration is required.</p>

<p>For online documentation and support please refer to
nginx.org.

Commercial support is available at
nginx.com.


<p><em>Thank you for using nginx.</em></p>
</body>
</html>

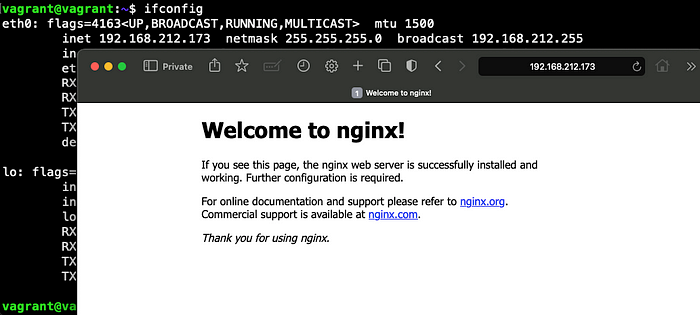
I have installed a simple website in Ubuntu with the help of nginx, for example, to show how port forwarding works in a virtual machine.


728x90

Sometimes changes made to the model or to the ORM may not reflect accurately on the database even after an execution of SchemaUpdate.

If the error actually seems to lack a sensible explanation, try recreating the database (or at least creating a new one) and scaffolding it with SchemaExport.


2024-07-23 14:30:43.399  WARN 17560 --- [ault-executor-0] o.h.engine.jdbc.spi.SqlExceptionHelper   : SQL Error: 1364, SQLState: HY000
2024-07-23 14:30:43.399 ERROR 17560 --- [ault-executor-0] o.h.engine.jdbc.spi.SqlExceptionHelper   : Field 'objectid' doesn't have a default value
2024-07-23 14:30:43.407 ERROR 17560 --- [ault-executor-0] c.c.otp.service.impl.OtpMgrServiceImpl   : Error saving OTP Entity: 

org.springframework.orm.jpa.JpaSystemException: could not execute statement; nested exception is org.hibernate.exception.GenericJDBCException: could not execute statement
	at org.springframework.orm.jpa.vendor.HibernateJpaDialect.convertHibernateAccessException(HibernateJpaDialect.java:331) ~[spring-orm-5.3.27.jar:5.3.27]
	at org.springframework.orm.jpa.vendor.HibernateJpaDialect.translateExceptionIfPossible(HibernateJpaDialect.java:233) ~[spring-orm-5.3.27.jar:5.3.27]
	at org.springframework.orm.jpa.AbstractEntityManagerFactoryBean.translateExceptionIfPossible(AbstractEntityManagerFactoryBean.java:551) ~[spring-orm-5.3.27.jar:5.3.27]
	at org.springframework.dao.support.ChainedPersistenceExceptionTranslator.translateExceptionIfPossible(ChainedPersistenceExceptionTranslator.java:61) ~[spring-tx-5.3.27.jar:5.3.27]
	at org.springframework.dao.support.DataAccessUtils.translateIfNecessary(DataAccessUtils.java:242) ~[spring-tx-5.3.27.jar:5.3.27]
	at org.springframework.dao.support.PersistenceExceptionTranslationInterceptor.invoke(PersistenceExceptionTranslationInterceptor.java:152) ~[spring-tx-5.3.27.jar:5.3.27]
	at org.springframework.aop.framework.ReflectiveMethodInvocation.proceed(ReflectiveMethodInvocation.java:186) ~[spring-aop-5.3.27.jar:5.3.27]
	at org.springframework.data.jpa.repository.support.CrudMethodMetadataPostProcessor$CrudMethodMetadataPopulatingMethodInterceptor.invoke(CrudMethodMetadataPostProcessor.java:174) ~[spring-data-jpa-2.7.12.jar:2.7.12]
	at org.springframework.aop.framework.ReflectiveMethodInvocation.proceed(ReflectiveMethodInvocation.java:186) ~[spring-aop-5.3.27.jar:5.3.27]
	at org.springframework.aop.interceptor.ExposeInvocationInterceptor.invoke(ExposeInvocationInterceptor.java:97) ~[spring-aop-5.3.27.jar:5.3.27]
	at org.springframework.aop.framework.ReflectiveMe


종종 ORM 관련되서 맛탱이가 가는 경우가 있는데, 정상적으로 save method 를 실행하지 못하며 신기하게 에러를 뱉는 경우가 있다.


디버깅에서 잡고 찔러봐도 분명히 데이터는 들어가는데, 왜 default value를 저장하는지 모르겠다 하고.

결론은 Stack Overflow 에서처럼 테이블 드랍시키고 다시 만들면 쑤욱 하고 들어간다


https://stackoverflow.com/questions/804514/hibernate-field-id-doesnt-have-a-default-value


Hibernate: "Field 'id' doesn't have a default value"

I'm facing what I think is a simple problem with Hibernate, but can't solve it (Hibernate forums being unreachable certainly doesn't help). I have a simple class I'd like to persist, but keep gett...

stackoverflow.com


728x90
Free forever
Way better than an Excel template.
Boring Excel template
A standard, premade Excel RACI chart template for assigning project roles.
 
Enter your email to download.

It’s a fact: Complex projects make it easy for teams to lose track of tasks.

You might have an air-tight project plan and a stellar team to back it up. But if you’re not crystal clear about assignments—or even involvement—on a task level, confusion, crankiness, and even demotivation will creep into your project team.

Lucky for you, avoiding those issues is as simple as creating a RACI chart. 

In this article, we’ll explain what RACI stands for and how it’s used in project management. We’ll also share a few practical examples so you can see how to apply the RACI model to different types of projects.

What is a RACI chart?

A RACI chart—also known as a responsibility assignment matrix—is a diagram used in project management to define team roles across 4 categories: Responsible, Accountable, Consulted, and Informed. It helps clarify who does the work, who calls the shots, whose opinion matters, and who needs to stay in the loop for each task, milestone, or decision.

A RACI chart enables you to visualize roles and responsibilities at a more granular level than simple resource assignments. That way team members and stakeholders know what’s expected of them so confusion doesn’t get in the way of project success.

Example of a simple RACI chart

RACI definitions explained

RACI stands for Responsible, Accountable, Consulted, and Informed. Each letter in the acronym represents the level of ownership each person involved in a project will have on an individual deliverable. 

This simple chart gives you an at-a-glance view of RACI meanings and how many people to assign to each role in your RACI matrix.

RACI definitions explained. Image description.

R = Responsible

This team member does the work to complete the task. Every task needs at least one Responsible party, but it’s okay to assign more.

Examples of people you might assign to the Responsible role:

  • Content writer
  • Graphic designer
  • UI/UX designer
  • Software developer
  • Business analyst
  • QA specialist

A = Accountable

This person delegates work and is the last one to review the task or deliverable before it’s deemed complete. On some tasks, the Responsible party may also serve as the Accountable one. Just be sure you only have one Accountable person assigned to each task or deliverable. (Note: It might not be your project manager!)

Examples of people you might assign to the Accountable role:

  • Project manager
  • Product manager
  • Department head
  • Team lead

C = Consulted

Every deliverable is strengthened by review and consultation from more than one team member. Consulted parties are typically the people who provide input based on either how it will impact their future project work or their domain of expertise on the deliverable itself.‍

Examples of people you might assign to the Consulted role:

  • Sales team
  • Software architect
  • Content editor
  • Creative director
  • QA manager
  • Compliance officer
  • Security specialist
  • Legal counsel

I = Informed

Informed stakeholders simply need to be kept in the loop on project progress, rather than roped into the details of every deliverable.

Examples of people you might assign to the Informed role:

  • Executive leadership
  • External clients
  • Team members assigned to dependent tasks
  • Customer support team
  • Administrative staff

Responsible vs Accountable meanings in RACI

The same person can be both Responsible and Accountable for a task in RACI—including a project manager. But they’re not one and the same. So what’s the difference?

  • Responsible is a task-oriented designation that applies to the person (or people) actually completing the work. A whole team can be responsible for the execution of one task.
  • Accountable is an outcome-oriented designation that applies to a single person who reports on the work, whether in status updates or upon delivery. Being Accountable means you must answer for and/or sign off on the deliverable and deal with the consequences if it falls short of goals.
Differences between Responsible vs Accountable in RACI. Image description.

Benefits of the RACI model in project management

At its core, the RACI model helps you set clear expectations about project roles and responsibilities. That way you don’t have multiple people working on the same task or against one another because tasks weren’t clearly defined on the front end.

A RACI chart also encourages team members to take responsibility for their work—or defer to someone else when needed. Essentially, you’ll remove personal judgment and politics from your process and focus on your team’s ability to act responsibly within a framework you’ve created. Sounds pretty sweet, huh?

How to make a RACI chart

Building a RACI chart for your project is a relatively simple task. The hardest part is thinking through all the people involved in your project and what role makes the most sense for individuals at each stage of work.

You’ll want to map out a RACI chart for your project during the planning stage. This ensures responsibilities are clearly defined before work begins and gives you time to adjust to avoid any gaps or overlaps in assignments.

Here are the basic steps for making a RACI chart:

  1. List key project phases, tasks, and/or milestones in a column down the left side of your chart. You can get as detailed as you want, depending on the complexity of your project (and attention-span of your project team and stakeholders). 
  2. Enter the people involved in your project across the top row of your chart. Each individual should serve as the header of a single column. You can use names or job roles—whatever makes sense for your team and project.
  3. Go line by line down the chart, and assign each person across the row an R, A, C, or I to indicate the role they’ll play on that particular task.

Once your RACI chart is good to go, you can create a communication plan that aligns with the roles you’ve outlined for project teams and stakeholders.

Want to save time? Download our free RACI Excel template, or see how TeamGantt's built-in RACI feature works.

RACI rules and best practices

Using a RACI chart is a whole lot easier when you follow a few simple rules. Once your RACI chart is complete, review it to be sure it meets these criteria:

  • Every task has at least one Responsible person.
  • There’s one (and only one!) Accountable party assigned to each task to allow for clear decision-making.
  • No team members are overloaded with too many Responsible tasks. You can use TeamGantt’s Workloads report to check availability across all your active projects.
  • Every team member has a role on each task. (It’s not uncommon for some folks to be Informed on most tasks.)

These best practices can help you get the most out of RACI:

  • Focus on project tasks, milestones, and decisions in the RACI chart. Avoid generic or administrative to-dos like team meetings or status reports.
  • Align the tasks in your RACI chart with your project plan so there’s no confusion about details and due dates. (TeamGantt does this work for you by tying your RACI chart directly to your plan!)
  • Keep RACI definitions close by because they can be tough to remember sometimes!
  • Assign the Responsible team members to tasks in TeamGantt.
Keep the big picture in easy view

Lay a clear path to success with a visual plan that’s easy to understand, and keep everyone in sync with flexible workflows and team collaboration.

Create your free plan

RACI chart examples: Practical application in the real world

Let’s take a closer look at how you might put the RACI model to work on real-life projects. 

Producing a marketing handout

We’ll start with a simple example. Imagine you’re creating a RACI chart for a handout your marketing manager will distribute at an industry conference. 

Basic tasks for this project might include:

  • Write project brief
  • Create content
  • Design handout
  • Review first draft
  • Update handout
  • Approve final
  • Send to printer

In this project example, we’ve assigned RACI roles to 7 key team members:

  • Project manager
  • CMO
  • Marketing manager
  • Editorial director
  • Content writer
  • Creative director
  • Designer
Sample RACI chart for the production of a marketing handout. Image description.

Let’s zoom in on the RACI roles we mapped out for the Create content task example so you understand the why behind these assignments. 

  • Responsible: The content writer is listed as Responsible for this task, so that’s who will actively work on content creation.
  • Accountable: The editorial director is listed as Accountable for this task because that’s who is ultimately on the line for content quality and accuracy. Once the content is written, she’s the one who will review it to ensure it meets their company’s editorial standards.
  • Consulted: The marketing manager is listed as Consulted. Since the marketing manager is the subject matter expert for the presentation, the writer can go to them for input or help filling in content gaps along the way.
  • Informed: Several people have been assigned to the Informed role, though for different reasons. Since the Design handout task depends on this one, we want to make sure the writer keeps the creative director and designer informed on the status of content creation. The project manager and CMO are listed as Informed simply because they want to be kept in the loop about how work is progressing.

Developing a new software product

Now let’s look at a more complex project example. 

Developers who use an Agile workflow to tackle the job likely know what they need to do because there’s a constant stream of communication. But cross-functional departments and senior leaders might need more clarity. 

Here’s how you might map RACI roles to major tasks in a software development project, broken down by key tasks and RACI roles. (For the Informed assignments, we only listed people who need detailed progress updates to keep our example easier to read.)

Market Research

  • Responsible: Business Analyst, Marketing Manager
  • Accountable: Product Manager
  • Consulted: Sales Representative, Customer Support
  • Informed: Project Manager, Software Developers

Requirement Gathering

  • Responsible: Business analyst
  • Accountable: Product manager
  • Consulted: UI/UX Designer, Software Architect
  • Informed: Project manager, QA analysts

Design and Prototyping

  • Responsible: UI/UX Designer
  • Accountable: Product manager
  • Consulted: Business analyst, software developers
  • Informed: Marketing manager, QA analysts

Software Development

  • Responsible: Software Developers/Engineers
  • Accountable: Software Architect
  • Consulted: Product Manager, QA Analysts
  • Informed: Project Manager, Technical Writer

Testing

  • Responsible: QA Analysts/Engineers
  • Accountable: Project manager
  • Consulted: Software Developers, DevOps Engineer
  • Informed: Product Manager, Technical Writer

Deployment

  • Responsible: DevOps Engineer
  • Accountable: Project Manager
  • Consulted: Software Developers, QA Analysts
  • Informed: Product Manager, Customer Support

Maintenance

  • Responsible: DevOps Engineer, Software Developers
  • Accountable: Project manager
  • Consulted: QA Analysts, Technical Writer
  • Informed: Product Manager, Customer Support

Monitoring

  • Responsible: DevOps Engineer, QA Analysts
  • Accountable: Project manager
  • Consulted: Software Developers, Technical Writer
  • Informed: Product Manager, Customer Support

Marketing and Sales

  • Responsible: Marketing Manager, Sales Representative
  • Accountable: Marketing Manager
  • Consulted: Product Manager, Customer Support
  • Informed: Project Manager, Software Developers

User Training

  • Responsible: Customer Support Specialist
  • Accountable: Product Manager
  • Consulted: Technical Writer, UI/UX Designer
  • Informed: All project team members

When to use or skip a RACI chart for your project

A RACI chart serves just about every project well. But it’s especially helpful when tasks require multiple resources, run concurrently, or depend on other tasks.

Here are a few scenarios when the RACI model is useful:

  • The decision-making or approval process could hold up the project.
  • There’s conflict about task ownership or decision-making.
  • The project workload feels like it’s not distributed evenly.
  • You experience turnover on a team and need to onboard someone quickly to a new role.

Of course, not all teams and projects are created equally. You might work with a team who just happens to communicate really well and stays on top of their own work. (Lucky you!) Or maybe your project is small enough that it would be silly to take the time to go through this exercise. 

In cases like these, don’t worry about taking the extra step of creating a RACI chart. Just be sure you have a clear plan in place to guide your team and project.

Further reading: How to Create a Realistic Project Plan: Templates & Examples

Common RACI pitfalls and how to avoid them

Now let’s walk through a few common mistakes that could hinder your RACI chart’s effectiveness.

Failing to get buy-in from your team and stakeholders

Creating a RACI chart in a vacuum is never a good idea. In a best-case scenario, you’d sit down with your team and stakeholders to walk through the role assignments on each task. But let’s be real: That’s not always possible.

Just be sure everyone represented has acknowledged and agreed to the roles and responsibilities you’ve laid out. More importantly, you want to check that your chart eliminates any further project confusion.

Setting it and forgetting it

It’s easy to build a RACI chart at the start of a project, then let it collect dust once the real work begins. But remember: This chart will defend you against mishaps that arise when you have too many cooks in the kitchen or a team member who thinks someone else is handling the work.

That’s why it’s important to keep these roles top of mind throughout a project’s life cycle. You can do this by reviewing RACI assignments for upcoming tasks in weekly status update meetings and making sure everyone involved in a project has easy access to the RACI chart. 

In TeamGantt, you can assign RACI roles directly in your project plan so they’re clearly visible as team members work their way to the finish line.

Overcomplicating stakeholder communication

If you have a lot of Consulted and Informed roles on your chart, make sure you have an easy and lightweight way to keep them informed. It could be as simple as making sure department heads and senior leaders have access to your project plan so they can follow progress along the way. 

Managing a project with external clients or stakeholders? Sharing a view-only link to your project in TeamGantt is a great option for looping in folks outside your organization.

Further reading: A Project Manager’s Guide to Effective Stakeholder Management

Keep teams in sync—and accountable—with TeamGantt

A RACI chart is a simple tool that makes projects easier to manage by creating less confusion and more accountability. But you’ve got more than roles and responsibilities to keep straight.

TeamGantt makes it easy to build a project plan your whole team can contribute to and collaborate on. Everything happens online, so you can stay on top of deadlines and monitor progress in real time.

Use our built-in RACI chart to assign roles and keep them visible from project start to finish, so everyone knows how they contribute to success.

728x90

Step

일반적으로 Spring Batch는 대용량 데이터를 다루는 경우가 많기 때문에 Tasklet보다 상대적으로 트랜잭션의 단위를 짧게 하여 처리할 수 있는 ItemReader, ItemProcessor, ItemWriter를 이용한 Chunk 지향 프로세싱을 이용한다.

작업 로직이 Chunk 지향 처리를 하기에는 너무 간단하거나, 부 자연스러운 경우 Tasklet을 사용하는 것이 좋다.


Chunk
한 번에 하나씩 데이터(row)를 읽어 Chunk라는 덩어리를 만든 뒤, Chunk 단위로 트랜잭션을 다루는 것
Chunk 단위로 트랜잭션을 수행하기 때문에 실패할 경우엔 해당 Chunk 만큼만 롤백이 되고, 이전에 커밋된 트랜잭션 범위까지는 반영이 된다.
Chunk 기반 Step은 ItemReader, ItemProcessor, ItemWriter라는 3개의 주요 부분으로 구성될 수 있다.

ItemReader, ItemProcessor, ItemWriter
Chunk 모델을 구현하면서 데이터의 입력/처리/출력 3가지 프로세스로 분할하기 위한 인터페이스로 데이터 IO를 담당하는 ItemReader와 ItemWriter는 데이터 베이스와 파일을 Java객체 컨버팅을 제공하기에 Spring Batch를 사용하는 것으로 충분히 컨버팅이 가능하다. ItemProcessor는 입력 확인 및 비즈니스 로직을 구현한다. 

  • 읽기(Read) — Database에서 배치 처리를 할 Data를 읽어온다.
  • 처리(Processing) — 읽어온 Data를 가공, 처리를 한다. (필수사항X)
  • 쓰기(Write) — 가공, 처리한 데이터를 Database에 저장한다.


Spring Batch에는 다양한 ItemReader와 ItemWriter가 존재한다.

대용량 배치 처리를 하게 되면 Item을 읽어 올 때 Paging 처리를 하는 게 효과적이다.

Spring Batch Reader에서는 이러한 Paging 처리를 지원하고 있다. 또한 적절한 Paging처리와 Chunk Size(한 번에 처리될 트랜잭션)를 설정하여 더욱 효과적인 배치 처리를 할 수 있다.


Paging Size와 Chunk Size

Paging Size가 10이며 Chunk Size가 20일 경우 2번의 Read가 이루어진 후에 1번의 Transaction이 수행된다.

한 번의 Transaction을 위해 2번의 쿼리 수행이 발생하게 되는 것이다.

적절한 Paging Size와 Chunk Size에 대해 Spring Batch에는 다음과 같이 적혀 있다.

Setting a fairly large page size and using a commit interval that matches the page size should provide better performance.
페이지 크기를 상당히 크게 설정하고 페이지 크기와 일치하는 커밋 간격을 사용하면 성능이 향상됩니다.

한번의 Read 쿼리 수행 시 1번의 Transaction을 위해 두 설정의 값을 일치를 시키는 게 가장 좋은 성능 향상 방법이며 특별한 이유가 없는 한 Paging Size와 Chunk Size를 동일하게 설정하는 것을 추천한다.


PagingReader 사용 시 필수 사항

  • SQL에 Order By 지정
  • SQL에 Offset과 Limit 지정 


Chunk 지향 프로세싱의 장점

Chunk 지향 프로세싱을 사용하지 않는다 하더라도 개발자가 충분히 비슷한 로직으로 구현을 할 수도 있다.

하지만 Chunk 지향 프로세싱은 단순히 Chunk 단위의 트랜잭션만 제공해주는 것은 아니다.
내결함성 (Falut tolernat)을 위한 다양한 기능들을 제공하고 있다는 것이다.


레코드 건너뛰기(Skip)

public Step step() throws Exception {
        return stepBuilderFactory.get("ChunkStep")
        		//<Input Type, Output Type>
                .<UserVO,UserVO>chunk(CHUNK_AND_PAGE_SIZE)
                .reader(reader())
                .processor(processor())
                .writer(writer())
                .faultTolerant()
                .skip(Exception.class)
                .noSkip(IllegalAccessException.class)
                .skipLimit(10)
                .listener(loggingChunkListener)
                .build();
}

입력에서 레코드를 읽는 중에 에러가 발생했을 때는 몇 가지 선택지가 존재한다. 먼저 예외를 던져 처리를 멈추는 것이다.

이 방법은 너무 극단적이다. 1만 명에 사람에게 만원씩 입금해야 한다고 했을 때 1000번째에서 예외가 발생하였다고 생각해보자. 나머지 9000명은 돈을 받을 수 없다. 


Spring Batch는 그 대신 특정 예외가 발생했을 때 레코드를 건너뛰는 Skip 기능을 제공한다. 


레코드를 건너뛸지 여부를 결정할 때 고려해야 할 두 가지 요소가 있다. 
어떤 조건에서 레코드를 건너뛸 것인가, 특히 어떤 예외를 무시할 것인가이다. 
레코드를 건너뛰려면 어떤 예외를 건너뛰게 할지, 몇 번까지 예외를 허용할지 설정하기만 하면 된다.


건너뛰고 싶은 예외보다는 건너뛰고 싶지 않은 예외를 설정하는 구성이 더 간편할 수도 있다.


소스에 대한 해석은 다음과 같다.

Exception을 Skip 하고 IllegalAccessException은 Skip하지 않는다. 즉, IllegalAccessException만 Skip하지 않는다는 뜻이다. IllegalAccessException을 제외한 Exception을 상속한 모든 예외를 10번까지 건너뛸 수 있음을 나타낸다.


.listener(loggingChunkListener)


@Component
public class LoggingChunkListener implements ChunkListener {
	private final Logger logger = LoggerFactory.getLogger(this.getClass());

	//Chunk 실행 전
	@Override
	public void beforeChunk(ChunkContext context) {
		StepContext stepContext = context.getStepContext();
		StepExecution stepExecution = stepContext.getStepExecution();
		logger.debug("###### beforeChunk : " + stepExecution.getReadCount());
	}

	//Chunk 실행 후
	@Override
	public void afterChunk(ChunkContext context) {	
		StepContext stepContext = context.getStepContext();
		StepExecution stepExecution = stepContext.getStepExecution();
		logger.debug("###### afterChunk : " + stepExecution.getCommitCount());
	}

	//Chunk 수행 중 Error가 발생했을시
	@Override
	public void afterChunkError(ChunkContext context) {
		StepContext stepContext = context.getStepContext();
		StepExecution stepExecution = stepContext.getStepExecution();
		logger.debug("##### afterChunkError : " + stepExecution.getRollbackCount());
	}

}

listener를 통해 Chunk별로 Log를 출력할 수 있다. afterChunkError메소드를 활용하면 예외처리가 발생한 Chunk들의 정보를 출력할 수 있을 것이다.


Example (Mybatis)

@Configuration
public class ExampleJobChunkConfiguration {

	@Autowired
	private JobBuilderFactory jobBuilderFactory;
	@Autowired
    private StepBuilderFactory stepBuilderFactory;
    @Autowired
    public SqlSessionFactory sqlSessionFactory;
    
    private int CHUNK_SIZE = 2;
    
    @Bean
    public Job exampleJobChunk() throws Exception {
        
        Job exampleJob = jobBuilderFactory.get("ExampleJobChunk")
                .start(step())
                .build();

        return exampleJob;
    }

    @Bean
    @JobScope
    public Step step() throws Exception {
        return stepBuilderFactory.get("ChunkStep")
        		//<Input Type, Output Type>
                .<UserVO,UserVO>chunk(CHUNK_SIZE)
                .reader(reader())
                .processor(processor())
                .writer(writer())
                .build();
    }

    @Bean
    @StepScope
    public MyBatisPagingItemReader<UserVO> reader() throws Exception {
		/*
		 * Paging 처리 시 OrderBy는 필수
		 */
    	MyBatisPagingItemReader<UserVO> reader = new MyBatisPagingItemReader<>();
    	reader.setPageSize(CHUNK_SIZE);
    	reader.setSqlSessionFactory(sqlSessionFactory);
    	reader.setQueryId("Mapper.id");
    	
    	return reader;
    }

    @Bean
    @StepScope
    public ItemProcessor<UserVO, UserVO> processor(){

    	return new ItemProcessor<UserVO, UserVO>() {
            @Override
            public UserVO process(UserVO model) throws Exception {

            	model.setNick(model.getNick() + "1");

                return model;
            }
        };
    }

    @Bean
    @StepScope
    public MyBatisBatchItemWriter<UserVO> writer(){
    	MyBatisBatchItemWriter<UserVO> writer = new MyBatisBatchItemWriter<>();
    	writer.setSqlSessionFactory(sqlSessionFactory);
    	writer.setStatementId("mapper.id");
    	return writer;
    }

}


<select id="chunkSelectTest" resultType="VO경로">
	SELECT
		...
	FROM
		...
	ORDER BY COLUMN1, COLUMN2, ...
	LIMIT #{_skiprows}, #{_pagesize}
</select>

SQL에는 정렬을 해야 한다. Paging처리를 할 때마다 SQL이 실행되기 때문에 순서가 보장되어야 하기 때문이다.

또한 Offset과 Limit을 지정해야 Paging처리를 하여 순차적으로 조회할 수 있다.


@JobScope, @StepScope

Chunk 지향 처리 Example을 확인하면 @JobScope와 @StepScope Annotation을 확인할 수 있다.

@JobScope는 Step 선언문에 사용 가능하며 @StepScope는 Step을 구성하는 ItemReader, ItemProcessor, ItemWriter에 사용이 가능합니다.

@JobScope와 @StepScope는 Singleton 패턴이 아닌 Annotation이 명시된 메소드의 실행 시점에 Bean이 생성되게 된다. 또한 @JobScope와 @StepScope Bean이 생성될 때 JobParameter가 생성되기 때문에 JobParameter 사용하기 위해선 반드시 Scope를 지정해주어야 한다. 이는 LateBinding을 하여 JobParameter를 비즈니스 로직 단계에서 할당하여 보다 유연한 설계를 가능하게 하고 서로 다른 Step이 서로를 침범하지 않고 병렬로 실행되게 하기 위함입니다.

+ Recent posts