728x90

It will be impossible to boot/start a Linux, or any other operating system, without the help of a boot loader. Boot loader plays a major role in bring up the system into running state. Infact the boot loader is the first program, that run's, when a computer is switched on.

Boot loader is the one, who transfers' control to an operating system kernel. Linux booting process requires special attention, and will be doing a dedicated post on that. In this post, we will be concentrating on GRUB(Grand Unified Boot loader), the default boot loader, for many Linux distributions.

GRUB was the result of a troubleshooting done by Erich Boleyn, to boot GNU Hurd(the operating system which was designed by GNU, as a free replacement of UNIX), with a micro kernel. Yoshinori K. Okuji, carried further work to advance the initial GRUB, and is called GRUB2.

The older version of GRUB(before grub2), is now called as GRUB-Legacy.

Why is GNU grub, the default boot loader for many Linux distributions?

Grub has got several added advantages, compared to previous boot loaders, and also many "Proprietary boot loader's".

  • Grub can be used to load, almost all operating system's available, with the help of a function called chain-loading.
  • Grub does not require the exact physical location of the operating system kernel in the hard disk. It just requires the hard disk number(like the first hard disk,second hard disk), and the partition number, along with the file name of the kernel. Because, GRUB understands the format in which kernel is made.
  • You can modify, the booting options, like kernel parameter's and its location while booting, through GRUB command line.

How does GRUB command and graphical interface work together?

Grub has got a wonderful graphical interface where a user can select, the desired operating system from the menu.

The graphical interface also works in exactly the same way as command line interface. The only difference is that, a pre-configured configuration file contains the command which specifies the hard disk and kernel location(which otherwise have to be typed by hand, if you are using the command line interface.)

Learning Grub command's will be an added advantage, because it will help you to troubleshoot most of the booting problems etc.

What is the difference between Grub-Leagacy & GRUB-2?

There are some notable differences between the previous Grub-Leagacy and the new GRUB-2.

  • Previously in Grub-Legacy partition number's of a hard disk, used to start from 0,1,2,..etc. But in GRUB-2 it starts the partition naming convention from 1,2,3..etc.
  • It now recognizes many more new file system's like ext-4
  • There are no more stages like stage-1,stage-1.5 etc, in grub image files, like the Grub-Legacy
  • Grub-2 has started using modules which can be loaded as per requirement.
  • GRUB-2 is capable enough to determine a hard disk partition using UUID's(Universally Unique Identifier)
  • The configuration file name is grub.cfg(no more menu.lst & grub.config)
  • The new grub-2 configuration file is highly configurable, compared to grub-legacy config file.
  • GRUB-2 also supports EFI(Extensible Firmware Interface)

Grub Device Naming Convention

Grub device naming convention is totally different from the operating system partition naming convention. Its an important thing to keep in mind while working with grub.

The below table will be helpful in remembring the grub device naming convention.

(hd0) First hard disk installed in the computer

(hd1) Second Hard disk installed in the computer
(hd0,1) First partition of first hard disk, in GRUB2
(fd0) Floppy disk
(hd1,2) third partition of the second hard disk in grub-legacy

hard disk number, partition number

How to install grub on a floppy disk or a partition?

When you are working on an already installed linux distribution, the grub package will be bydefault installed on the system.

I will be showing you, the example's of working with grub-legacy. Because any grub version number thats in the form 0.9x is grub-legacy now.(Please note the fact that grub-legacy is no longer under active developement.)

For this example, i will be working on a Red hat enterprise linux 5.

[root@localhost ~]# rpm -qa | grep grub
grub-0.97-13.5
[root@localhost ~]#

the above shown package, will also provide you with a command called grub-install.

[root@localhost ~]# whereis grub-install
grub-install: /sbin/grub-install /usr/share/man/man8/grub-install.8.gz
[root@localhost ~]# rpm -qf /sbin/grub-install
grub-0.97-13.5

As you can clearly see from the above command results that the grub-install command comes from the package grub-0.97-13.5

You can simply install grub, on your desired partition, as shown below, with the help of grub-install command.

[root@localhost ~]# grub-install /dev/sda
Installation finished. No error reported.
This is the contents of the device map /boot/grub/device.map.
Check if this is correct or not. If any of the lines is incorrect,
fix it and re-run the script `grub-install'.
# this device map was generated by anaconda
(hd0)     /dev/sda
[root@localhost ~]#

In the above command, it will install grub in the MBR of the hard disk /dev/sda.

the above command result tells you an important fact to understand. It tells that, there is a device map file, and is asking us to check and confirm whether the file is correct or not.

Device map file is used by grub to identify the OS device names in a precise way. GRUB uses this file to map the device names of BIOS to operating system device names.This was devised, because there was inconstancies with, Linux operating system's device naming convention.

!http://www.slashroot.in/images/important note.gif

This file is configurable as per your requirement.

In the above example output of the /boot/grub/device.map tells that (hd0) in grub means /dev/sda in the operating system.

!http://www.slashroot.in/images/important note.gif

Whenever you install GRUB, on any of your partition, it gets installed and images are put under the directory "boot" in that partition.

If you want to install grub, under a directory other than the default "boot", you need to specify the boot directory with a command line argument to grub-install command.

Imagine that you want to install grub, on one of your external hard disk, and is currently mounted under /mydisk. lets see how to do it.

[root@localhost ~]# grub-install --root-directory=/mydisk/grub/ /dev/sdb

mount point = /mydisk/grub

default grub mounted point → boot directory

Booting an OS from grub command line

Booting an operating system from grub command line is quite simple. You just need to specify the partition where your kernel and initrd images are present before entering the boot command.

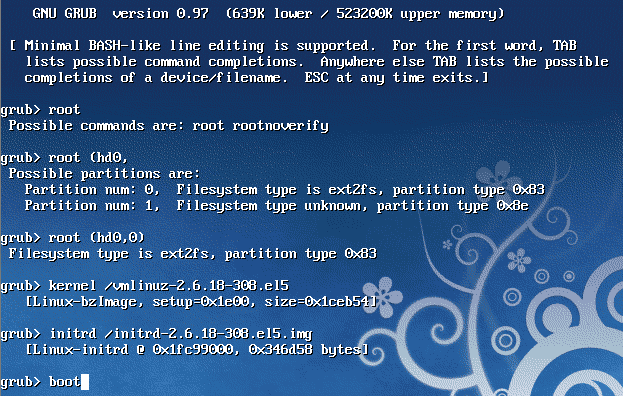
press "c" when you are in grub menu selection area. You will be presented with a grub> grub console, as shown below. This is not your Linux console, its a grub console, and will only accept grub specific commands.

!https://www.slashroot.in/sites/default/files/grub command line.png

fortunately this command line interface supports TAB-completion. So you dont need to remember the exact full name of the kernel,initrd & the partition numbers.

Infact whenever you are unable to boot, you can do a hit and trial method in multiple partition.

After entering the grub console by pressing "C", set the root partition and hard disk with the command "root"(always take help from tab completion)

press TAB after "root(",  and you will be shown the possible hard disk and partitions.

After selecting hard-disk and partition, you need to tell the name of the kernel(as i told before, grub understands kernel file formats, and will by default look @ /boot in the partition, and so tabing will work here also.)

type "kernel" followed by a / with vmlinuz(the default kernel package name, do tabing to complete the filename.)

Similarly you can give initrd file name and finally enter the command boot, to boot with the currently entered configuration.

!http://www.slashroot.in/images/important note.gif

you can use the same technique to boot a system, with a wrong or corrupted grub configuration.

What is chain loading in grub?

You might have noticed that grub is capable of loading different operating system. like for example, you can even load a windows operating system with the help of grub(Infact if you install Linux after windows, everything is done automatically by the installer for you).

Grub achieves this ability to load multiple or even proprietary operating system, with the help of chain loading.

chain loading is the method used by grub, in which it transfers' the control of booting that operating system to its native boot loader.


Grub → Control of booting that operating system → native boot loader


when Linux is installed after windows, GRUB stage-1 overwrites MBR(After removing the windows boot loader, and placing it in the volume boot record of the windows C partition).

!http://www.slashroot.in/images/important note.gif

Volume boot record is similar to MBR. its the first sector of a partition. However MBR is the first sector of a hard-disk(first 512 bytes of a hard disk).

the grub config file entry for windows chain loader looks like the below.

title Windows Operating System
        rootnoverify (hd0,0)
        chainloader +1

the first line "title" will be shown to you in the selection list at boot time in grub. the second line is similar to the "root" command, we previously used to boot the system using grub command line.

The only difference between "root" and "rootnoverify" is that, "rootnoverify" will not try to mount the file-system (because it will mostly be an unknown file system).

The third line tells to load the first sector of that partition, or say volume boot record(which will contain windows boot loader). Now windows will boot normally, because its being booted by windows boot loader.

Understanding GRUB stages

GRUB-legacy consists of three stages. They are as below.

  1. GRUB stage 1 (MBR Side, loading grub stage-1.5)
  2. GRUB stage 1.5 (MBR side - GRUB stage 1.5 - First partition)
  3. GRUB stage 2 (displaying GRUB menu)

In a hard-disk, if you are using MBR partition style, then the first sector of your hard disk(the first 512 bytes of your hard disk), will contain the boot loader & the partition table

440 bytes is for the boot loader and the remaining is for partition table(remember that, i am talking about MBR partition scheme).

GRUB stage 1 resides in the MBR of the hard disk.

Due to the extremely small size of the MBR(512 bytes), the grub stage-1 does the small job of loading grub stage-1.5, which resides in the blocks immediately after the MBR and before the first partition. This area, where grub-1.5 resides is roughly around 30kb.

Grub stage 1.5 is very much important, because it contains file system driver's to open the file system specific stage 2(which will open file from a known location in the partition, like /boot/). stage 2 is responsible for displaying the grub menu(because the menu is based on the config file grub.conf which is inside /boot)

How does the grub config file look like?

Grub config file looks like the below shown entries.

[root@localhost ~]# cat /boot/grub/grub.conf
# grub.conf generated by anaconda
#
# Note that you do not have to rerun grub after making changes to this file
# NOTICE:  You have a /boot partition.  This means that
#          all kernel and initrd paths are relative to /boot/, eg.
#          root (hd0,0)
#          kernel /vmlinuz-version ro root=/dev/sda2
#          initrd /initrd-version.img
#boot=/dev/sda
default=0
timeout=5
splashimage=(hd0,0)/grub/splash.xpm.gz
hiddenmenu
title CentOS (2.6.18-238.12.1.el5)
        root (hd0,0)
        kernel /vmlinuz-2.6.18-238.12.1.el5 ro root=LABEL=/ rhgb rhgb quiet
        initrd /initrd-2.6.18-238.12.1.el5.img

the original file is infact, is /etc/grub.conf, there is a symbolic link given from this /etc/grub.conf to /boot/grub/grub.conf file

[root@localhost etc]# ll /etc/grub.conf
lrwxrwxrwx 1 root root 22 Jan 28  2011 /etc/grub.conf -> ../boot/grub/grub.conf

"default=0" tell's the default operating system to boot, if nothing is selected within a specified timeout during boot, from the grub menu. 0 means the first entry(which in the above case is centos.) default=1 will boot the second title entry as the default operating system if nothing selected within the specified timeout during the boot.

"timeout=5", this specifies the time in seconds, to wait before the default option is selected to boot automatically by the grub.

"splashimage"

, specifies the location of the grub background image to show, behind the menu list(you can put your pic there

!http://www.slashroot.in/sites/all/libraries/ckeditor/plugins/smiley/images/regular_smile.gif

).

"hiddenmenu" will keep the menu hidden if no key is pressed during the grub boot screen(and will bydefault boot the default operating system without showing the menu)

728x90

Abstract

본 글과 다음 글에서는 GUID Partition Table에 대해 알아볼 것이다. GPT는 EFI에서 사용하는 디스크 파티션 구조로, BIOS 시스템의 MBR을 개선하기 위해 만들어졌으며, 더 큰 주소 비트를 지원하기 때문에 더 큰 디스크를 인식할 수 있게 되었고, 더 많은 파티션을 생성할 수 있게 됐다.

GPT를 알아보기 전에 EFI에 대한 설명을 간략하게 할 것이다. 다만 내용이 길어 본 글에서는 UEFI와 GPT의 개요, 기존 BIOS 시스템과의 호환성 유지를 위한 Protective MBR에 대해 설명하고 주요 내용인 GPT 헤더, 파티션 테이블, 백업 GPT에 대한 설명은 다음 글에서 이어 하도록 하겠다.

GPT

UEFI(Unified Extensible Firmware Interface)

GPT를 알아보기 전에 선수지식으로 UEFI에 대해 알아보고 가자. 바쁘다면 굳이 읽진 않아도 괜찮다.

https://uefi.org/faq
WHAT IS UEFI?

UEFI stands for "Unified Extensible Firmware Interface." The UEFI Specification defines a new model for the interface between personal-computer operating systems and platform firmware. The interface consists of data tables that contain platform-related information, plus boot and runtime service calls that are available to the operating system and its loader. Together, these provide a standard environment for booting an operating system and running pre-boot applications.

UEFI란 "Unifed Extensible Firmware Interface"를 의미한다. UEFI 명세는 개인 컴퓨터 운영체제와 플랫폼 펌웨어 간의 인터페이스를 위한 새로운 모델을 정의한다. 인터페이스는 플랫폼 관련 정보와 더불어 운영체제와 그것의 로더(Loader)가 이용할 수 있는 부팅, 런타임 서비스 호출을 포함하는 데이터 테이블로 구성된다. 이것들은 운영체제를 부팅하고 사전 부팅 어플리케이션을 실행하기 위한 표준 환경을 제공한다.

1990년대 중반 인텔은 16비트 크기의 주소 모드를 사용하는 탓에 1 MB 크기의 메모리, 2 TB의 스토리지만 인식 가능하다는 기존 BIOS의 문제를 해결하고 싶어했다. 고성능 서버 플랫폼에 넣을 아이타니움(Itanium)이라는 새 아키텍처를 만드는 데 있어 작은 주소 비트와 메모리를 가진 BIOS는 너무 제한적이었기 때문이다. 그래서 나온 것이 바로 EFI라고 불리게 되는 Intel Boot Initiative다. EFI 훗날 UEFI 포럼에서 Specification을 관리하게 되며, 라이센스는 인텔이 유지하게 된다. 오늘날 UEFI라고 불리는 것은 EFI 1.10를 기반으로 한 Specification이다.

https://uefi.org/learning_center/logouse

UEFI 로고

EFI는 BIOS 같은 하드웨어와 밀접한 소프트웨어인 펌웨어와 비교적 상위 계층인 운영체제의 사이에 위치하며, 운영체제를 부팅하거나 Pre-Boot 응용 프로그램을 실행하는 표준 환경을 제공한다. "운영체제를 부팅한다"는 말에서 알 수 있 듯 운영체제가 설치된 볼륨을 찾아 해당 볼륨의 운영체제 부트 로더를 실행하는 역할도 한다. 기존 MBR 구조에서는 스토리지의 첫 섹터를 읽어 메모리에 로드한 후 첫 바이트부터 명령을 이어나갔지만 EFI 시스템에서 MBR은 호환성을 위해 남아있을 뿐 GPT라는 구조를 사용해 파티션들을 관리하고 운영체제를 부팅한다.

EFI를 사용하면 MBR보다 더 큰 크기의 스토리지도 인식할 수 있고 Pre-Boot(PXE)를 통한 네트워크 부팅, 부팅 프로세스가 변조되지 않았는지 검사하는 보안 부팅도 가능해진다. 또한 운영체제는 EFI를 통해 GOP(그래픽 출력 프로토콜), 메모리 맵, ACPI, 시간 서비스 등을 이용할 수 있다. EFI는 단독적으로 EFI 응용 프로그램을 실행할 수 있는데, EFI 응용 프로그램의 예시로는 Windows Boot Manager 같은 운영체제 부트 로더가 있다. 그래픽스 기능을 통한 GUI(이 땐 GOP가 아닌 UGA 프로토콜 이용), 다국어 지원, 마우스와 키보드도 사용할 수 있다는 점 덕분에 아래 그림처럼 화려한 BIOS 메뉴를 사용할 수 있게 됐다.

MSI Motherboard 제품군의 BIOS 메뉴

EFI와 UEFI의 차이는 뭘까. 그 답도 UEFI 포럼에서 찾을 수 있다.

https://uefi.org/faq
WHAT IS THE RELATIONSHIP BETWEEN EFI AND UEFI?

The UEFI specification is based on the EFI 1.10 specification published by Intel®, with corrections and changes managed by the UEFI Forum. Intel still holds the copyright on the EFI 1.10 specification, but has contributed it to the Forum so that the Forum can evolve it. There will not be any future versions of the EFI specification, but customers who license it can still use it under the terms of their license from Intel. The license to the Unified EFI Specification will come from the Forum, not from Intel.

UEFI 명세는 인텔에 의해 발표된 EFI 1.10 명세를 기반으로 하며 수정 및 변경사항은 UEFI 포럼에 의해 관리된다. 인텔은 여전히 EFI 1.10 명세의 저작권을 유지하고 있지만 포럼이 그것을 발전시킬 수 있도록 포럼에 기여하고 있다. 그 어떤 EFI 명세의 추후 버전은 없을 것이지만 라이센스를 가진 이용자들은 인텔의 라이센스 조건 하에 그것을 사용할 수 있다. UEFI 명세는인텔이 아닌 포럼으로부터 나온다.

단순 부팅뿐만 아니라 메모리에 접근하고, 하드웨어에 저장된 시간 값을 가져오는 등 운영체제가 담당하는 기능도 UEFI를 통해 운영체제가 이용하는 것이다. 그러므로 UEFI는 아래 그림과 같이 운영체제와 펌웨어 중간에 위치해있는 셈이다. 

https://en.wikipedia.org/wiki/Unified_Extensible_Firmware_Interface

소프트웨어 스택에서의 EFI 위치

굳이 추가한다면 사용자와 가까운 User Application은 운영체제 위에, 드라이버는 운영체제와 EFI 사이에 위치할 것이다. 아래 그림에서 Run time과 Boot라고 적힌 것이 EFI가 제공하는 런타임 서비스와 부트 서비스다. Microsoft 커뮤니티에 BIOS와 UEFI 관련해 자세하게 작성된 좋은 글이 있어 참고하면 좋을 듯 하다.

https://answers.microsoft.com/en-us/windows/forum/all/uefi-secure-boot-in-windows-81/65d74e19-9572-4a91-85aa-57fa783f0759

EFI의 위치와 역할

본 글의 주제인 GPT에 대한 Specification도 UEFI Specification에서 명시하고 있다. 최신 버전의 UEFI Specification은 아래 링크에서 볼 수 있다. 가장 최신 버전 UEFI Specification을 보면 목차에 GPT에 대한 내용이 있는 걸 볼 수 있다.

https://uefi.org/specifications

GPT(GUID Partition Table)

그렇다면 GPT는 무엇인가. GPT는 EFI가 사용하는 파티션 테이블 구조다. MBR에서는 디스크의 첫 섹터 영역 중 446~510 바이트 영역에 16 바이트 크기의 엔트리 4개를 두고 각각의 파티션 정보를 저장했다. 그리고 파티션 정보가 저장된 영역을 우리는 파티션 테이블이라고 했다. 즉 GPT도 파티션의 시작 섹터, 크기 등을 담은 정보가 담겨있다. 확장 파티션이라는 구조를 사용해 5개 이상의 파티션을 나타내야 했던 MBR과 다르게 GPT는 처음부터 많은 수의 파티션을 나타낼 수 있도록 되어있다.

GPT 시스템은 크게 보호용 또는 하이브리드 MBR, GPT 헤더, 파티션 테이블, 파티션 영역, 백업 영역으로 나뉜다.

GPT Disk Layout

UEFI Specification에서 설명하는 GPT의 이점은 아래와 같다(UEFI 2.9 Specification의 "5.1 GPT and MBR disk layout comparison" 참조).

  • Logical Block Addresses (LBAs) are 64 bits (rahter than 32 bits).
  • Supports many partitions (rather than just four primary partitions).
  • Provides both a primary and backup partition table for redundancy.
  • Uses version number and size fields for future expansions.
  • Uses CRC32 fields for imporved data integrity.
  • Defines a GUID for uniquely idetifying each partition.
  • Uses a GUID and attributes to define partition content type.
  • Each partition contains a 36 character human readable name.

GUID

이름에서도 알 수 있듯이 GPT는 GUID를 사용한다. GUID를 보기 전에 UUID(Universally Unique IDentifier)를 먼저 잠깐 보자.

UUID는 각각의 주체를 고유하게 구분하기 위한 식별자(의 형식과 생성 방법에 대한) 표준이다. 각 주체가 스스로 이름(식별자)을 짓되 고유성을 충족할 수 있도록 하기 위한 방법이 필요했고, 이를 위해 오픈 소프트웨어 재단(OSF)에서 분산 컴퓨팅 환경(DCE)의 일부로 표준화했다. UUID는 16 Octets (128 Bits) 길이의 수(2^128 개가 만들어짐)이며, 표현 방식은 32자의 Hexadecimal과 4개의 하이픈('-')을 사용해 36자를 사용한다.

ex) 01234567-0123-0123-0123-0123456789AB

GUID는 UUID를 기반으로 만들어진 유사 난수다. 응용 프로그램에서 사용되며 특히 MS의 Windows에서 Component를 구별하는 식별자로 자주 사용된다. 예를 들면 WFP(Windows Filtering Platform)에서 필터, 콜아웃 객체들을 식별하는 데 있어 32 비트, 64 비트 정수도 사용되지만 GUID를 사용한 Key로도 이들을 식별할 수 있다. 그래서 GUID와 UUID는 겉보기에는 차이가 없으며 생성방법에만 차이가 있다.

아래 그림은 Windows에서 AMSI Provider를 구분하는 데 GUID를 사용하는 모습이다.

V3Lite의 AMSI Provider GUID

MBR

EFI는 MBR 위치의 부트코드를 사용하지 않는다. 하지만 GPT 시스템에서 디스크의 가장 첫번째 섹터(LBA 0)는 MBR을 사용하던 기존 BIOS와의 호환성을 위해 Legacy MBR이 위치될 수 있다. non-UEFI 모드에서는 MBR의 부트코드가 실행되지만 GPT를 사용하는 시스템에선 MBR의 부트코드는 실행되지 않는다.

GPT 시스템의 MBR Partition Table Entry는 파티션 타입 값으로 아래 값들을 가질 수 있다.

  • 0xEE: 전체 디스크를 다루는(covering) 가짜 파티션(a fake partition)을 정의하기 위해 Protective MBR에서 사용된다.
  • 0xEF: UEFI 시스템 파티션임을 나타낸다.

부팅 가능한 디스크에서 Protective MBR은 GPT 디스크 레이아웃의 LBA 0 섹터에 위치해야 한다. GPT 파티션 구조를 이해하지 못하는 툴들과의 호환성을 유지하기 위해 Protective MBR은 GPT 파티션 테이블 헤더(LBA 1)보다 앞서있다. Protective MBR은 아래 표와 같은 값을 가진다.

영역 오프셋 크기 내용
Boot Code 0 440 Unused by UEFI systems.
Unique MBR Disk Signauter 440 4 Unused. Set to zero.
Unknown 444 2 Unused. Set to zero.
Partition Record 446 16 * 4 Array of four MBR partition records.
Signature 510 2 Set to 0x55AA

Protective MBR의 파티션 테이블은 첫번째 엔트리만 사용하며, 디스크 전체 영역을 예약(reserving)하기 위한 값들이 저장된다. 나머지 3개 엔트리는 모두 0으로 채워진다. 디스크의 크기가 2 TB를 넘어 Protective MBR Partition Table Entry로 전체 디스크를 예약하지 못해도 GPT가 2 TB 크기를 넘어 인식할 수 있기 때문에 대용량 디스크도 사용하는 데 문제가 없다. 첫번째 엔트리에는 다음 값들이 들어갈 수 있다.

영역 오프셋 크기 내용
BootIndicator 0 1 Set to zero.
StartingCHS 1 3 Set to 0x200.
OSType 4 1 Set to 0xEE (i.e., GPT Protective)
EndingCHS 5 3 Set to 1.
StartingLBA 8 4 Set to 1.
SizeInLBA 12 4 Set to -1(0xFFFFFFFF).

EFI가 아닌 BIOS 서비스를 사용해 GPT 기반의 부팅을 지원하는 운영체제에서는 디스크의 첫번째 섹터(LBA 0)는 GPT 파티션 시스템을 인식할 수 있도록 수정된 부트로더 코드를 저장하는 데 사용될 수 있다. 이 경우 디스크의 기본 섹터 크기가 512 바이트가 아닐 수 있다. 이는 Hybrid MBR이라고 한다.

Close

글이 길어져 본 글에서는 GPT를 사용하는 EFI란 것에 대한 설명과 GPT에 대한 개요, Protective MBR에 대한 설명에서 끝내고 GPT의 주요 내용들은 다음 글에서 이어 작성하도록 하겠다.


https://geun-yeong.tistory.com/70


#1 GPT - GUID Partition Table (1)

Table of Contents Abstract 본 글과 다음 글에서는 GUID Partition Table에 대해 알아볼 것이다. GPT는 EFI에서 사용하는 디스크 파티션 구조로, BIOS 시스템의 MBR을 개선하기 위해 만들어졌으며, 더 큰 주소 비

geun-yeong.tistory.com


728x90

I

In this post we will be discussing about the following things.

  • 1.What is MBR partition table?
  • 2.What were the demerits of MBR partition structure?
  • 3.What is GPT Partition table?
  • 4.What are the plus points of GPT?
  • 5.What tools in Linux can be used to create GPT partition structure?

With the increasing demand for large size partitions, the partitioning and file systems are becoming more complex and advanced.

there are two mainly used disk partition styles.They are as follows.

1.MBR (Master Boot Record) partitioning style

2.GPT (GUID Partition Table)

Both the above mentioned schemes are used to identify the location of the partition on the hard disk.the type of partition used is decided when the disk is initiliazed.

the above shown diagram shows a disk initialization dialog in windows, when a new disk is added to the machine. when you initialize the disk these days you are presented with exactly the same options as shown in the above figure.

Master Boot Record (MBR) or Globally Unique Identifier Partition Table (GPT.).Previously there was only one option MBR.

MBR Partitioning style:

in this style the MBR resides in the first 512 bytes of the hard disk. This 512 bytes contains two things in MBR partitioning scheme.

  1. 440 bytes for boot loader(Grub, or windows boot loader)
  2. the remaining space is used for the partition table, ie: there can only be 4 primary partition in an MBR partitioning scheme.this remaining area also has the partition location information.

this can be done by two methods

  • CHS method: in this method a partition is located through cylinder,head,sector method. this is mentioned by a 24 bit number, in this case it can only mention disk at the max of 8gb.
  • LBA method: LBA stands for Logical Block Addressing, in this each and every sector is numbered serially resulting easy addressing of spaces upto 2TB.

Demerits of MBR partitioning scheme:

  1. it only allows four primary partitions.
  2. the workaround for creating more than four partition by making one of them extended(containing logical partitions inside that) this also leads to problems sometimes as some operating systems can only boot from Primary partitions. → Can be possible only some operating system can only boot from primary partititions.
  3. the CHS implementation in MBR partition table can lead to problems because the Cylinder,Head,Sector geometry of the disk can change.
  4. even the LBA scheme implemented puts a 2tb limitation.
  5. Logical partitions are stored in Linked List data structure over the extended partition, and can easily fail, which intern make can make some logical partitions inaccessible.

GPT Partition Style:

Now the MBR type partition table keep the partition table info such as information about the four primary partition in the first 512 bytes of the hard disk. In case of GPT the first sector is kept for "protective MBR" so that, old bios based computers can also boot from GPT partition table.

The GPT partition information starts from the second block or call it LBA 1

Note: LBA is nothing but the sectors numbered in such a way that it can be easily addressed, like LBA 0 is for MBR,LBA 1 for GPT header info etc.


LBA 0 - Protective MBR

LBA 1 - GPT Header information (GPT partition information)

LBA 2 - GPT partition array entry → 128 bytes for each partition array (1byte), which calls partition code

                                                → can reach upto 16,384 bytes. (16 byte), which calls GUID, consisting of randomly UUID


And most of the time LBA 2 contains GPT partition array entry.

the partition array entry typically reserves 128 bytes for each partition entry. Now for a disk of 512-byte sectors the partition array entry can reach upto 16,384 bytes. And in most cases the 34'th sector or call it block is the first usable sector in the disk.

Merits of GPT partition Style:

1.GPT supports up to 128 partitions so there is no need for extended of logical partitions.

2.GPT addresses 64 bit number LBA scheme, so it can address up to 8 ZiB size partitions.

3.GPT structure have primary and secondary header, so recovery is more promising that MBR

4.GPT provides 1 byte partition code, but GPT give you 16byte GUID value to uniquely identify the partition.

Tools for Creating GPT partitions:

Fdisk cannot create a GPT partition so we need to use some other tool to create it.

1.Parted can be used to create GPT partition table, and partitions of more than 2tb size.

2.Gdisk is also a nice tool to create GPT partition table.

728x90

이 부분해서 Slack 에서 대화생성하기 이후에 던져주는 부분을 활용하려면 아래와 같이 Slack 에서 Oauth Permission 을 허용시켜주어야 한다.


conversations.create


Initiates a public or private channel-based conversation

https://api.slack.com/methods/conversations.create


conversations.create API method

Initiates a public or private channel-based conversation

api.slack.com


Bot token 에 대해서 제대로 설정해주고, 해당 부분에 대한 코드를 작성하면 된다.

(물론 샘플 코드도 있더라)


import com.slack.api.bolt.App;
import com.slack.api.bolt.AppConfig;
import com.slack.api.bolt.jetty.SlackAppServer;
import com.slack.api.methods.SlackApiException;

import java.io.IOException;

public class ConversationsCreate {

    public static void main(String[] args) throws Exception {
        var config = new AppConfig();
        config.setSingleTeamBotToken(System.getenv("SLACK_BOT_TOKEN"));
        config.setSigningSecret(System.getenv("SLACK_SIGNING_SECRET"));
        var app = new App(config); // `new App()` does the same

        // Listen for a message shortcut with the callback_id "sample_message_action"
        // Message shortcuts require the commands scope
        app.messageShortcut("sample_message_action", (req, ctx) -> {
            var logger = ctx.logger;
            try {
                var payload = req.getPayload();
                // Call the conversations.create method using the built-in WebClient
                var result = ctx.client().conversationsCreate(r -> r
                    // The token you used to initialize your app
                    .token(System.getenv("SLACK_BOT_TOKEN"))
                    // The name of the conversation
                    .name("pretend-channel")
                );
                // Print result
                logger.info("result: {}", result);
            } catch (IOException | SlackApiException e) {
                logger.error("error: {}", e.getMessage(), e);
            }
            // Acknowledge incoming command event
            return ctx.ack();
        });

        var server = new SlackAppServer(app);
        server.start();
    }

}


하지만 여기서 단순하게 이렇게 설정하게 만들어주면 망하는 결과가 ... (난 Back-end API 에서 중계단을 만들거니까 이렇게 만들면 안되고 Service 부터 DTO 등까지 죄다 세세하게 분배해주었다.)

+ Recent posts