Configures the specified pin to behave either as an input or an output. See theDigital Pinspage for details on the functionality of the pins.
As of Arduino 1.0.1, it is possible to enable the internal pullup resistors with the modeINPUT_PULLUP. Additionally, theINPUTmode explicitly disables the internal pullups.
Syntax
pinMode(pin, mode)
Parameters
pin: the Arduino pin number to set the mode of. mode:INPUT,OUTPUT, orINPUT_PULLUP. See theDigital Pinspage for a more complete description of the functionality.
Returns
Nothing
Example Code
void setup() {
  pinMode(13, OUTPUT);    // sets the digital pin 13 as output
}

void loop() {
  digitalWrite(13, HIGH); // sets the digital pin 13 on
  delay(1000);            // waits for a second
  digitalWrite(13, LOW);  // sets the digital pin 13 off
  delay(1000);            // waits for a second
}
Notes and Warnings
The analog input pins can be used as digital pins, referred to as A0, A1, etc.
A client recently wanted to customize the product sort order of their WooCommerce products on the product category archive page. The archive used the default alphabetical sorting, but they had a few products that they wanted to be listed at the top of the category listing. Here’s how we did it.
Product Sorting Options
WooCommerceoffers the ability to customize the sorting order of products with a few settings changes.
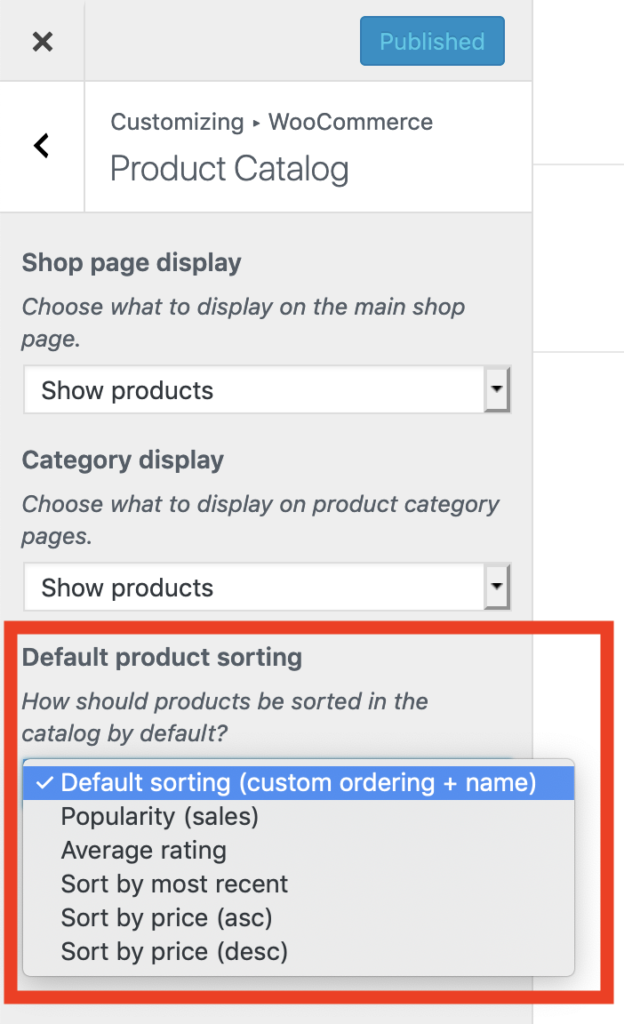
Go to Appearance > Customize in your WordPress admin. Once the Customizer opens, go to WooCommerce > Product Catalogue. This is where you will find your options for sorting products. Ensure that Default Product Sorting is set to “Default sorting (custom ordering + name)”. Publish the new settings and then go to edit an individual product.
[In previous versions of WooCommerce, this is how you would get to that setting: Go to WooCommerce > Settings in your WordPress admin. On the Products tab, click on the Display settings.]
Custom Sorting
All custom sorting is applied against all items and not against separate categories. Keep this in mind if you have a page that displays all products. For this particular project, the product pages were separated by category, so the sorting options didn’t need to be as detailed as others may need.
From the Products admin panel, you can select Sorting and then drag and drop your products in the specific order that you’d like. You can also order the products in the Quick Edit menu by changing the “Order” value. All items default to the value zero.The custom order displays the lower numbers first. You can also edit the order value in the Product Data > Advanced tab on the product edit page.
Move Specific Products to the Top
If you want to custom sort each and every product, you may do so. If you simply want to move a few select items to the top of the list, there is an easy way to do that.
Enter a negative number in the “Order” field of the product. By using a negative number, the item will have a lower value than the default “0” and therefore will show above those items. If you want to lump a group of products together and have WooCommerce sort them alphabetically, just use the same “order” value.
Conclusion
WooCommerce is a powerful e-commerce solution for WordPress and provides lots of ways to customize your online store.
Need Help with WooCommerce?
We offer web development services for WooCommerce and can build a custom WooCommerce extention that meets your exact needs.
When you compile your program it says how much program memory (stored in flash) you are using and how much dynamic ram you are using.
If you use F() you can move constant strings to the program memory instead of the ram. This will take up space that will decrease the amount of other code you can write. But it will free up dynamic ram.
My chip has 32KB of Flash memory (2Kb taken up by bootloader) and 2KB or RAM. Sometimes I need to store lots of data in RAM so I move the constant strings to Flash memory. Sometimes my program has a lot of steps and I have a shortage of Flash memory so I leave the strings in RAM.
If you use F() you can move constant strings to the program memory instead of the ram.
Actually what happens in a Harvard architecture uC is that thecompiled string stays in flashand does not get copied to SRAM during the C++ initialization that happens before your sketch receives run control.
Since the string is not moved to SRAM, it has the PROGMEM property and runs from flash.
Sometimes my program has a lot of steps and I have a shortage of Flash memory so I leave the strings in RAM.
That's not how it works.
Your string constants are ALWAYS in flash memory. They have to be, because when you take power away from RAM everything's gone. When you put power back on again, they have to be reloaded from somewhere, and that somewhere is the flash memory. Leaving off PROGMEM will do nothing to save you significant amounts of flash memory.
It's just that a normal part of initializing a C++ program is to load those arrays into SRAM before setup(). PROGMEM is an AVR-specific attribute that can be applied to variables that tells the compiler to not do that. Because flash is in a different memory space than RAM, special functions are needed to access from flash than from RAM.
In Gravity Forms 1.5 we're adding some new "Ready Classes". Using these new classes, you can easily create more advanced alternative layouts for the fields in your forms.
Essentially, Ready Classes are class names that you can add to the parent element surrounding each field to take advantage of pre-defined styles included in the default form stylesheet.
How to Use Ready Classes
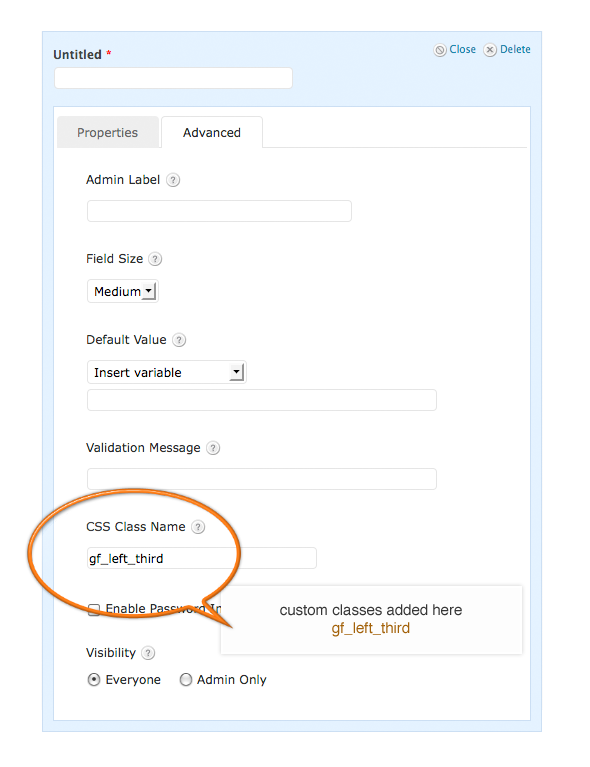
To add a Ready Class to a field, just edit your form in the Form Builder and then select the field you want to add the classes to. Under the "Advanced" tab, you’ll see an input called "CSS class name". Add the Ready Class name or names you want to add to the field here and then save the form.
Please note that this feature does NOT update live in the Form Builder. After you specify your Ready Class names, just save the form and you’ll see the classes being applied to your form in the preview window and on the live site.
The Ready Class Names
Here are the Ready Classes that are built in the Gravity Forms default stylesheet that you can use right away without having to write any of your own CSS.
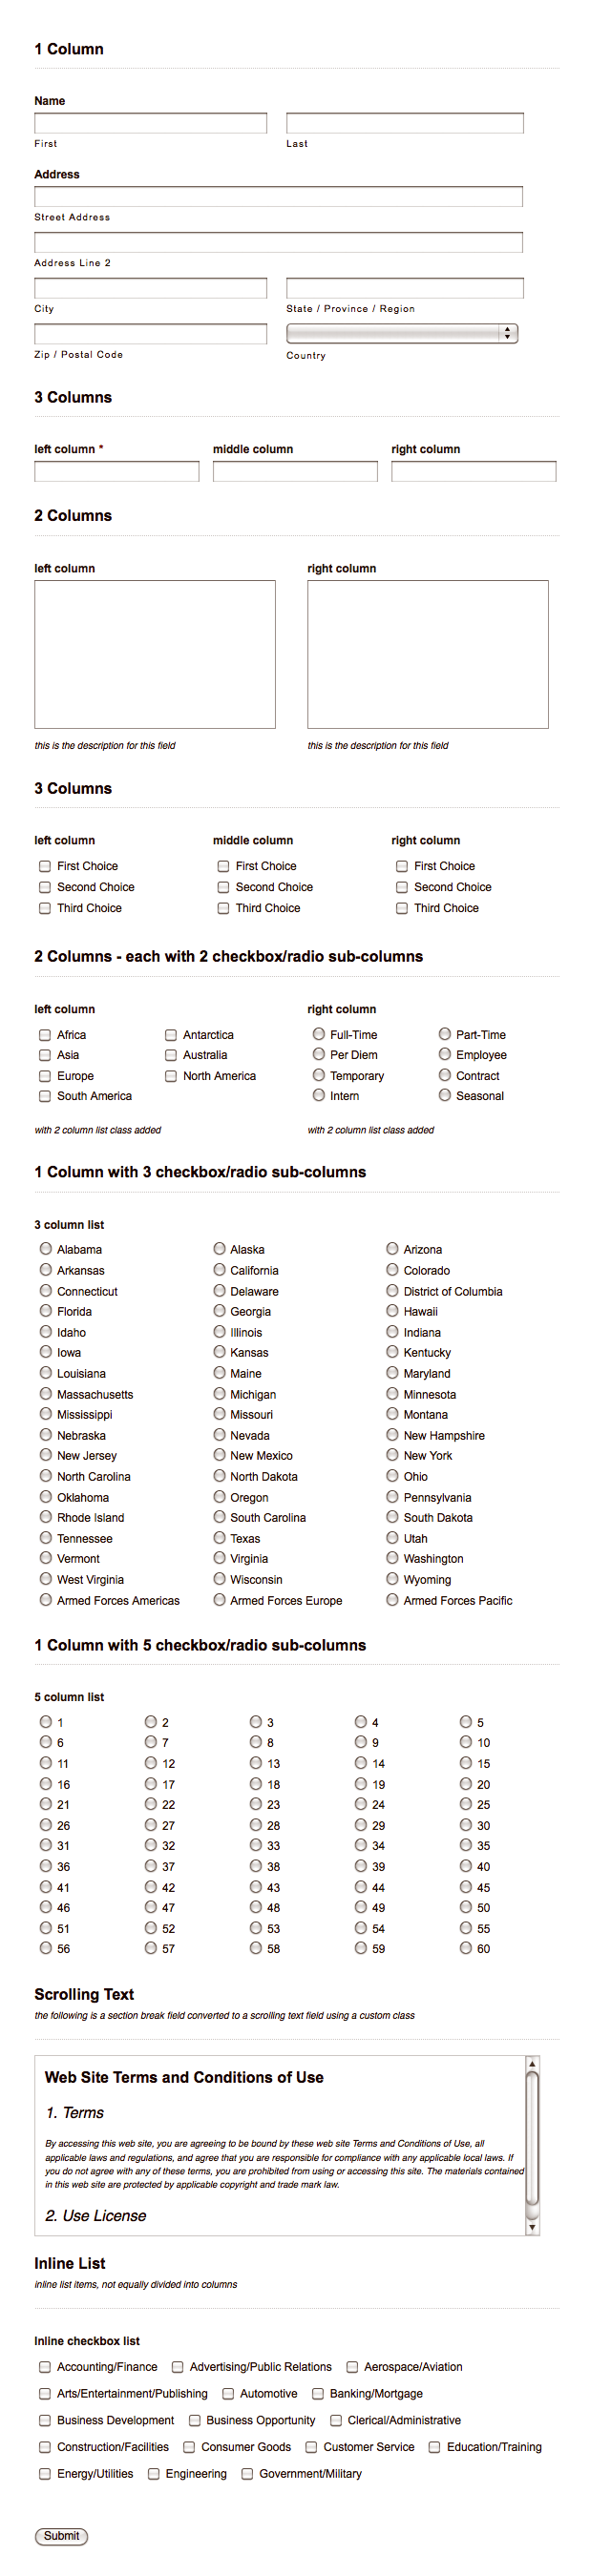
Halves (2 Columns)
Note: These only work with the "top label" form layout option.
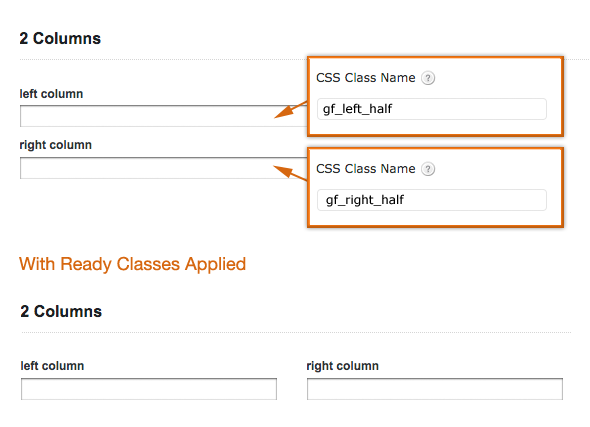
gf_left_half
This places the field in the left column (left half) of a 2 column layout. This only work with the "top label" form layout option.
gf_right_half
This places the field in the left column (right half) of a 2 column layout. This only work with the "top label" form layout option.
To align two fields side by side (2 equal columns) you can add these classes. The two fields have to be adjacent to each other in the Form Builder. The gf_left_half class has to be added to the first field and the gf_right_half class to the second field.
Example:
Thirds (3 Columns)
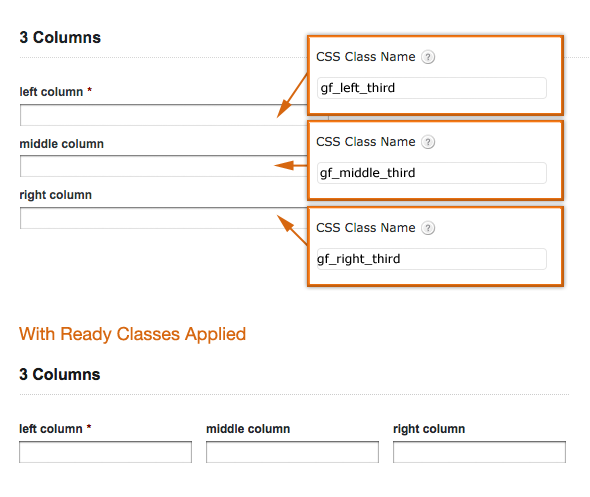
gf_left_third
This places the field in the left column (left third) of a 3 column layout. This only work with the "top label" form layout option.
gf_middle_third
This places the field in the middle column (middle third) of a 3 column layout. This only work with the "top label" form layout option.
gf_right_third
This places the field in the right column (right third) of a 3 column layout. This only work with the "top label" form layout option.
To align three fields side by side (3 equal columns) you can add these classes. The three fields have to be adjacent to each other in the Form Builder. The gf_left_third class has to be added to the first field, the gf_middle_third class to the second field and the gf_right_third class to the third field.
Example:
List Classes
gf_list_2col
This turns a multiple choice/checkbox list into an equally-spaced 2 column format. This only applies to multiple choice/checkbox lists and work with any of the form label position settings.
gf_list_3col
This turns a multiple choice/checkbox list into an equally-spaced 3 column format. This only applies to multiple choice/checkbox lists and work with any of the form label position settings.
Example:
gf_list_4col
This turns a multiple choice/checkbox list into an equally-spaced 4 column format. This only applies to multiple choice/checkbox lists and work with any of the form label position settings.
gf_list_5col
This turns a multiple choice/checkbox list into an equally-spaced 5 column format. This only applies to multiple choice/checkbox lists and work with any of the form label position settings.
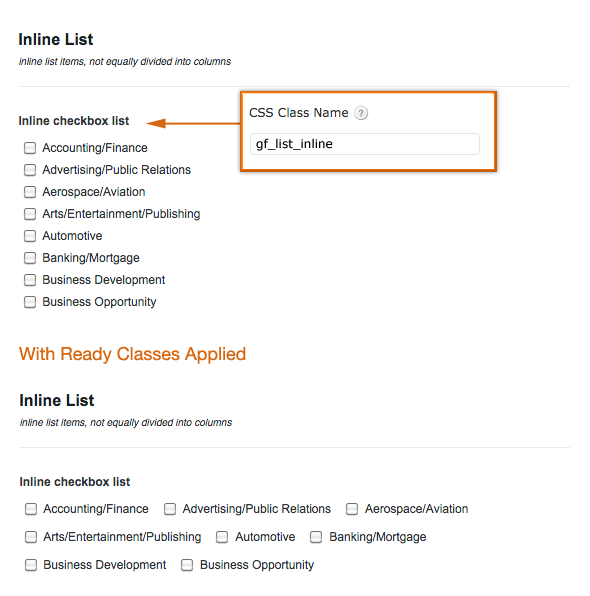
gf_list_inline
This turns a multiple choice/checkbox list into an inline horizontal list (not evenly spaced columns). This only applies to multiple choice/checkbox lists and work with any of the form label position settings.
Example:
gf_list_height_25
This applies a 25px height value all multiple choice/checkbox items in that list. This can be useful to avoid "hanging floats" caused by list items of unequal height. This only applies to multiple choice/checkbox lists and work with any of the form label position settings.
gf_list_height_50
This applies a 50px height value all multiple choice/checkbox items in that list. This can be useful to avoid "hanging floats" caused by list items of unequal height. This only applies to multiple choice/checkbox lists and work with any of the form label position settings.
gf_list_height_75
This applies a 75px height value all multiple choice/checkbox items in that list. This can be useful to avoid "hanging floats" caused by list items of unequal height. This only applies to multiple choice/checkbox lists and work with any of the form label position settings.
gf_list_height_100
This applies a 100px height value all multiple choice/checkbox items in that list. This can be useful to avoid "hanging floats" caused by list items of unequal height. This only applies to multiple choice/checkbox lists and work with any of the form label position settings.
gf_list_height_125
This applies a 125px height value all multiple choice/checkbox items in that list. This can be useful to avoid "hanging floats" caused by list items of unequal height. This only applies to multiple choice/checkbox lists and work with any of the form label position settings.
gf_list_height_150
This applies a 150px height value all multiple choice/checkbox items in that list. This can be useful to avoid "hanging floats" caused by list items of unequal height. This only applies to multiple choice/checkbox lists and work with any of the form label position settings.
Other Classes
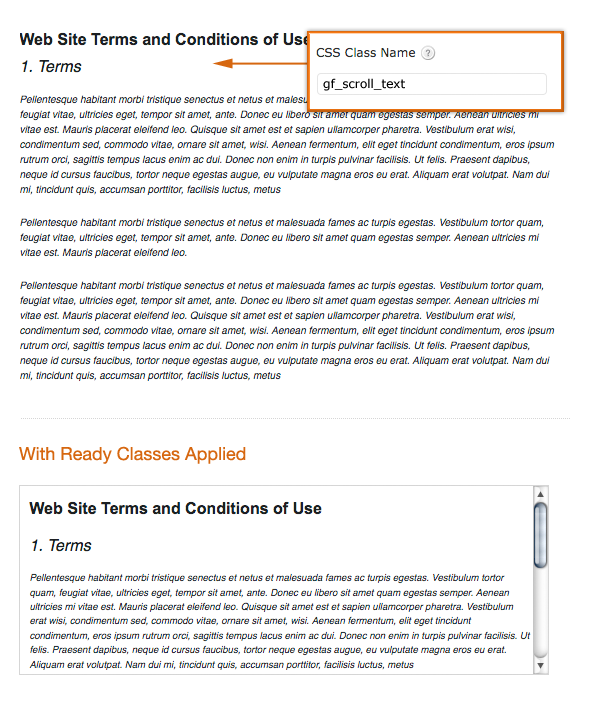
gf_scroll_text
This converts a section break field into a box with a fixed height that will automatically show a scroll bar if there’s a large amount of text. This is useful if you’re wanting to show large amounts of content to the user, but don’t want to have to link to it or make the form very long to show it (Terms of Service Agreements, etc). This class only works on section breaks and works with any of the form label position settings.
Example:
gf_hide_ampm
This hides the am/pm selector in the time field- this only hides the field on the form, not in the form entry table. This works with any of the form label position settings.
gf_hide_charleft
This hides the characters left counter beneath paragraph text fields when using the maximum characters option. This works with any of the form label position settings.
Q & A
Can I use multiple classes on the same field?
Yes, you can use multiple classes together. Just separate each class name by a space. Note: This doesn't work for all of the styles, but many can be combined if they're applicable to the field type. For example, you may have a 2 column primary layout, and want to use 2 column list layouts within the columns.
Can I create my own classes?
Yes, the classes are added to the parent <li> element surrounding a field so you can define your own class name and add your own rules to your theme stylesheet based on that class name being added to the field.
Notes
You can also see anexampleof several of these classes applied in one formhere.
One final note. As with any CSS rules, your particular theme CSS may override or supersede some of these styles. They've been tested in a variety of themes and work well, but you may have to make some adjustments to your theme styles for everything to work properly.


