728x90

In this blog post, we will see the C program to convert Hexadecimal to Decimal. In the interview, people ask the below questions,


  • How will you convert hexadecimal to decimal value?
  • Write a C program to convert hexadecimal number system value to decimal number system?
  • Implement logic to convert a hexadecimal number to a decimal number system?
  • Get a hexadecimal number from the user and convert it to its decimal equivalent?

Examples:

Input : 67

Output : 103


Input : 512

Output : 1298


Input: 123

Output: 291


We need to know the decimal and hexadecimal numbers before writing the C program to convert hexadecimal to the decimal.

The hexadecimal number system is a base 16 number system. The hexadecimal number is represented by 16 values i.e 0 1 2 3 4 5 6 7 8 9 A B C D E F.

The decimal number system is a base 10 number system. It uses 10 symbols to represent all numbers i.e. 0123456789


Logic to convert Hexadecimal to Decimal System:

We know that in hexadecimal number uses 16 symbols {0, 1, 2, 4, 5, 6, 7, 8, 9, A, B, C, D, E, F} to represent all numbers. Here, (A, B, C, D, E, F) represents (10, 11, 12, 13, 14, 15).

We need to run a loop from 0 to  (buffer_length -1). The buffer_length  is the length of the buffer which contains entered hexadecimal number.

To convert hex to decimal, we need to extract the digits of a given hexadecimal number from the buffer. At the time of extracting digits from the hexadecimal number, multiply the digit with the proper base (Power of 16) and add it to the variable “decimal”.


After ending the iteration, the variable “decimal” will store the resultant decimal number.
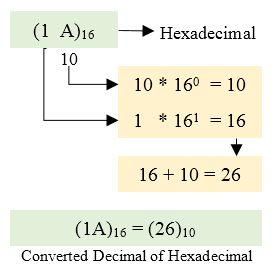
For Example:
If the hexadecimal number is 1A.
decimal = 1*(16^1) + 10*(16^0) = 26

Below diagram explains how to convert hexadecimal number ( 1AB ) to equivalent decimal value:


C Program to convert hexadecimal to decimal number system:


#include <stdio.h>
#include <math.h>
#include <string.h>
#define ARRAY_SIZE  20
int main()
{
    char hex[ARRAY_SIZE];
    long long decimal = 0, base = 1;
    int i = 0, value, length;
    /* Get hexadecimal value from user */
    printf("Enter hexadecimal number: ");
    fflush(stdin);
    fgets(hex,ARRAY_SIZE,stdin);
    length = strlen(hex);
    for(i = length--; i >= 0; i--)
    {
        if(hex[i] >= '0' && hex[i] <= '9')
        {
            decimal += (hex[i] - 48) * base;
            base *= 16;
        }
        else if(hex[i] >= 'A' && hex[i] <= 'F')
        {
            decimal += (hex[i] - 55) * base;
            base *= 16;
        }
        else if(hex[i] >= 'a' && hex[i] <= 'f')
        {
            decimal += (hex[i] - 87) * base;
            base *= 16;
        }
    }
    printf("\nHexadecimal number = %s", hex);
    printf("Decimal number = %lld\n", decimal);
    return 0;
}


Enter hexadecimal number: 1A
Hexadecimal number = 1A
Decimal number = 26
728x90

청약통장의 명의변경


청약저축 통장의 경우에는 가입일자와 상관없이, 위의 명의변경 가능사유를 적용

청약예금과 청약부금의 경우에는 위와 같이, 가입일자 2000. 3. 26 이전 가입인지 후 가입인지를 두고 명의변경의 기준여부를 적용한다


배우자 또는 직계존비속간의 명의 변경시 반드시 세대주 변경이 전제되어야 하는가?

세대별 주민등록표상 세대주 변경이 전제, (즉 주민등록등본 상에 같이 등재되어 있으면 된다.) 단순히 세대주가 각각 분리된 상태라면 명의 변경은 불가능하다.


출처:

www.applyhome.co.kr/cu/cub/selectFAQList.do#faq_con09

'부동산 > 청약' 카테고리의 다른 글

정부24 세대주 변경  (0) 2020.12.17
728x90

node.js의 module.exports와 exports

(노트: 이 글은 Node.js 6.1.0 릴리즈 이후에 작성되었습니다.)

요약

  • module.exports는 require() 함수를 사용했을 때 반환 받는 변수라고 생각해봅시다. 비어 있는 객체가 기본값이며 어떤 것으로도 자유롭게 변경할 수 있습니다.
  • exports 자체는 절대 반환되지 않습니다! exports는 단순히 module.exports를 참조하고 있습니다. 이 편리한 변수를 사용하면 모듈을 작성할 때 더 적은 양의 코드로 작성할 수 있습니다. 이 변수의 프로퍼티를 사용하는 방법도 안전하고 추천하는 방법입니다.

exports.method = function () { /* ... */ } // vs. module.exports.method = function () { /* ... */ }

간단한 모듈 예제

먼저 예제로 사용할 코드가 필요합니다. 간단한 계산기로 시작합니다.

// calculator.js module.exports.add = (a, b) => a + b

다음처럼 사용할 수 있습니다.

// app-use-calculator.js const calculator = require('./calculator.js') console.log(calculator.add(2, 2) // 출력: 4

모듈 감싸기

Node.js는 require()로 모듈을 불러올 때 함수 래퍼(wrapper) 형태를 사용해 내부적으로 감싸서 호출합니다.

(function (exports, require, module, __filename, __dirname) { // calculator.js의 내용은 여기에 추가해 실행합니다. module.exports.add = (a, b) => a + b });

module 객체

변수 “module”은 객체로 현재 모듈을 나타냅니다. 이 변수는 각 모듈에 지역적이며 비공개(private) 입니다. (모듈 코드에서만 접근할 수 있습니다.)

// calcualtor-printed.js module.exports.add = (a, b) => a + b console.log(module) // 이 모듈을 require('./calculator-printed.js')로 호출하면 다음과 같은 결과를 볼 수 있습니다. // // Module { // id: '/Users/laz/repos/module-exports/calculator-printed.js', // exports: { add: [Function] }, // parent: // Module { ... } // filename: '/Users/laz/repos/module-exports/calculator-printed.js', // loaded: false, // children: [], // paths: [ ... ] // }

module.exports

  • 객체 참조로 require() 호출을 하면 받는 값입니다.
  • Node.js에 의해 자동으로 생성됩니다.
  • 일반 JavaScript 객체를 참조합니다.
  • 또한 기본값은 비어 있습니다. (앞서 코드에서는 add() 메소드를 추가했습니다.)

다음 두 방법으로 module.exports를 사용합니다.

  1. 공개(public) 메소드를 붙여 사용합니다. (앞서 작성한 예제가 이 방법입니다.)
  2. 직접 작성한 객체나 함수로 대체하는 방식을 사용합니다.

왜 대체하는 방식으로 사용할까요? 대체하는 방식으로 사용하면 다른 클래스를 임의적으로 수정해 반환하는 것도 가능합니다. 다음 ES2015 예제를 보겠습니다.

// calculator-base.js module.exports = class Calculator { add(a, b) { return a + b } substract(a, b) { return a - b } }

이 calculator-base 예제에서는 클래스를 내보냈습니다. 다음 예제에서는 “Calcaulator” 클래스를 확장한 후, 클래스의 개체를 내보냅니다.

// calculator-advanced.js const Calculator = require('./calculator-base.js') class AdvancedCalculator extends Calculator { multiply(a, b) { return a * b } devide(a, b) { return a / b } } module.exports = new AdvancedCalculator()

// app-use-advanced-calculator.js const calculator = require('calculator-advanced.js') console.log(calculator.add(2, 2)) // 출력: 4 console.log(calculator.multiply(3, 3)) // 출력: 9

exports 별칭(alias)

  • exports는 편의 변수로 모듈 작성자가 코드를 덜 작성하도록 돕습니다.
  • 이 변수의 프로퍼티를 사용하는 방식은 안전하고 추천하는 방법입니다. (예를 들면 exports.add = function () { /* ... */ } 식으로)
  • exports  require() 함수에서 반환되지 않습니다. (module.exports는 반환하지만요!)

좋은 예제와 나쁜 예제를 확인합니다.

// calculator-exports-exmaples.js // 좋음 module.exports = { add(a, b) { return a + b } } // 좋음 module.exports.subtract = (a, b) => a - b // 가능함 exports = module.exports // 위에서 작성한 코드보다 간단하고 짧은 코드 exports.multiply = (a, b) => a * b // 나쁨, exports는 바깥으로 전달되지 않음 exports = { divide(a, b) { return a / b } }

노트: module.exports를 함수나 객체로 대체하는 경우는 일반적인 접근법입니다. 이렇게 대체하면서도 여전히 exports 축약을 사용하고 싶다면 exports를 새로 대체할 객체를 가리키도록 설정해야 합니다. (위에서도 이런 방법을 사용헀습니다.)

exports = module.exports = {} exports.method = function () { /* ... */ }

결론

변수명은 exports지만 실제로 내보내지 않는다는 사실은 좀 혼란스러울 수 있습니다. 막 node.js를 시작한 사람이라면 특히 그럴겁니다. 공식 문서에서도 이 부분이 조금 이상합니다.

exports와 module.exports의 관계가 마술처럼 느껴진다면 exports는 무시하고 module.exports만 사용하도록 지침을 드립니다.

제 경우엔 이런 코드가 마술이라고 생각하지 않습니다. 개발자라면 사용하는 플랫폼과 언어가 어떻게 동작하는지 깊게 이해하려는 노력을 항상 해야합니다. 이처럼 깊게 이해하는 과정에서 프로그래머는 값진 자신감과 지식을 얻으며 코드 품질, 시스템 구조와 생산성에 긍정적인 영향을 주게 됩니다.

제 글을 읽어주셔서 감사합니다. 의견이나 생각은 언제나 환영하니 덧글로 남겨주세요.


edykim.com/ko/post/module.exports-and-exports-in-node.js/

728x90

[Nodejs] Class사용 및 상속(extends)하기

출처: https://fenderist.tistory.com/313 [Devman]

+ Recent posts