Facebook Instant Articles, introduced in 2015, is a mobile publishing format that enables news publishers to distribute articles through the Facebook app.
LikeGoogle AMP, thesearticles load and display 10x fasterthan the standard mobile web, creating a better user experience. Publishers were initially hesitant to comply with this new Facebook initiative, but those that were most interested in getting their content out to new audiences embraced this new content formatting system.
It certainly didn’t hurt that Facebook promised that they wouldhelp publishers earnfrom the content they published. Facebook would keep 100% of the advertising revenue for any ads they sold, and publishers could take 70% of whatever Facebook sold for them.
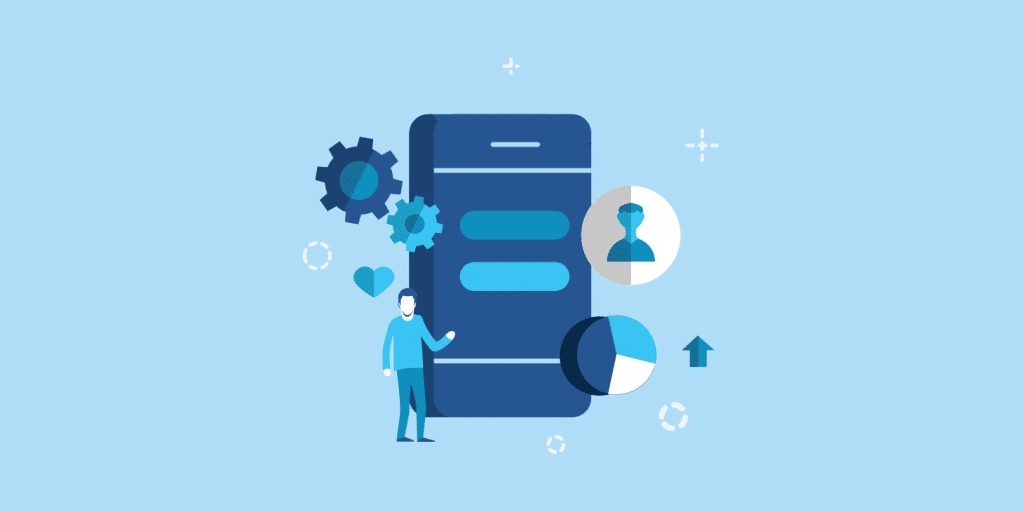
In order to get involved, all that publishers needed to do was adapt their articles to take on Facebook Instant Articles’ new formatting. Buzzfeed, Mashable, and Techcrunch are popular media sites that complied almost immediately. It’s possible to identify Facebook Instant Articles from those that aren’t thanks to the lightning bolt icon attached to the article preview.
Adapting existing content to a new format inevitably comes with challenges. Here are some of the greatest pros and cons associated with using Facebook Instant Articles with your WordPress website:
Facebook Instant Articles: Pros
Faster site load speed = an enhanced user experience.
Users may share your content more.
Gives publishers access to new monetization options.
Access to new audiences and increased reach.
Facebook Instant Articles: Cons
Only displays your article: Facebook will not show anything that isn’t directly related to your article’s content, such as your importantwidgetsoremail signup forms.
Limits photos, videos, and ad blocks (though you can still use them with a little tinkering).
It presents yet another way a company is trying to serve up your own content. In other words, you have less control as people aren’t hitting your original site. People have expressed similar concerns with Google AMP.
You have to get manually approved by Facebook.
How to Format Facebook Instant Articles
There are several ways to format Facebook Instant Articles.
One way is to create Instant Article templates. That said, this method is for when youaren’tusing WordPress or aren’t publishing articles through a third-party tool.
However, if you use WordPress or are publishing articles through a third-party tool, you can import your articles in 3 ways:
Supported third-party publishing tool, such as a Facebook Instant Articles WordPress plugin
If you’re using a Custom CMS, the first two methods are the way to go, but if you’re using CMS such as Drupal or WordPress and do not have a team of developers at your disposal, the last option (using a WordPress plugin) is best. It enables independent publishers to make use of Facebook Instant Articles in the same way the big publishers do.
How to Setup Facebook Instant Articles for WordPress
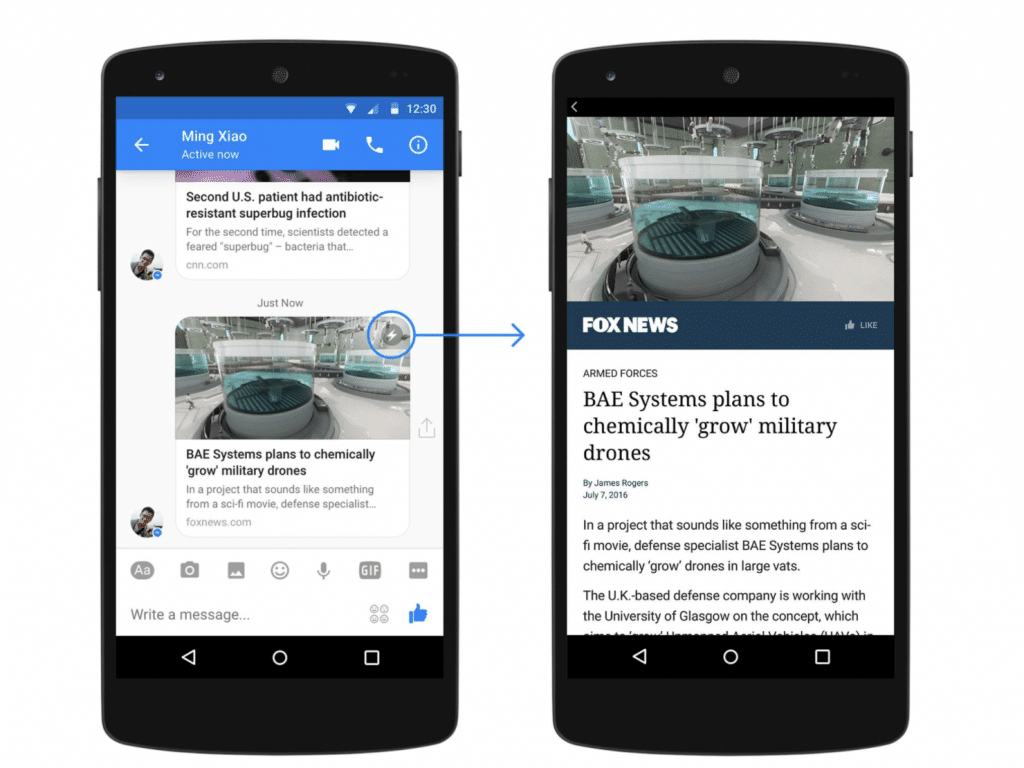
WordPress is the largest CMS used in the world today andpowers 33% of the web. Knowing this, Facebook decided to work with Automattic, the parent company of WordPress, to provide WordPress users with a free plugin to easily share content on Facebook in the Instant Articles format. However, we have seen somecritical performance issueswith theofficial plugin.
Facebook Instant Articles performance
Because of this, we recommend using an unofficial third-party plugin. In order to setup Facebook Instant Articles on your WordPress website, you’ll need:
A WordPress site
A Facebook page associated with the business behind your WordPress site (suggested reading:how to create a Facebook page)
Facebook will ask you to select a Facebook page for your website. Check the box to agree with the terms and then click on the ‘Access Instant Articles Tools’ button.
Access Instant Articles Tools
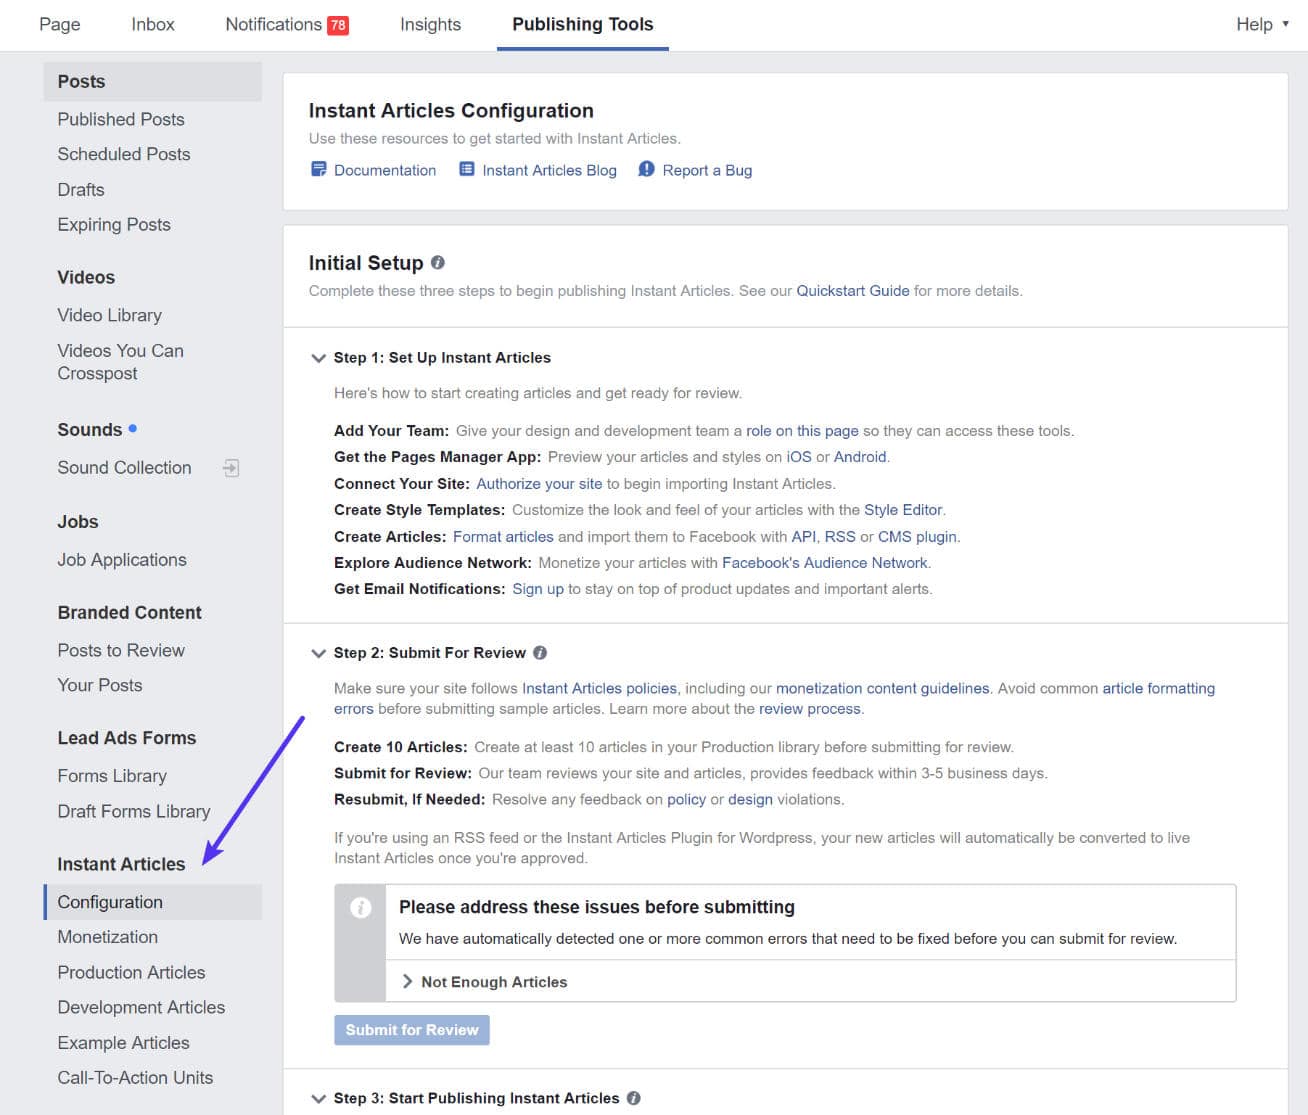
This will take you to the publisher tools on your Facebook page, which will now have anInstant Articlessection.
Facebook Instant Articles publishing tools
Step 2
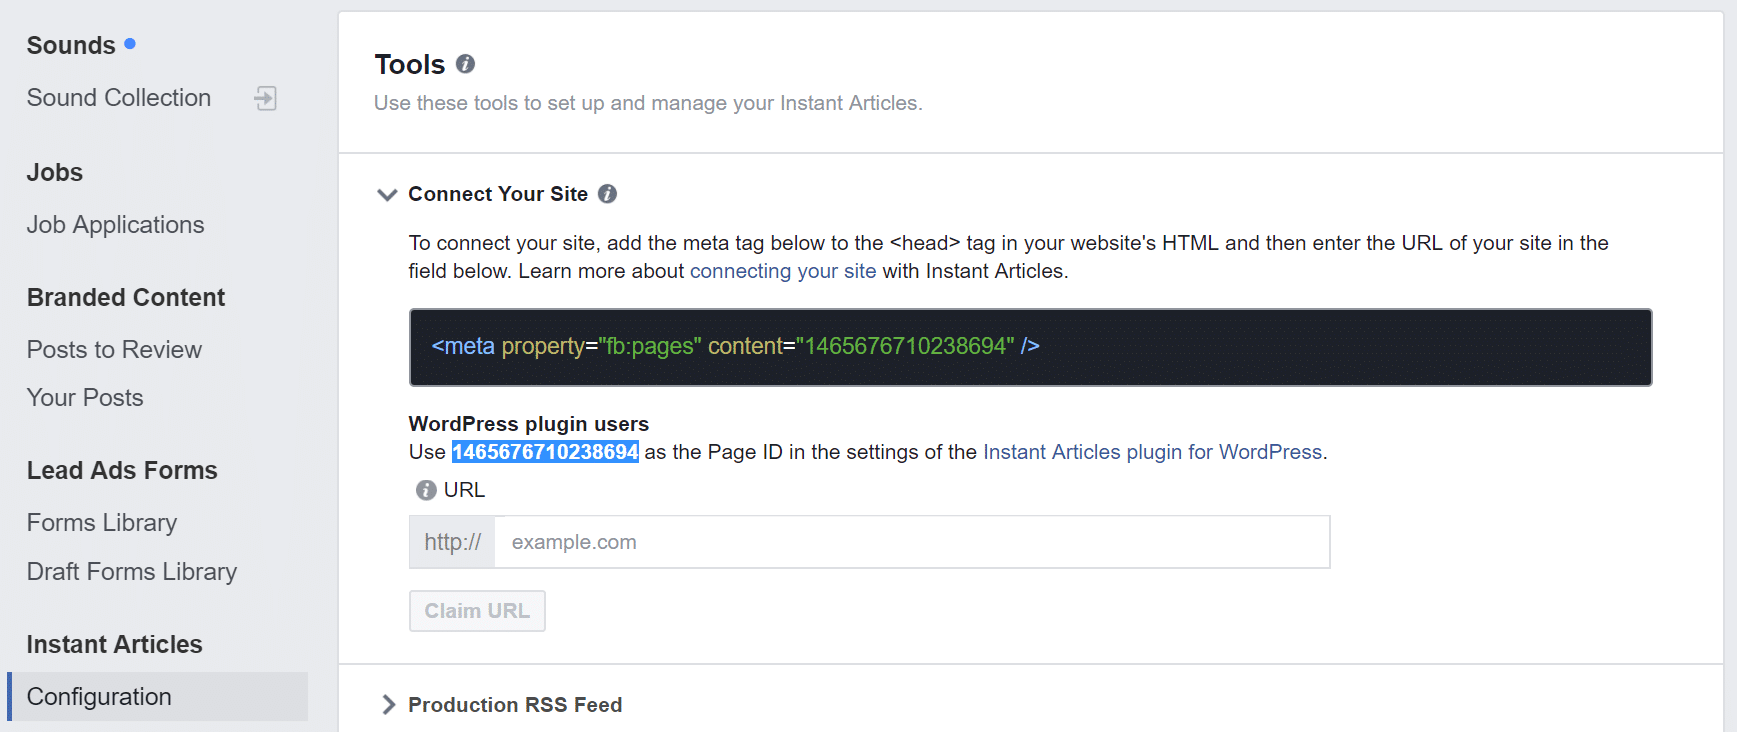
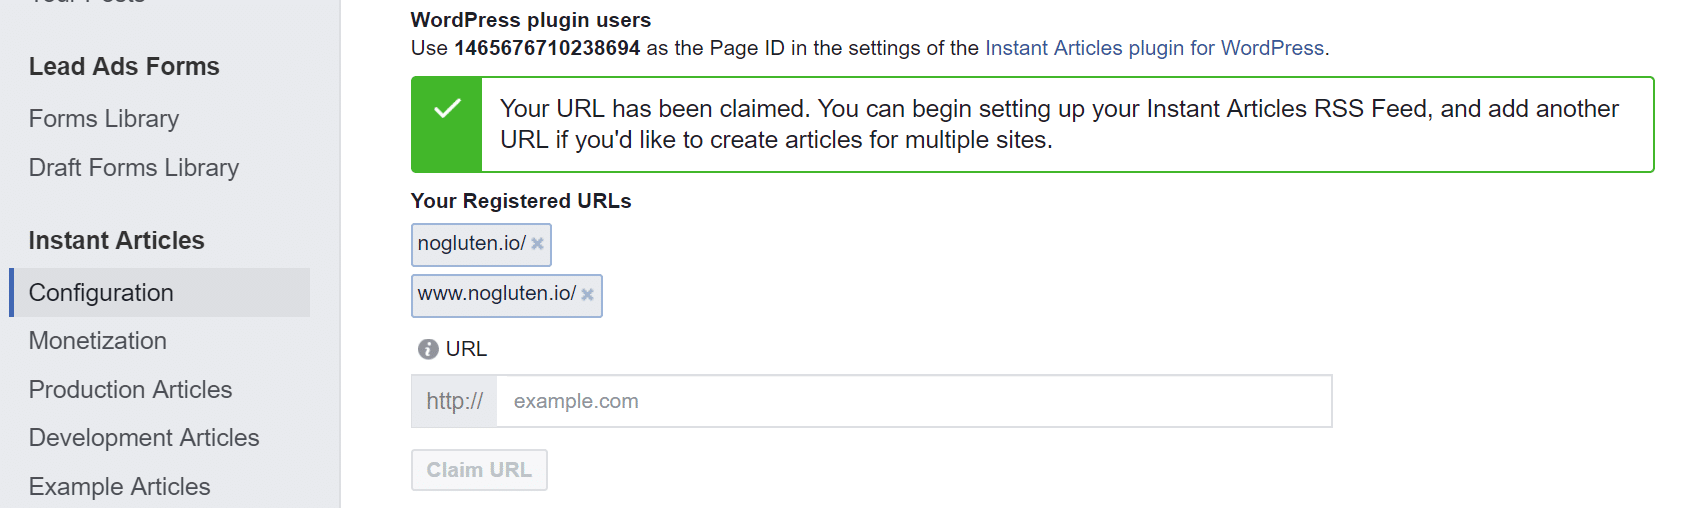
Prove ownership of your website by claiming your URL. Under “Instant Articles → Configuration → Tools → Connect Your Site” you will find your Page ID. Copy this to your clipboard.
Facebook Instant Articles connect site
Step 3
Download and install the WP Native Articles plugin on your WordPress site. This is not the official plugin, but the one we recommend if you’re concerned with performance.
One of the most useful and interesting features is content parsing, which corrects for some of the unstructured nature of WordPress content. By adding proper structure and formatting, WP Native Article’s content parsing feature helps content load even faster than the standard plugin offering. It also lets you integrate Google Analytics, ads, etc.
WP Native Articles WordPress plugin
Though the core WP Native Articles plugin is free, there’s a premium version available starting at $49 for a single site. The premium version comes with API syncing, advanced article analytics, and premium support if you run into any issues with deployment.
We grew our traffic 1,187% with WordPress. We’ll show you how.
Join 20,000+ others who get our weekly newsletter with insider WordPress tips!
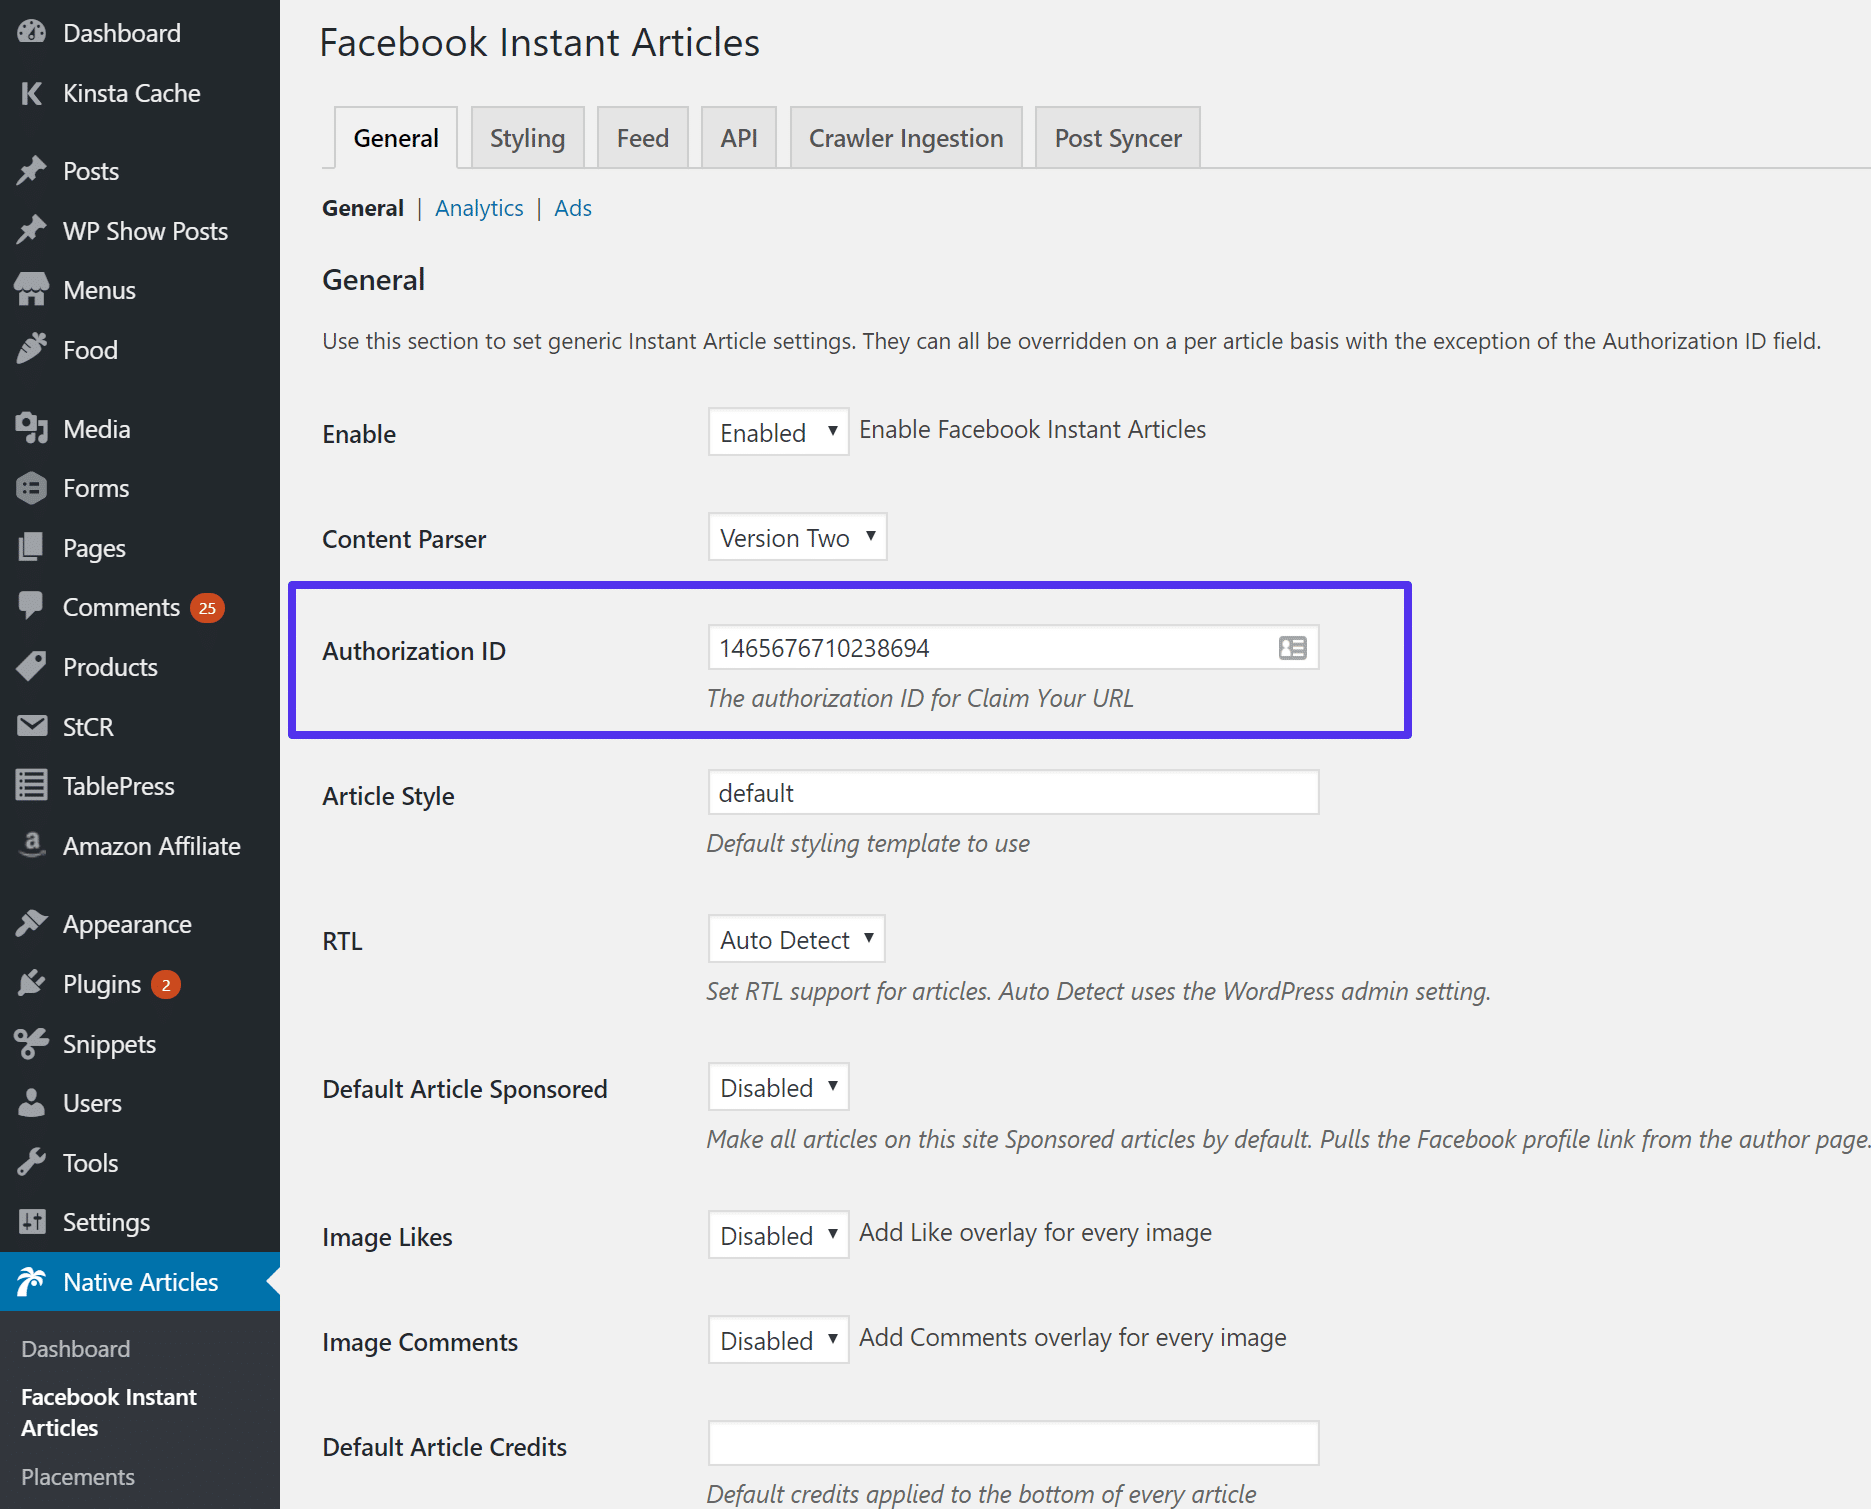
Take the Page ID you copied in Step 2 and paste it into the Authorization ID field of the WP Native Articles WordPress plugin.
Facebook Instant Articles authorization ID
Then click “Save Changes.”
Step 5 ★
After adding your page ID to the plugin settings, go back to the publisher tools on your Facebook page. Add your website URL below the code you copied earlier and then click on the claim URL button. Note: You might need toclear the cache on your WordPress site first for it to pick up the changes.
Claimed Facebook Instant Articles URL
If you receive the following error, it appears this is aknown issuefor some.
Here are a few tips on getting approved for Facebook Instant Articles:
Ensure you have a decent amount of content already on your WordPress site.Don’t try applying with a blank website.
Content can’t be behind a paywall.
Have a link to your site’s privacy policy visible.
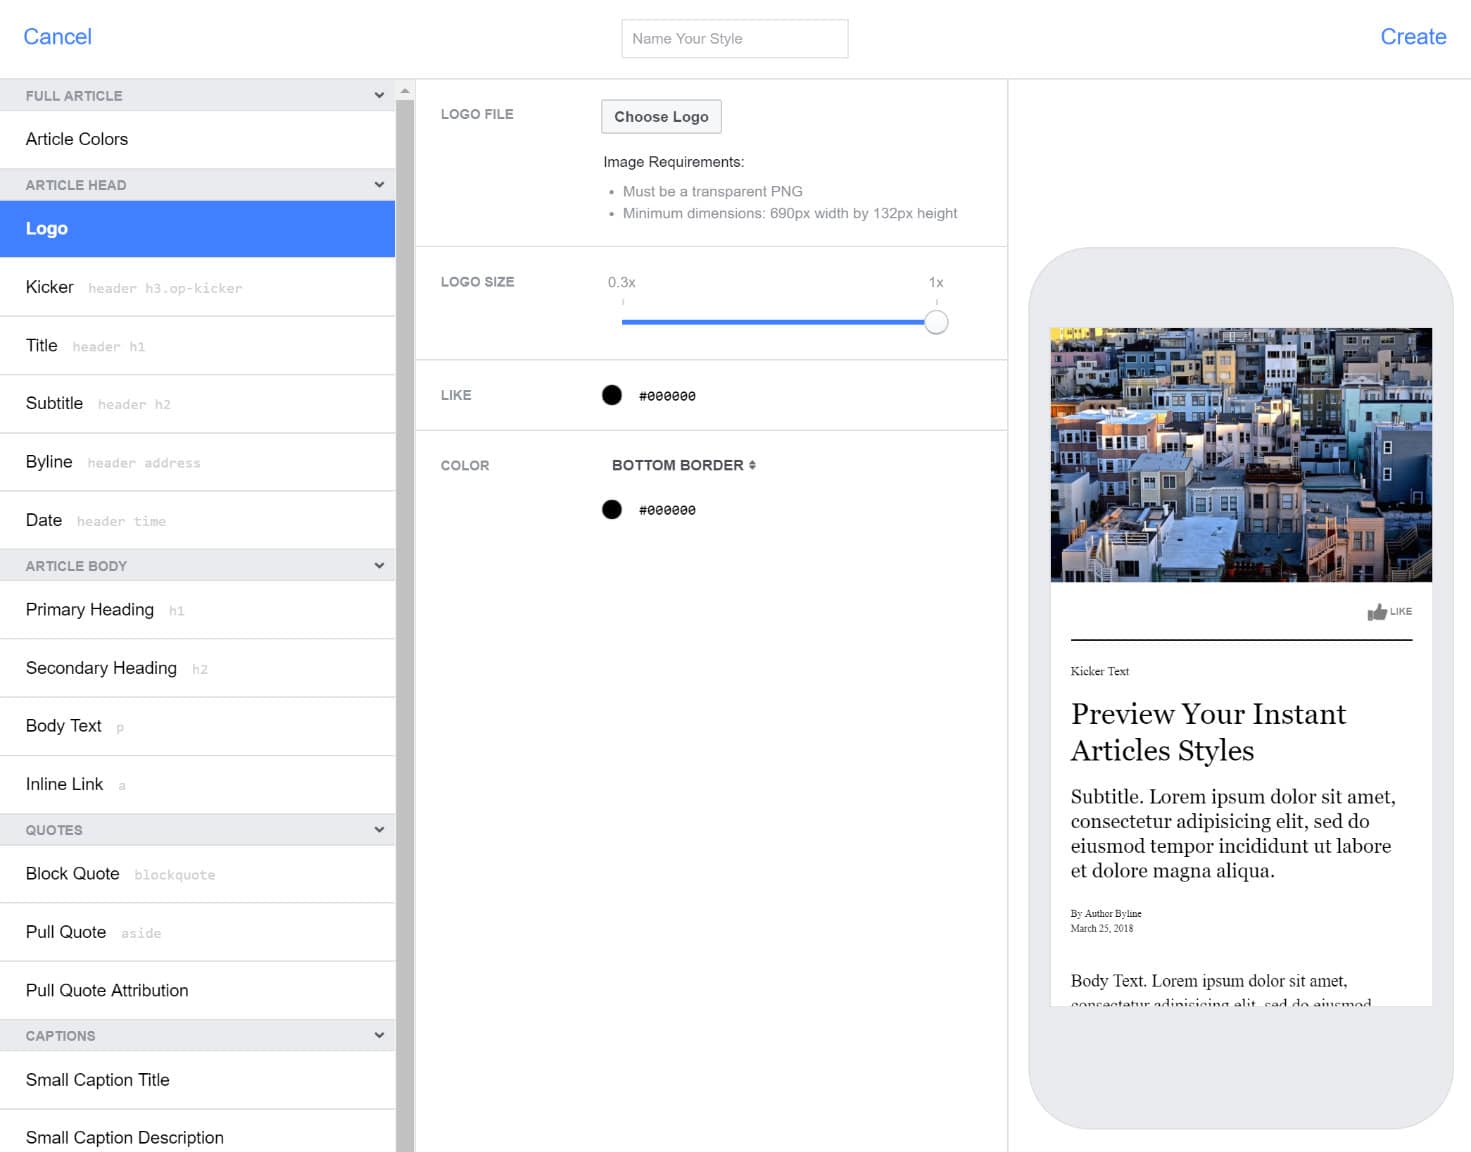
Step 6
You should then style your Facebook posts to match the branding of your site. We recommend at least adding your logo and changing the colors. Go got the Facebook Publishing Tools and under “Instant Articles → Configuration → Tools → Styles” you can create and edit the default style.
Struggling with downtime and WordPress problems? Kinsta is the hosting solution designed to save you time!Check out our features
Facebook Instant Articles style editor
Step 7
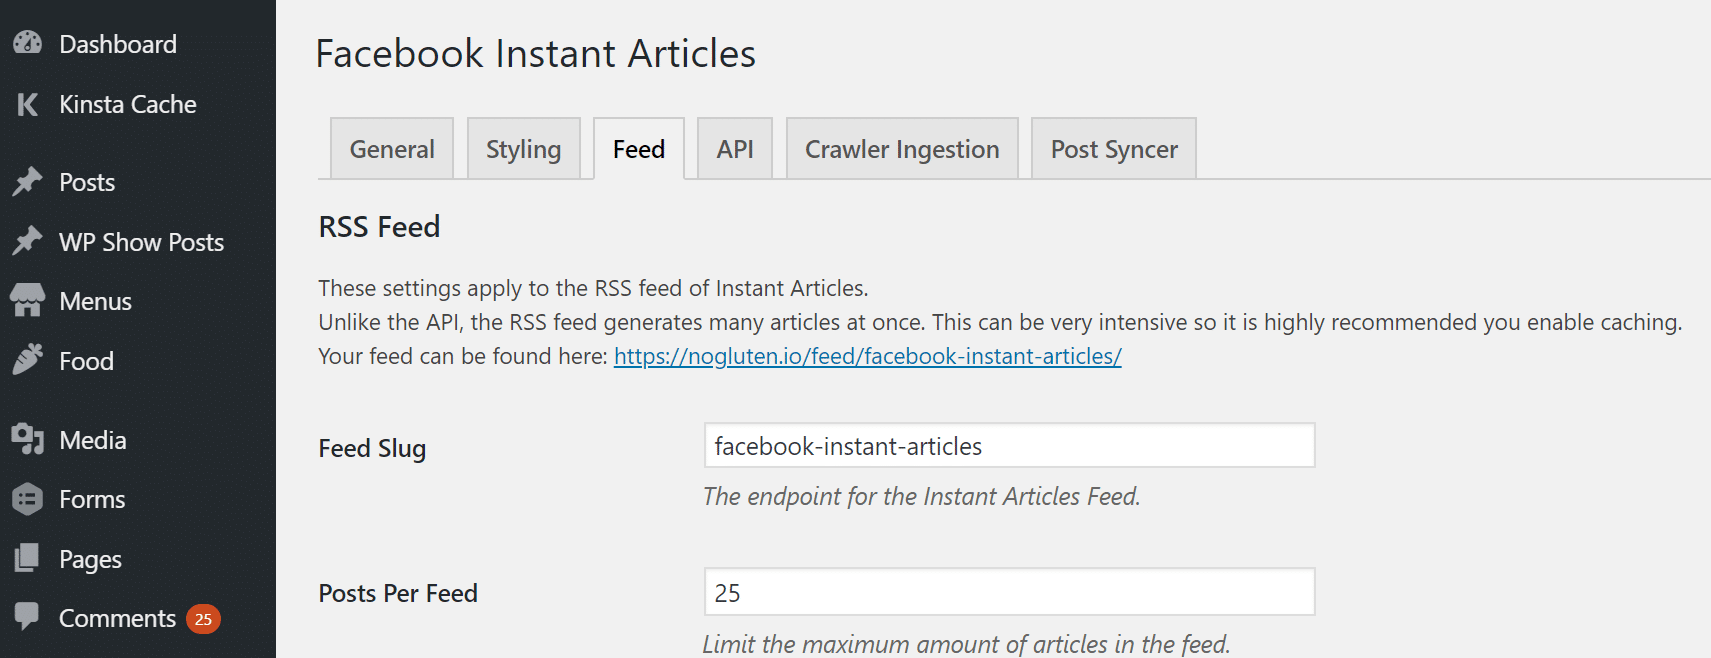
The WordPress plugin will automatically generate an Instant Articles feed for your WordPress site. To get the feed URL, add the extension/feed/facebook-instant-articles/after your website URL. You can also find this under the “Feed” tab in the WP Native Articles plugin.
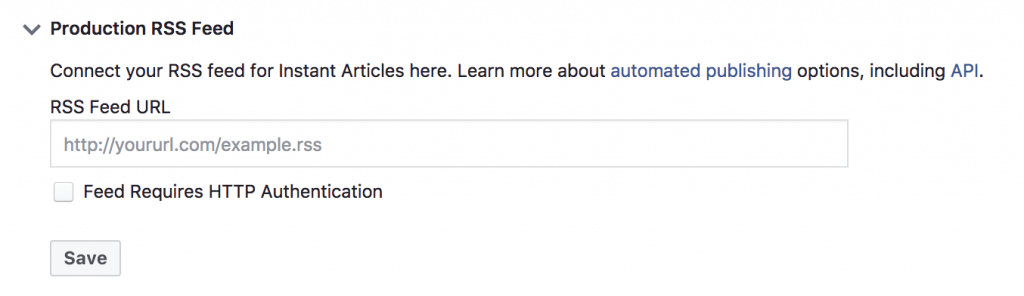
Copy that URL and switch back to the Facebook page Publishing Tools section. Then go to “Instant Articles → Configuration → Tools → Production RSS Feed”. Paste the URL there and save your changes.
Facebook Instant Articles production RSS Feed
It can take up to an hour for Facebook to ingest posts via the RSS Feed method.
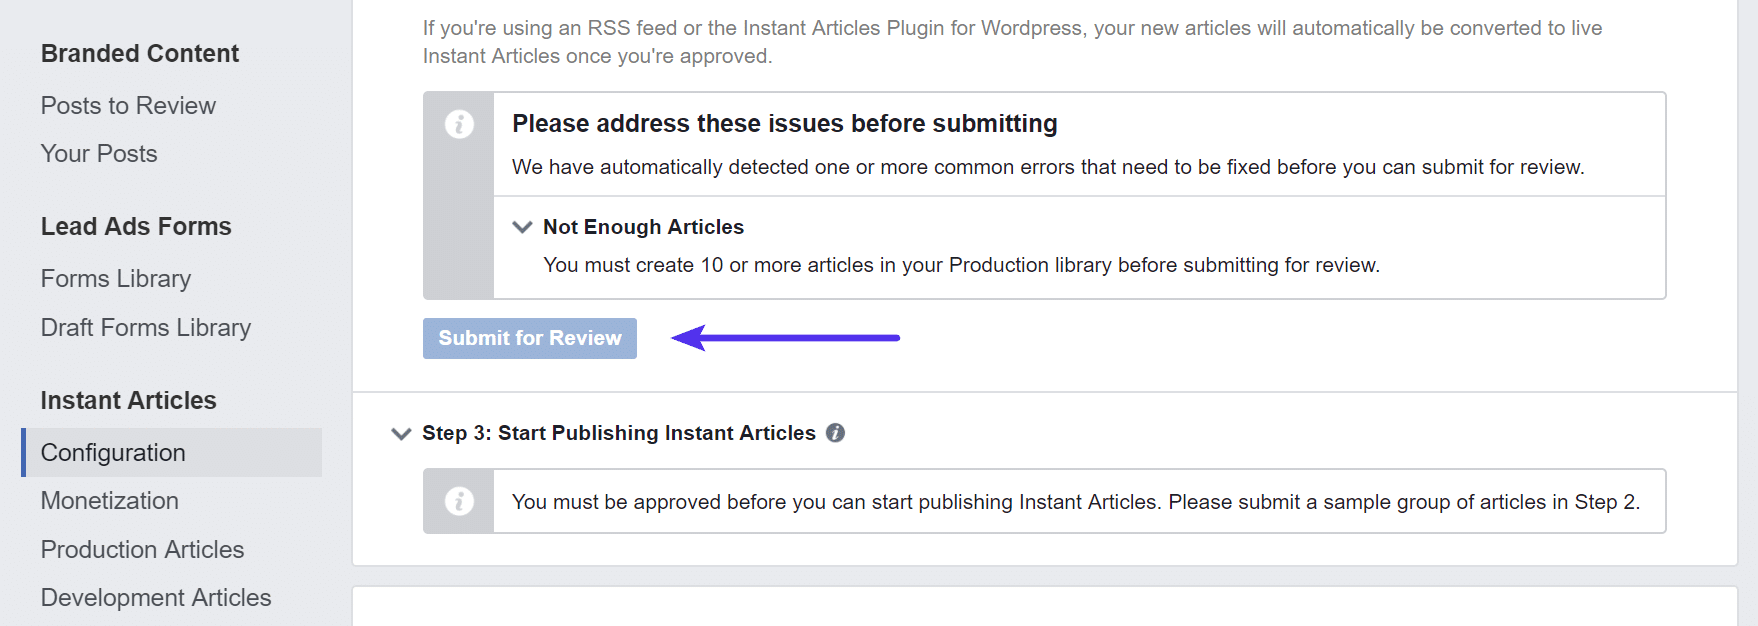
Step 8
When Facebook has ingested 10 articles you can then submit them for review from the Configuration page. Reviews normally take 3-5 days and once approved your Instant Articles will be live. Any posts you share to your Facebook page will now automatically use the Instant Article version if it is available.
Facebook Instant Articles submit for review
Alternative Facebook Instant Article Plugins
As with any WordPress site, sometimes one plugin might work better than another with your current mix of installed plugins and your theme. If you have any issues with the already-mentioned plugin, you might want to also check out these other up and coming options:
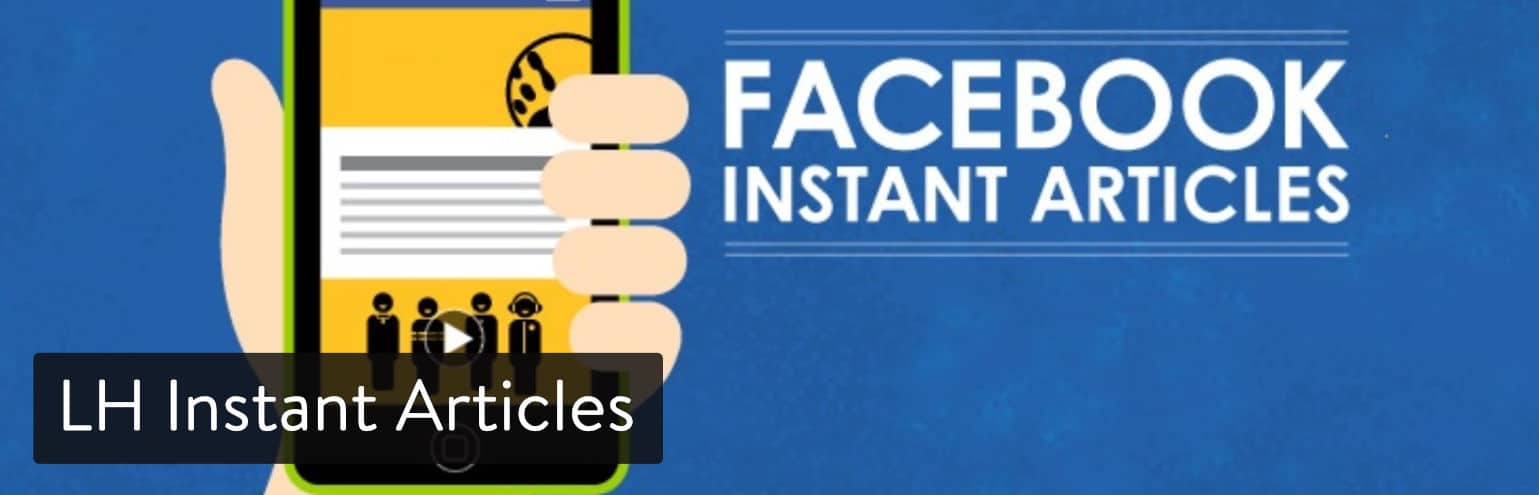
LH Instant Articles
LH Instant Articlesprides itself on creating “bloat free” Facebook Instant Articles thanks to the way it creates a Facebook-compliant RSS feed for your existing WordPress content.
LH Instant Articles WordPress plugin
Advanced functionality includes the ability to add related posts, analytics, and advertisements. Compared to some of the other options, it also claims to be easier to implement—making it ideal for someone who isn’t super handy with coding and troubleshooting.
Facebook Instant Articles for WordPress
The Facebook Instant Articles feature is helpful for both giant and independent publishers that want to reach new audiences with their content.
Being on Facebook’s Instant Articles platform (despite some backlash andpublishers pullingout) can give you an extra advantage now that Facebook has introduced a new feature calledExplore Feed(which allows you to discover content relevant to your interests). Furthermore, Instant Articles are easier to share than regular WordPress content, load faster, and integrate with Facebook for (perceived) higher prioritization in the news feed.
What are your thoughts? Have you given Facebook Instant Articles a try yet on your WordPress site?
If you enjoyed this article, then you’ll love Kinsta’s WordPress hosting platform. Turbocharge your website and get 24/7 support from our veteran WordPress team. Our Google Cloud powered infrastructure focuses on auto-scaling, performance, and security. Let us show you the Kinsta difference!Check out our plans
Git으로 버젼 관리를 하며 개발하다보면, 작성한 커밋들을 되돌려서 다시 이전 상태로 원상복구하고 싶은 경우가 한번쯤 있을 것이다. 만약 로컬까지만 저장된 커밋인 경우는$ git reset명령어를 이용해 쉽게 커밋을 되돌릴 수 있지만, 이 커밋이 GitHub과 같은 원격 저장소까지 이미 올라갔다면 얘기는 조금 달라진다. 이 글에서는 이를 해결하기 위한 몇가지 방법들을 하나씩 소개하려고 한다.
원격 저장소로는 가장 대중적으로 사용되고 있는 GitHub을 사용하였습니다.
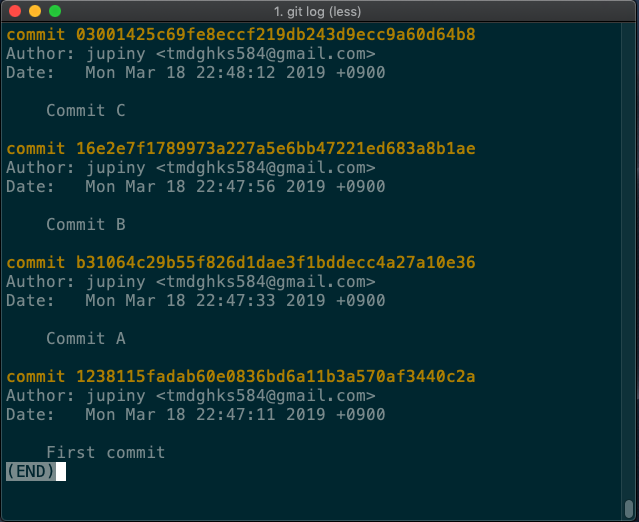
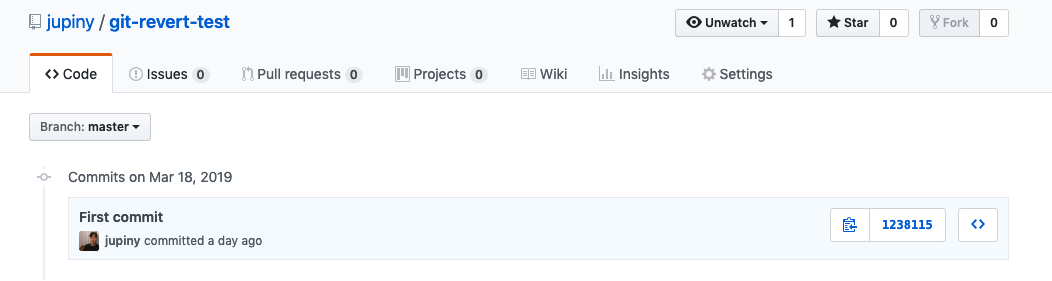
우선 아래와 같이 "Commit A", "Commit B", "Commit C" 세 개의 커밋들을 모두 푸시까지 한 상태에서 되돌리고 싶은 상황이라고 가정해보자. 참고로 세 커밋의 작업 내용은 아래와 같다.
첫번째 방법은 로컬 저장소에서 일단 커밋을 되돌린 후, 이를 원격 저장소에 강제로 반영시키는 방법이다.
방법
먼저 로컬에서$ git reset명령어를 이용해 내가 되돌리고 싶은 커밋들을 되돌린다.
$ git reset --hard HEAD~3
그리고 난 후,$ git push를 실행하면
$ git push origin master
아래와 같은 에러 문구가 나타날 것이다.
로컬 저장소의 커밋 히스토리가 원격 저장소의 커밋 히스토리보다 뒤쳐져 있는데 푸시를 하였으므로 발생하는 에러이다. 하지만 지금 우리가 원하는 것은 이 뒤쳐져 있는 로컬 저장소의 커밋 히스토리를 원격 저장소의 커밋 히스토리로 강제로 덮어쓰는 것이므로 이를 위한 옵션-f또는--force를 명령어에 추가하여야 한다.
$ git push -f origin master
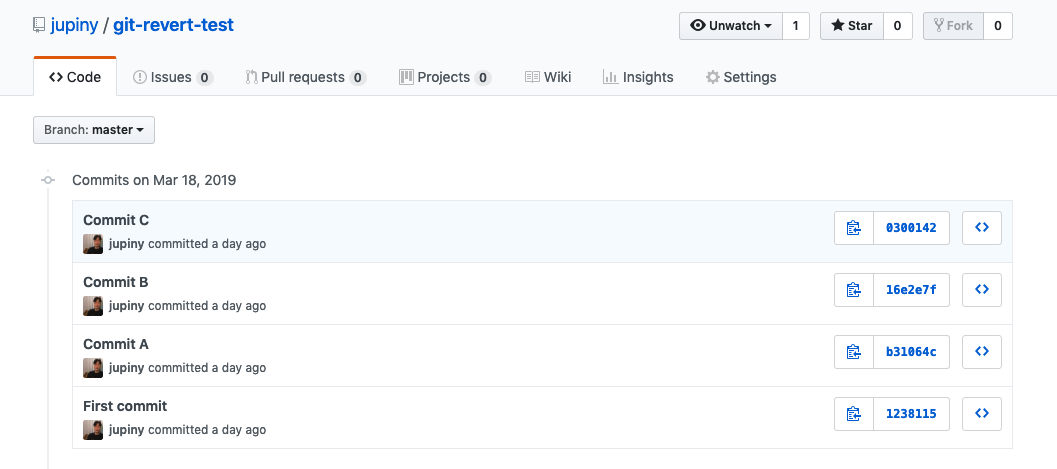
GitHub 페이지를 통해 원격 저장소에서의 커밋이 되돌려졌음을 확인할 수 있다.
주의사항
이 방법을 이용하면 원격 저장소에 흔적도 없이 내가 만들었던 커밋들을 제거할 수 있으므로 겉보기에는 가장 깔끔한 해결책으로 보인다. 하지만 만약 해당 브랜치가 팀원들과 공유하는 브랜치이고, 내가 커밋들을 되돌리기 전에 다른 팀원이 혹시나 내가 작성한 커밋들을 이미 pull로 땡겨갔다면, 그때부터 다른 팀원의 로컬 저장소에는 내가 되돌린 커밋들이 남아있게 된다. 그 커밋들이 되돌려진 사실을 모르는 팀원은 자신이 작업한 커밋들과 함께 push할 것이고, 그 때 내가 되돌렸던 커밋들이 다시 원격 저장소에 추가되게 된다.
따라서 이 방법은 다른 팀원이 내가 되돌린 커밋들을 pull로 땡겨가지 않았다고 확신할 수 있는 경우, 예를 들어,
나 혼자만 사용하는 브랜치에 커밋을 push하였고, 이를 되돌리고 싶은 경우
팀원들과 직접 커뮤니케이션해서 내가 되돌린 커밋을 pull로 땡겨간 팀원이 없다고 확인된 경우
이러한 경우에는 안전하고 간편하게 사용할 수 있는 방법이다.
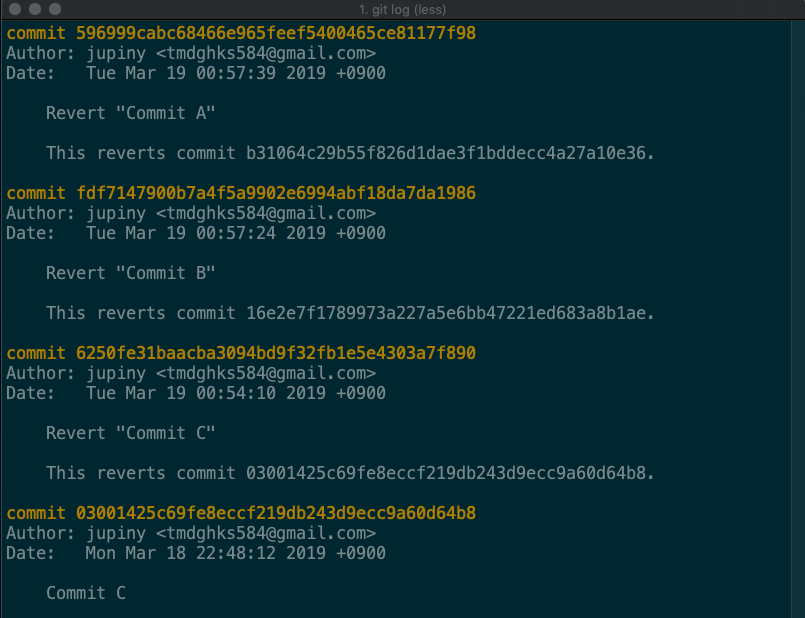
2. git revert 사용하기
앞서 1번 방법에서 발생했던 근본적인 문제점은 다른 팀원들과 공유하는 원격 저장소의 커밋 히스토리를 강제로 조작한다는 점이었다. 이 때,$ git revert명령어를 사용하여 revert 커밋을 커밋 히스토리에 쌓는 방식을 사용한다면 이러한 문제점을 막을 수 있다. 쉽게 말해서, 특정 커밋을 되돌리는 작업도 하나의 커밋으로 간주하여 커밋 히스토리에 추가하는 것이므로, 내가 되돌린 작업을 다른 팀원들과도 공유할 수 있게 된다.
방법
$ git revert [되돌리고 싶은 commit의 hash]는 특정 커밋에서의 변경 사항을 제거하는 또 다른 커밋을 생성하는 명령어이다. 따라서Commit A->Commit B->Commit C커밋의 순서로 커밋 히스토리가 쌓여있는걸 생각해봤을 때, 이를 다시 원래대로 돌리기 위해서는Commit C->Commit B->Commit A순서로 거꾸로 revert하여야 한다(우리가 흔히 사용하는 "실행취소"를 생각하면 이해하기 쉽다.).
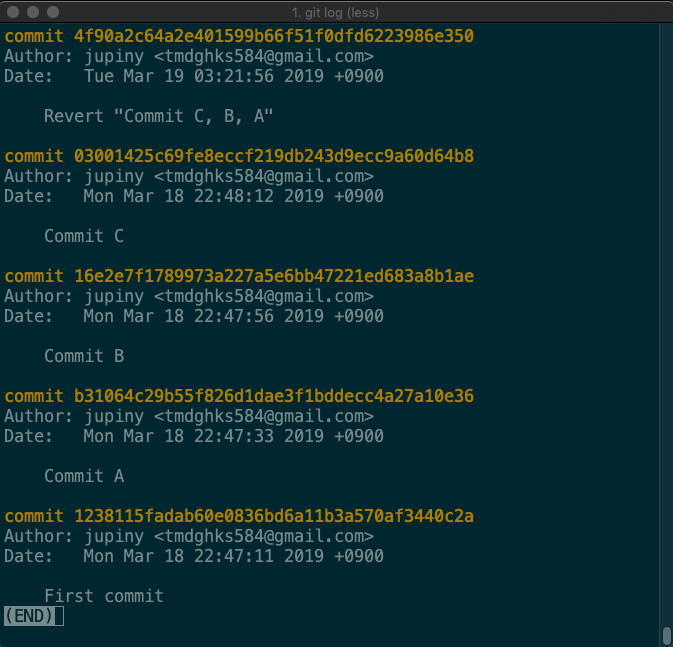
커밋 로그를 보면 알 수 있듯이, 이렇게 하면 되돌리고 싶은 커밋의 수만큼의 불필요한 revert 커밋이 생겨난다. 즉, 되돌리고 싶은 커밋이 100개라면 100개의 revert 커밋을 추가해야한다. 이때--no-commit옵션을 이용하면, revert를 위한 커밋을 하나만 생성할 수도 있다. $ git revert --no-commit [되돌리고 싶은 commit의 hash]을 실행하면, 아까처럼 revert 커밋이 자동으로 생성되는게 아니라working tree와index(staging area)에만 변경 사항이 적용된다.
하지만 이 방법도 역시 일일히 revert할 커밋의 수만큼 명령어를 반복해서 실행해야한다는 단점이 있다. 다행히$ git revert는 특정 커밋 하나뿐만 아니라 복수개의 커밋에 대해서도 revert를 지원해주고 있다. 그때는 특정 커밋의 hash아닌[되돌리고 싶은 커밋의 범위]를 인수로 입력해주면 된다.
$ git revert --no-commit HEAD~3..# 또는 master~3..master
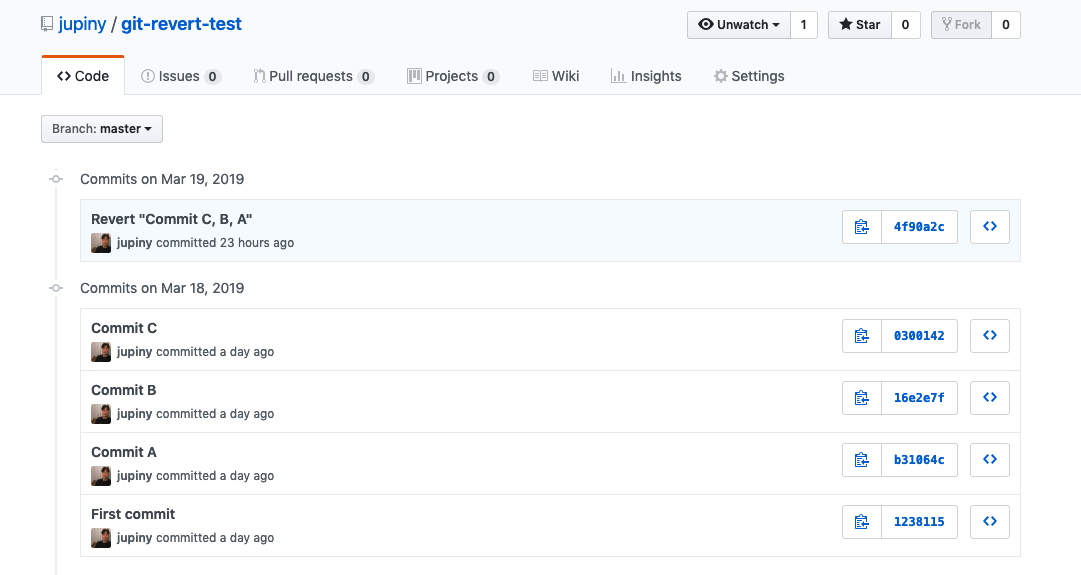
마지막으로 index에 올라간 변경들을 한꺼번에 커밋한 다음, 원격 저장소에 푸시하면 된다.


