728x90


fata error 가 compile 도중 init.h 를 찾지 못하며 등장했다. 

You need to build the module within the Context of the Linux tree. By default, the compiler will look for user-space headers in /usr/include. There ARE some linux headers there (/usr/include/linux), but module.h is not one of them, as it deals with kernel constructs directly.

In short, you need a Makefile. Also, get rid of the #define MODULE. save the following to a file called Makefile and run make:


결론은 Linux tree (여기서 Linux tree 라고 언급하는 것은, Linux Kernel 을 컴파일할때 들어가는 필수적인 요소이기 때문에 Linux tree 라고 언급한다.) 기본적으로 컴파일러는 user-space header 들에 대해서 /usr/include 디렉토리 밑에서 검사하는데 (일부 linux header 들은 (/usr/include/linux) 안에 있다), module.h 는 둘 다 포함되지 않는다. 

(이게 뭔 개소리요?!)


결국적으로 이것은 kernel 구성체에서 직접적으로 다뤄줘야 한다는 얘기다.

짧게는 그냥 Makefile 을 만들어서 조작하면 된다. 


상단의 #define MODULE 을 지우고, Makefile 을 부르고 make를 실행시켜보자.


#define MODULE
#include <linux/module.h>
int init_module(void) { printk("<1>Hello, world\n"); return 0; }
void cleanup_module(void) { printk("<1>Goodbye cruel world\n"); }
when i'm gonna compile it, i get this error:
Code:
root@ubuntu:/home/devilboy/Desktop# gcc -c hello.c 
hello.c:2:26: fatal error: linux/module.h: No such file or directory
compilation terminated.
how can i install module.h library and where should it be placed?
 
Old 11-26-2011, 05:32 AM  #2
jhwilliams
Senior Member
 
Registered: Apr 2007
Location: Portland, OR
Distribution: Debian, Android, LFS
Posts: 1,168

Rep: Reputation: 210Reputation: 210Reputation: 210
Hi Devil Boy,

You need to build the module within the Context of the Linux tree. By default, the compiler will look for user-space headers in /usr/include. There ARE some linux headers there (/usr/include/linux), but module.h is not one of them, as it deals with kernel constructs directly.

In short, you need a Makefile. Also, get rid of the #define MODULE. save the following to a file called Makefile and run make:

Code:
obj-m += foo.o
all:
		make -C /lib/modules/$(shell uname -r)/build M=$(PWD) modules
clean:
		make -C /lib/modules/$(shell uname -r)/build M=$(PWD) clean
This triggers the kernel build system.

Given that you are using Ubuntu, you probably already have the kernel headers installed at /usr/src/linux-headers-$(uname -r). module.h lives here:

Code:
jameson@aqua:~$ ls /usr/src/linux-headers-$(uname -r)/include/linux/module.h
/usr/src/linux-headers-3.0.0-12-generic/include/linux/module.h

Last edited by jhwilliams; 11-26-2011 at 05:39 AM.
 
Old 11-26-2011, 05:58 AM  #3
devilboy09
Member
 
Registered: Nov 2011
Location: Iran
Distribution: Debian, CentOS, LFS, CloudLinux
Posts: 377

Original Poster 
Rep: Reputation: 8
i did what you said i created a directory named header and i put the Makefile in it, but i got this error:
Code:
root@ubuntu:/home/devilboy/Desktop/Header# make
make -C /lib/modules/3.0.0-12-generic/build M=/home/devilboy/Desktop/Header modules
make[1]: Entering directory `/usr/src/linux-headers-3.0.0-12-generic'
make[2]: *** No rule to make target `/home/devilboy/Desktop/Header/foo.c', needed by `/home/devilboy/Desktop/Header/foo.o'.  Stop.
make[1]: *** [_module_/home/devilboy/Desktop/Header] Error 2
make[1]: Leaving directory `/usr/src/linux-headers-3.0.0-12-generic'
make: *** [all] Error 2
 
Old 11-26-2011, 06:23 AM  #4
jhwilliams
Senior Member
 
Registered: Apr 2007
Location: Portland, OR
Distribution: Debian, Android, LFS
Posts: 1,168

Rep: Reputation: 210Reputation: 210Reputation: 210
Ah, your module is called hello.c, not foo.c. You'd need to change that one first line of the makefile, from foo.o to hello.o.
 
Old 11-26-2011, 08:03 AM  #5
devilboy09
Member
 
Registered: Nov 2011
Location: Iran
Distribution: Debian, CentOS, LFS, CloudLinux
Posts: 377

Original Poster 
Rep: Reputation: 8
i did what you said and i could compile it . but i can't insert it as module:
Code:
root@ubuntu:/home/devilboy/Desktop# insmod ./hello.o 
insmod: error inserting './hello.o': -1 Invalid module format
 
Old 11-26-2011, 09:25 AM  #6
jhwilliams
Senior Member
 
Registered: Apr 2007
Location: Portland, OR
Distribution: Debian, Android, LFS
Posts: 1,168

Rep: Reputation: 210Reputation: 210Reputation: 210
You need to insert the Kernel Object (.ko) file, hello.ko. hello.o is intermediary object code.
 
1 members found this post helpful.
Old 11-26-2011, 11:03 AM  #7
devilboy09
Member
 
Registered: Nov 2011
Location: Iran
Distribution: Debian, CentOS, LFS, CloudLinux
Posts: 377

Original Poster 
Rep: Reputation: 8
i'm sorry, i didn't get it.what should i do exactly?
 
Old 11-26-2011, 11:58 AM  #8
jhwilliams
Senior Member
 
Registered: Apr 2007
Location: Portland, OR
Distribution: Debian, Android, LFS
Posts: 1,168

Rep: Reputation: 210Reputation: 210Reputation: 210
hello.o is not the file you want to insert. You want to insert the kernel module, which is hello.ko.
Code:
insmod hello.ko
 
Old 11-27-2011, 02:52 AM  #9
devilboy09
Member
 
Registered: Nov 2011
Location: Iran
Distribution: Debian, CentOS, LFS, CloudLinux
Posts: 377

Original Poster 
Rep: Reputation: 8
i did insert the hello.ko but nothing happend!!!
Code:
root@ubuntu:/home/devilboy/Desktop# insmod ./hello.ko 
root@ubuntu:/home/devilboy/Desktop#
shouldn't it show me a message(Hello, world)?
 
Old 11-27-2011, 03:21 AM  #10
jhwilliams
Senior Member
 
Registered: Apr 2007
Location: Portland, OR
Distribution: Debian, Android, LFS
Posts: 1,168

Rep: Reputation: 210Reputation: 210Reputation: 210
Run dmesg and you'll see it.
 
Old 11-28-2011, 11:22 AM  #11
devilboy09
Member
 
Registered: Nov 2011
Location: Iran
Distribution: Debian, CentOS, LFS, CloudLinux
Posts: 377

Original Poster 
Rep: Reputation: 8
tanX
 
Old 11-30-2011, 01:41 PM  #12
devilboy09
Member
 
Registered: Nov 2011
Location: Iran
Distribution: Debian, CentOS, LFS, CloudLinux
Posts: 377

Original Poster 
Rep: Reputation: 8
i'm having the same problem with init.h
hello.c:
Code:
#include <linux/init.h>
#include <linux/module.h>
MODULE_LICENSE("Dual BSD/GPL");
static int hello_init(void)
{
printk(KERN_ALERT "Hello, world\n");
return 0;
}
static void hello_exit(void)
{
printk(KERN_ALERT "Goodbye, cruel world\n");
}
module_init(hello_init);
module_exit(hello_exit);
gcc -c hello.c:
Code:
root@ubuntu:/home/devilboy/Desktop# gcc -c hello.c 
hello.c:1:24: fatal error: linux/init.h: No such file or directory
compilation terminated.
i created the Makefile like this
Code:
obj-m += hello.c
all:
		make -C /lib/modules/$(shell uname -r)/build M=$(PWD) modules
clean:
		make -C /lib/modules/$(shell uname -r)/build M=$(PWD) clean
make Makefile:
Code:
root@ubuntu:/home/devilboy/Desktop# make
make -C /lib/modules/3.0.0-12-generic/build M=/home/devilboy/Desktop modules
make[1]: Entering directory `/usr/src/linux-headers-3.0.0-12-generic'
scripts/Makefile.build:310: target `/home/devilboy/Desktop/hello.c' doesn't match the target pattern
  Building modules, stage 2.
  MODPOST 0 modules
make[1]: Leaving directory `/usr/src/linux-headers-3.0.0-12-generic'
 
Old 12-02-2011, 07:28 AM  #13
jhwilliams
Senior Member
 
Registered: Apr 2007
Location: Portland, OR
Distribution: Debian, Android, LFS
Posts: 1,168

Rep: Reputation: 210Reputation: 210Reputation: 210
You shouldn't be running gcc directly. That's the problem. Just run make. Also, that won't work at this point because you have an error in your makefile.

Code:
obj-m += hello.c
should read:

Code:
obj-m += hello.o
 
Old 12-04-2011, 11:52 AM  #14
devilboy09
Member
 
Registered: Nov 2011
Location: Iran
Distribution: Debian, CentOS, LFS, CloudLinux
Posts: 377

Original Poster 
Rep: Reputation: 8
thank you
 
Old 12-05-2011, 02:47 AM  #15
resetreset
Senior Member
 
Registered: Mar 2008
Location: Cyberspace
Distribution: Dynebolic, Ubuntu 10.10
Posts: 1,340

Rep: Reputation: 62
Quote:
Originally Posted by jhwilliams View Post
You need to insert the Kernel Object (.ko) file, hello.ko. hello.o is intermediary object code.
I'd love to find out a bit more about this - so there are TWO files generated then? What then, is "hello.o", and why is it generated?


Thnx.


결국적으로 여기서 다뤄야할 것은 insmod 와 rmmod 등에 대한 것인데, 이것이 바로 kernel compile 이후에 등장하는 System Call 과 관련이 되어있다. 어쨋든 Linux kernel 을 구성하고 System Call 을 구성하는 근간이긴 하나 여기서는 설명하기엔 정말 쓸데없는 소리라 일단 넘어가본다.

728x90

Objective

The objective is to install Google Chrome web browser on Kali Linux. See an appendix for a possible issue troubleshooting.

Requirements

Privileged access to your Kali Linux installation or Live system is required.

Difficulty

EASY

Conventions

  • # - requires given linux commands to be executed with root privileges either directly as a root user or by use of sudo command
  • $ - requires given linux commands to be executed as a regular non-privileged user

Instructions

Download Google Chrome

To start, use wget command to download a latest Google Chrome debian package:
# wget https://dl.google.com/linux/direct/google-chrome-stable_current_amd64.deb

Install Google Chrome

The easiest way to install google chrome on you Kali Linux is to by use of gdebi which will automatically download all depended packages.
# gdebi google-chrome-stable_current_amd64.deb

Start Google Chrome

To start Google Chrome, open up a terminal and run google-chrome command:
$ google-chrome


728x90

현재 시간을 알기 위해 gettimeofday()의 사용법을 찾던 중 clock_gettime()을 접했습니다. 알고 보니 gettimeofday()는 이미 POSIX.1-2008에서 구식(obsolescent) 함수로 지정되었더군요. 당장 gettimeofday()가 삭제되는 건 아니지만 향후 지원이 중단될 가능성이 있으니 대신 clock_gettime()을 사용해야겠습니다.


clock_gettime()

clock_gettime()은 time.h에 정의되어있습니다. 사용하려면 컴파일 옵션에 -lrt를 넣어줘야 합니다. 형태는 다음과 같습니다.

1
int clock_gettime(clockid_t clock_id, struct timespec *tp);

POSIX에선 clock_id의 값으로 한 가지 값을 기본으로 정의해두었습니다. 실제 시스템에선 이보다 더 다양할 수 있습니다.

CLOCK_REALTIME

- 시스템의 실제 시간입니다.

시스템에 따라 추가로 사용할 수 있는 값은 다음과 같습니다.

CLOCK_MONOTONIC

- 특정 시간, 예를 들면 시스템 시작 시간이나 Epoch 등등으로부터 흐른 시간입니다.

CLOCK_PROCESS_CPUTIME_ID

- 프로세스가 CPU를 사용한 시간입니다.

CLOCK_THREAD_CPUTIME_ID

- 스레드가 CPU를 사용한 시간입니다.

여기서 CLOCK_REALTIME을 사용하면 gettimeofday()와 같은 동작을 얻을 수 있습니다. 이때 얻은 시간 struct timespec은 다음과 같습니다.

1
2
3
4
struct timespec {
    time_t tv_sec
    long tv_nsec
}

gettimeofday()와는 달리 나노초 단위까지 얻을 수 있는 걸 볼 수 있습니다. 다만 시스템에 따라 나노초 정확도를 지원하지 않을 수도 있습니다. 이는 clock_getres()로 확인하시면 됩니다.

실제로 사용해보겠습니다.

1
2
3
4
5
6
7
8
9
10
int main( void) {
    struct timespec time;
    if ( 0 == clock_gettime( CLOCK_REALTIME, &time)) {
        printf( "tv_sec: %ld\ntv_nsec: %ld", time.tv_sec, time.tv_nsec);
    } else {
        fprintf( stderr, "Something wrong on clock_gettime()\n");
    }
 
    return 0;
}


728x90

This tutorial will walk you through the difficult process of installing Kali Linux in VMware Player, a free virtual machine manager that can be downloaded from www.vmware.com.

This tutorial assumes that you have some basic knowledge of your computer (amount of RAM, number of processors, x32 or x64 architecture, etc.) and that you’re using VMware Player as a virtual machine manager,not VMware Workstation or other software.


Step One:


First we need to download Kali from http://kali.org/downloads/. If you have a 64-bit capable computer (like me), then you probably will want the 64-bit version of Kali for performance and compatibility reasons. Select the 64-bit version ONLY if you have a 64-bit computerIf you don’t have a 64-bit capable computer, or if you aren’t sure, then get the 32-bit version, as it will work on both architectures.


Step Two:

You can either direct download Kali through the browser’s download manager by clicking on ISO, or you can torrent it by clicking on Torrent. Torrenting is usually a bit faster, but if you don’t have a torrent program, or don’t know what a torrent is, don’t worry about it and click ISO to do a normal download.

Step Three:

When Kali has finished downloading, open VMware Player and click Create a new virtual machine.


step 3

Step Four: 

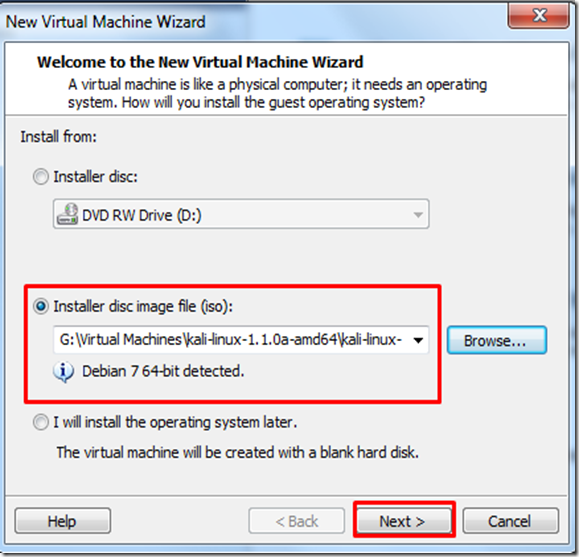
In the window that opens, select Installer disc image file (iso), browse to the location of and select the Kali Linux ISO file that you just downloaded.


step 4

Once you have selected the file, click Next.

3.5


Step Five:

In the next step, select a name for the virtual machine. I’m going to name it Tutorial Kalifor this tutorial. You also need to select a location for it, I recommend creating a folder called “Virtual machines” in My Documents. Then click Next.

step 5

Step Six:

Next step, you need to select a maximum size for Kali. I recommend doing at least 30 GB’s as Kali tends to expand over time. After you’ve entered your desired value (no less than 20 GB) change the next option to Store virtual disk as a single file and click Next

step 6

Step Seven:

In the next window, we need to customize some hardware settings, so click on theCustomize Hardware… button.

step 7

Step Eight:

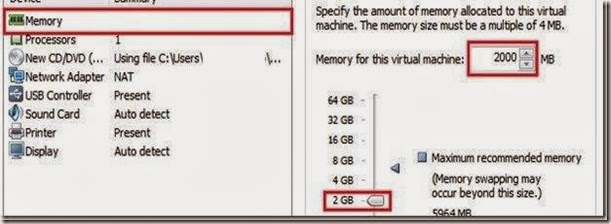
You will now be presented with a Hardware window. Select Memory in the left pane of the window, and slide the slider on the right side to at least 512 MB*. Since I have 8 GB of RAM on my computer, I’m going to put it at 2 GB’s (2000 Mb’s).

*Note, you should give a virtual machine a maximum of half the RAM installed on your computer. If your computer has 4 GB of RAM, then the max you want to slide it to is 2 GB. If your computer has 8 GB, then you can go to a max of 4 GB, etc. 

step 8

Now highlight Processors in the left pane. This option really depends on your computer, if you have multiple processors, then you can select multiple or all processors for better performance.

step 8.1

Moving on, click on Network Adapter in the left pane. On the right side, move the dot to the Bridged (top) option. Now click on the Configure Adapters button.

8.2

In the small window that pops up, uncheck all the boxes except for the one next to your regular network adapter and hit OK.

8.4

You can now click on Close at the bottom of the Hardware window and then click onFinish in the Wizard.

step 8.5

Step Nine

After you click Finish the window will close and the new virtual machine file will be added to the VM library. Now all we have to do is start Kali and install it! To do this, highlight the name of the newly created virtual machine by clicking on it, and click Play virtual machinein the right pane.

step 9

This will start Kali for the first time.

Step 10:

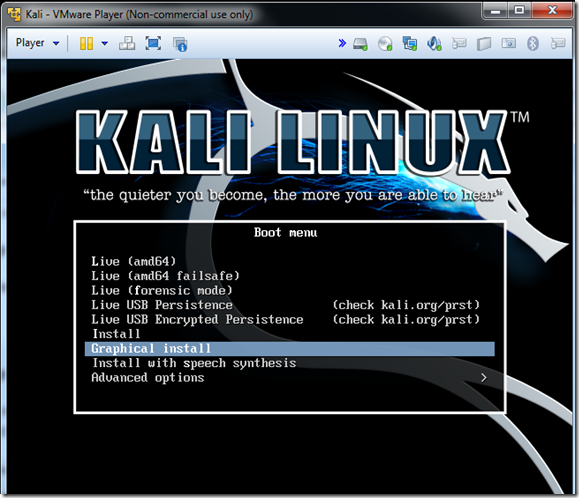
At the boot menu, use the arrow keys to scroll down to Graphical install and hit enter.

4

Step 11:

The next screen will ask you to select your preferred language, you can use the mouse to select this, then click Continue.

step 11

Step 12

On the next screen, select your location and hit Continue.

step 12

It’ll now ask you for your standard keymap. If you use the standard American English keyboard, then just click Continue.

step 13

Step 14:

Wait until Kali finishes detecting the hardware on your computer. During this, you might be presented with this screen:

step 14

Just hit Continue and select Do not configure the network at this time on the next screen.

step 14.5

Step 15:

You will now be asked to supply a hostname, which is kind of like a computer name. You can enter anything you want, or you can just leave it as kali. When you’re done, hitContinue.

step 15

Step 16:

Kali will now ask you to enter a password for the root (main) account. Make sure you can easily remember this password, if you forget it, you’ll have to reinstall Kali. Hit Continueafter you’ve enter and re-entered the password of your choice.

step 16

Step 17:

The next step will ask you for your time zone, select it and click Continue.

step 17

Step 18:

Wait until Kali detects the disk partitions. When you are presented with the next step, selectGuided – use entire disk. (this is usually the top option) then click Continue.

step 18

The installer will now confirm that you want to use this partition. Hit Continue.

step 18.5

One more question about the partition will appear. Select the option that says All files in one partition and hit Continue.

step 18.9

Step 19:

Confirm that you want to make these changes by selecting Finish partitioning and write changes to disk. Then hit Continue.

step 19

Step 20:

The last question! Confirm that you really want to make these changes by moving the dot to Yes and hitting Continue.

step 20

Kali will now start installing! Wait until it has completed, this might take upwards of 30 minutes.


Step 21:

Alright, Kali has finished installing and now you are presented with a window that asks you about a network mirror. You can just select No and hit Continue.

step 21

Step 22:

After a few minutes, the installer will ask you if you want to install GRUB boot loader. ClickYes and Continue.

step 22

Step 23:

The installation should now complete, and you’ll be shown with the following notification message:

step 23
Click Continue.

Step 24:

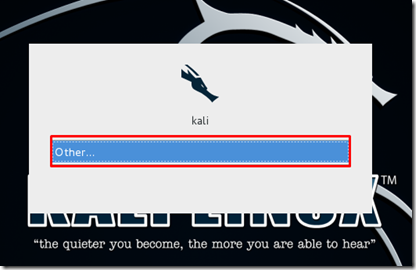
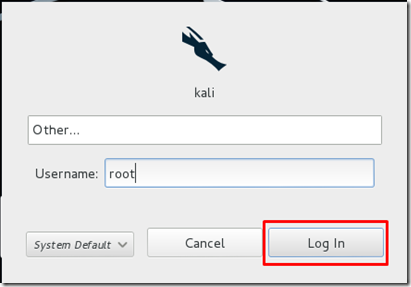
After it restarts, and you’re shown with the “login” screen, click on “Other…”

Screenshot_1

Type the username root in the box and press Enter or click “Log In,”

Screenshot_2

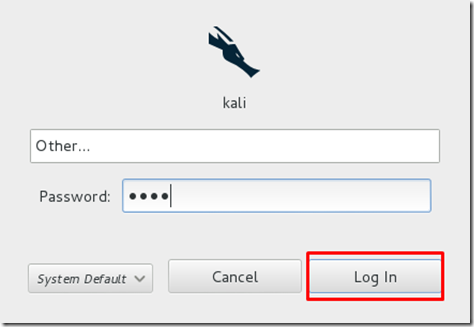
On the next screen, type the password that you created earlier, and press Enter or click “Log In” again.

Screenshot_3

Kali should login, and you’re done!


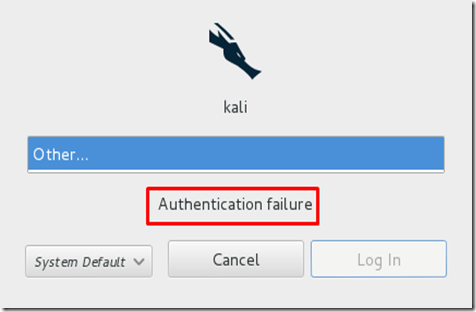
If you type the password/username incorrectly, you’ll get this message:

Screenshot_4

Just try again, and remember to use the password that you created earlier.


You’ve successfully installed Kali Linux in VMware!

You can delete that massive ISO file that you downloaded as well, it isn’t necessary any more. To get the most functionality out of Kali Linux, you should install VMware Tools. You can follow my tutorial on how to do that.

+ Recent posts