On this page: We explain best practices for optimizing images with a WordPress plugin, online tools, or your local computer.
Tags: Images, optimization, performance
Updated: December 7th, 2017

When your images aren’t scaled to the right dimensions, the excess bytes being loaded can slow down your site’s overall load time. If you resize your images with HTML and CSS on your site, it’s far better to simply use a file in the right size in the first place. By default, when uploading images WordPress will make three “thumbnail” sizes of the image. But even when using smaller sizes, often times images can be compressed in size without sacrificing image quality. Compressing images in this way can help ensure your page is loading the images in correct scale and quality to speed up the page load time.
LOSSLESS VS LOSSY
When compressing your images there are two primary methods: Lossless, and Lossy. The difference between the two stems from whether or not the metadata associated with the file remains when compressing or uncompressing it. Metadata can include items like location, color information, and ID3 tags. Most of this metadata is not visibly noticeable to users – it was simply extra contextual data added by the device that captured the image, or the computer used to edit it. So typically this metadata isn’t something most users will need at all.
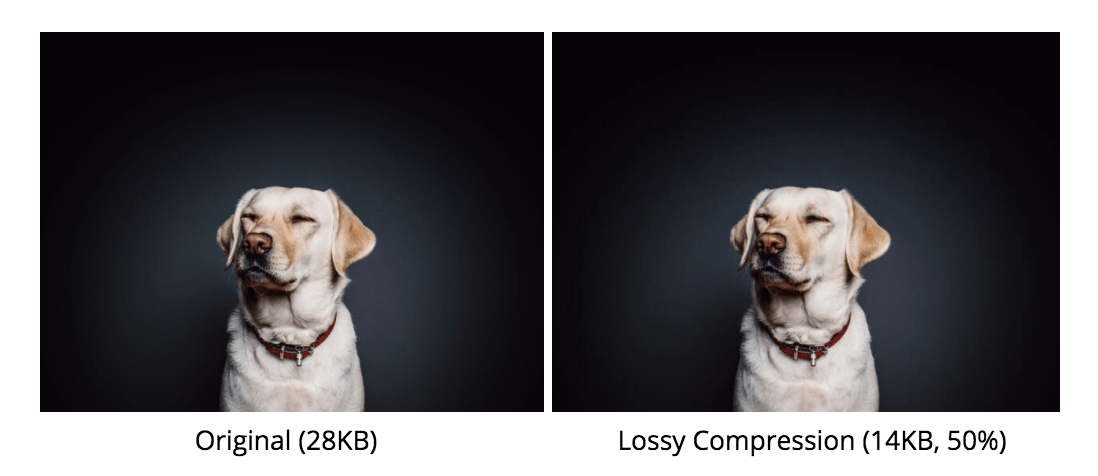
With Lossless compression, this metadata remains through the whole process and comes back when the file is uncompressed. However, while Lossless compression results in zero quality loss, it also results in less overall compression and larger files. With Lossy compression this extra image metadata is deleted which allows for much greater size reduction. While this does permanently remove the data, often times Lossy compression causes no visual differences to users. Just keep in mind: the higher compression rate you choose, the less “specific” your colors will be. The method you should use depends on the file type.
Lossless compression should be used on file types that need to retain all metadata like spreadsheets or other text-formatted files. Lossy compression should be used on JPEG, GIF, and TIFF images, and can also safely be used on PDF, audio, and video files.
By default WordPress will use Lossy compression to compress files 90% for image previews. However, it doesn’t automatically compress the images that you embed in your pages. With that in mind, it’s important to find out which compression method works best for you and your team.
OPTIMIZE IMAGES WITH A PLUGIN
The most easy method to optimize your images is certainly to use a WordPress plugin. However, since compressing images requires a good amount server power by the plugin provider, these plugins are paid services.
WP SMUSH
WP Smush is one of the most popular plugins to use for Lossy image compression. It can be found in the WordPress plugin repo, or just by searching for a new plugin in your WordPress Admin Dashboard. This plugin is maintained by WPMU Dev and is frequently updated to ensure it’s compatible with the latest versions of WordPress. Some of the best features are only available in the Pro version of the plugin – for example, being able to do a “bulk smush” where you can optimize all your existing images in one click is only available in the “Pro” version. For sites that have been around for a long time already, the “bulk smush” feature is definitely a necessity as you most likely have a large amount of images already. The free version WP Smush is also only able to optimize images smaller than 1MB.
WP Smush Pro is offered for free with a WPMU Dev membership. They offer a free trial for 30 days, and $49 per month as a flat rate after that point. For sites which are constantly uploading images every day, this flat rate is ideal. However, for sites with fewer images it’s likely easier to use a service that charges based on the number of images optimized.
EWWW IMAGE OPTIMIZER CLOUD
EWWW Image Optimizer Cloud is the other large contender in plugins for Lossy image compression. In order to start using the plugin you first need to set up an account and get a key from their website. This offers you a number of free credits to use to get started optimizing images, and then charges based on your usage after at a low and reasonable rate. No upgrades are needed to do a bulk optimization of your images, and this plugin also integrates nicely with other plugins.
Please be aware that the non-Cloud version of this plugin is not able to be used on WP Engine’s platform, but the Cloud version is perfectly fine to use and is a recommended option for users.
OPTIMIZE IMAGES WITH AN ONLINE TOOL
There are a few online image compression tools out there. If you choose to use one, be sure the website uses https so that any data you enter on the site is securely encrypted. We will list a few examples, but there are many other tools you can use on the web. Whichever tool you decide to use, make sure the tool offers Lossy or Lossless compression, and supports the file type you need to compress (JPEG, PNG, GIF, TIFF, and so on).
IMAGERESIZE.ORG
ImageResize.org is a free online image compression tool that allows you to drastically reduce the file size of JPEG and PNG images. It uses a Lossy algorithm to reduce image file size by up to 80%. The tool is free to use and has no max file size limit. You can compress up to 20 image files per batch.
KRAKEN.IO
Kraken has free and paid services, and supports JPEG, PNG, and GIF files. The online service is free, and allows you to drag and drop images to be optimized, upload a zip file, or import from services like Dropbox or Google Drive. You can then redownload the compressed files, or upload them to one of the above services as well.

The paid version of Kraken offers the ability to resize the image and more pro features like the ability to download the optimized images at any time. The free option allows you to access and download the optimized images online for 12 hours. Additionally, the free web interface can only optimize images of 1MB or smaller. Kraken offers a WordPress plugin as well, which allows the service to communicate directly with your website and overwrite your media files directly.
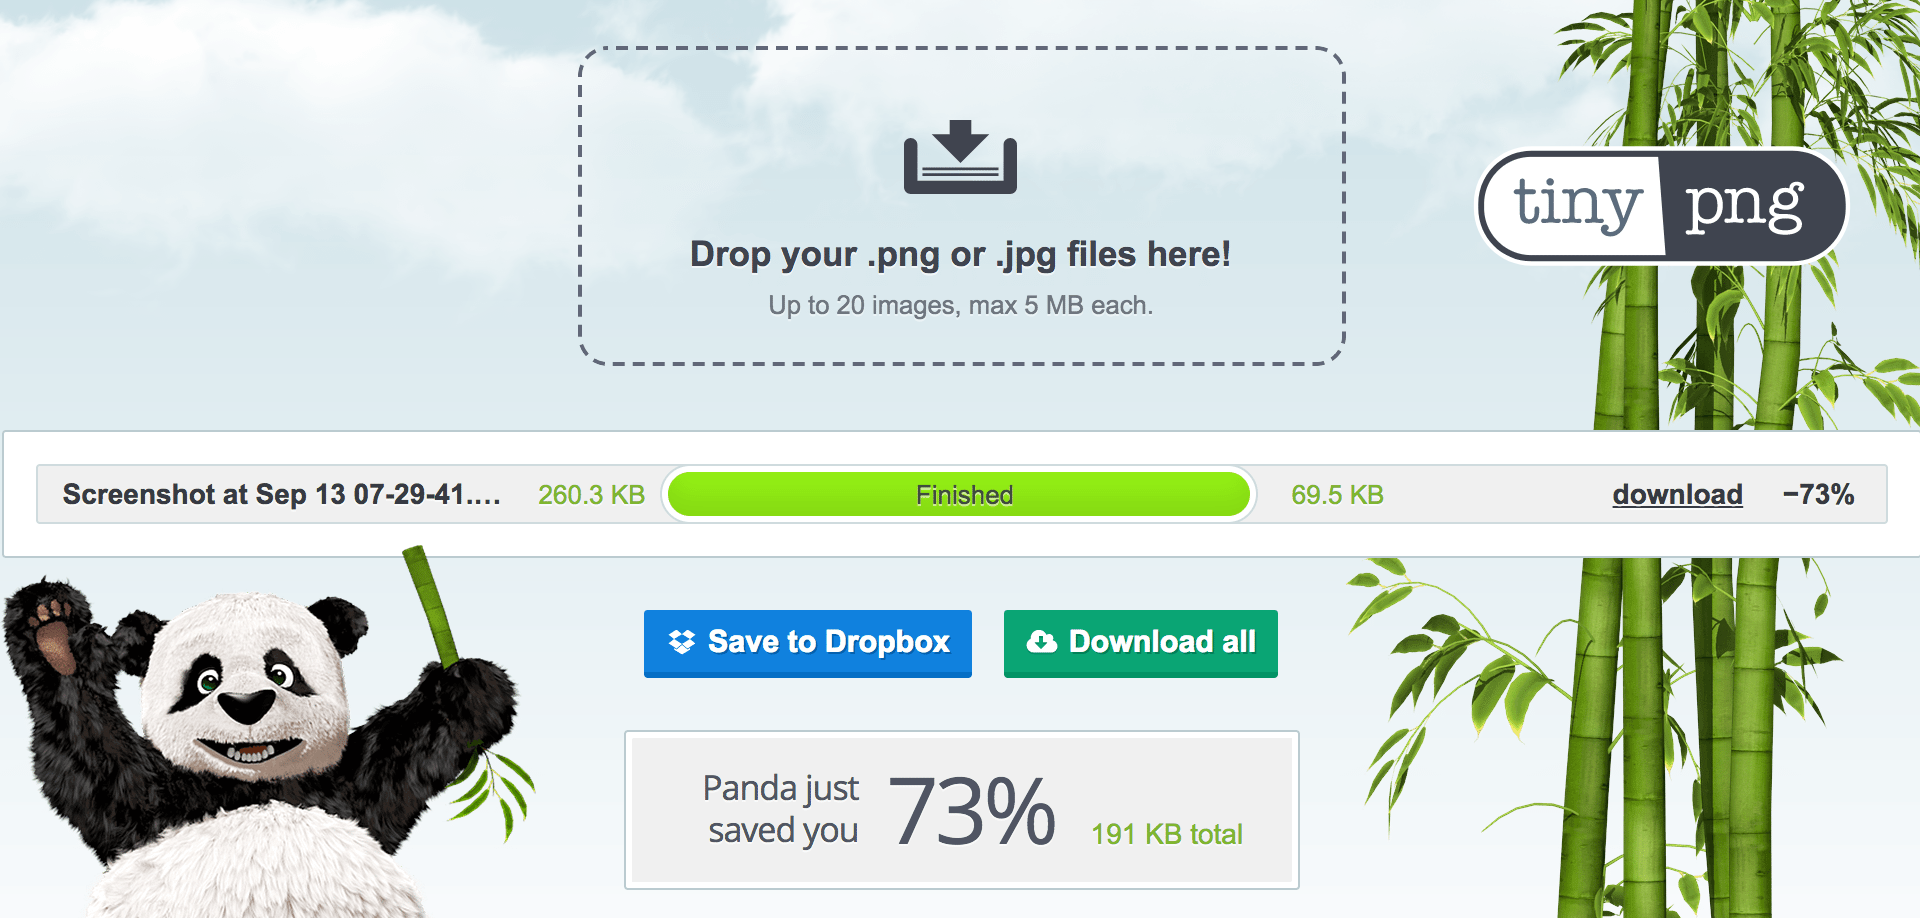
TINYPNG.COM
Similar to Kraken, TinyPNG offers both a WordPress plugin and an online compression tool, with free and paid options. The tool supports compression for PNG and JPEG file types only, but this does include Animated PNGs (APNGs). Naturally, the paid version has more features and offers a larger file size limit. The free online option supports files up to 5MB, and can optimize up to 20 images at a time. With the WordPress plugin the authors estimate you can compress about 100 images per month – this varies a little depending on the number of thumbnail sizes your site stores. This tool allows you to save files to a Dropbox folder, but doesn’t support Google Drive as some others do.
OPTIMIZE IMAGES LOCALLY
If you’d rather maintain more fine-tuned control over your image compression or just don’t want to pay for a compression service, optimizing your images on your own computer works just fine as well.
PHOTOSHOP
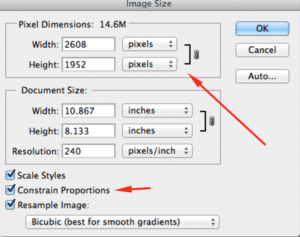
If you use Adobe Photoshop on your computer, you can easily compress your images. First, open the file in Photoshop. Choose View > Actual Pixels to view the full size of the image to get an idea of how large it really is. You can choose to resize this down now by going to Image > Image size and entering the desired dimensions. Make sure the “Constrain proportions” box is checked so that the image is scaled proportionally, and will not be distorted when resized.
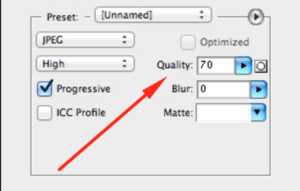
Now go to File > Save For Web & Devices to export. Choose JPEG as the file type (Lossy compression) and image quality option from the dropdown menu. The higher the quality, the larger the image will be. For printing you’ll want a higher quality, but for web the quality does not need to be quite so high. You can use the image preview to determine which quality still leaves you with a nice image but a smaller file size.
Photoshop is a nice and easy method to use to compress images locally, but keep in mind that this method optimizes one image at a time. This option is less feasible for sites which already exist with thousands of photos.
PREVIEW (MAC)
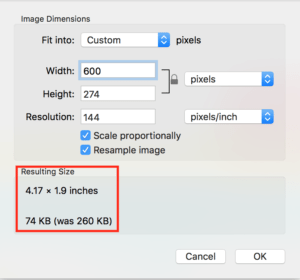
On a Mac you can use the Preview application to resave files in a different size and resolution. While this isn’t quite the same as compressing images and removing unneeded metadata, it does reduce the overall size of the image the browser has to load.
To resave a file in a different size, first open your file with the Preview application. Then go to Tools > Adjust size to change the file size. Change the file width or height to the size you want, and ensure “Scale proportionally” is selected so that the corresponding values change automatically and the image is not distorted.
Just like with Photoshop, this method resizes images one at a time. So remember that this option is not ideal if you have thousands of images to optimize.
GIMP (WINDOWS)
On a computer using Windows, tools like GIMP offer pretty basic compression methods as well. To compress an image, first open it in the GIMP program. Choose Image > Scale image from the top navigation menu. Here you can adjust the pixel size just like in the other examples. In the “Quality” menu, choose the option you’d like (Cubic is most common). Click “Scale” to save. Last, you’ll need to export the image in the preferred format by clicking File > Export. Use PNG for icons and buttons, and JPEG for photos which have more color variation. Click “Export” at the bottom of the dialogue box to save the exported file to your computer.
ARTICLE QUICK TIPS
TIP
To see how long your images are taking to load, try running a WebPageTest or Pingdom test to see a waterfall view of the load time.
TIP
Optimizing a large number of photos is easiest using a plugin for WordPress, or bulk optimizer tool online.
RELATED CONTENT
DEVELOPMENT
- Server Cache and How to Purge Cache
- Staging and Development Environments on WP Engine
- How do I add new SFTP accounts?
MAKE MY SITE FASTER
SPEED
SHARE:
CONTACT THE
WP ENGINE
SUPPORT TEAM
In order to get expert one-on-one help, please log into your account so we can identify your account and get you exactly the help you need. We offer support 24 hours a day, 7 days a week, 365 days a year.
'WEB' 카테고리의 다른 글
| Simple Redirects with .htaccess (0) | 2020.01.30 |
|---|---|
| Subdomain to Sudirectory 301 Redirect Generator for Htaccess (0) | 2020.01.30 |
| Random number in range [min - max] using PHP (0) | 2019.07.16 |
| How do I make a full-width iframe with fixed aspect ratio? in Youtube (0) | 2019.05.26 |
| Runtime Configuration in PHP (0) | 2019.05.07 |