우커머스 사용시에 원화에서 페이팔을 사용하게 해줄 수 있는 것이지만, Pro 플러그인을 끌어다 써야하기에 좀 의아한 부분이 있는 플러그인이다. 해당 부분에 있어서 Pro 플러그인을 쓸 수 없는 상황이라면, 네이버 환율 등을 php에서 끌어다가 파싱해서 써야하는 단점도 의외로 존재한다.
WPML에서 PG를 분리해서 사용하는 경우에는 사실상 쓸모가 없는 내용이였지만, 생각보다 유익해 보이기에 긁어온다.
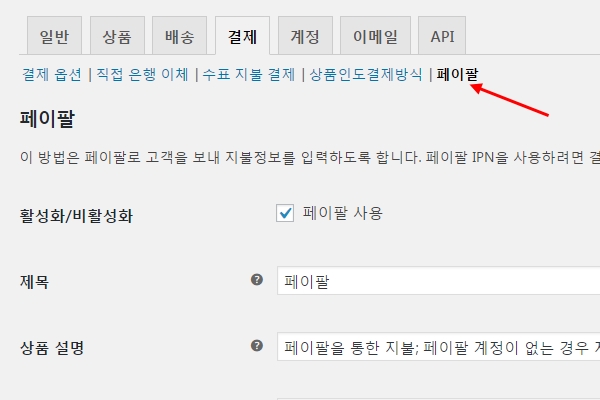
페이팔 사용 설정
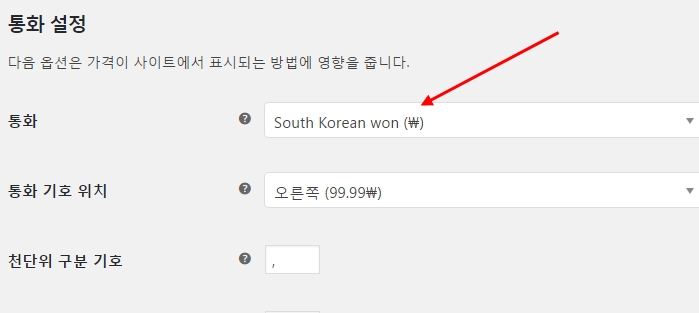
워드프레스 우커머스로 쇼핑몰을 운영할때 가장 기본적으로 설정하는 것이 상점의 기본 통화입니다. 이 상점의 기본통화는 상품진열과 함께 결제 과정에서 기본이 되는 통화를 설정하는 것입니다. 이 때 한국 쇼핑몰의 경우 원(₩) 단위를 설정합니다.
<우커머스 쇼핑몰의 기본 통화 설정>
이 경우 우커머스의 결제 방법 중 페이팔은 활성화 되지 않습니다.
<우커머스에서 한국 통화 설정시 페이팔 비활성화>
이 때 아래의 코드를 사용중인차일드 테마의 functions.php 파일 하단에 입력하면 페이팔 사용이 가능해 집니다.
위와 같이 페이팔이 결제 수단에서 가능하도록 설정 해 두더라도 문제가 있습니다. 페이팔에서 원화를 지원하지 않기 때문에 실제 페이팔 결제로 넘어갈 때 현재 상품의 가격이 페이팔이 지원하는 통화로 환산되어 넘겨지지 않는다는 것입니다. 다시 말하면 상품의 가격이 10,000원(₩) 일 경우 페이팔 결제로 넘어갈 때 10,000 이라는 값과 페이팔에서는 원화(₩) 결제가 없으므로 기본 통화인 $가 합쳐져서 10,000$ 가 결제화면에 나타나는 것입니다. (참고현재 페이팔이 지원하는 통화) 이 문제를 해결하기 위해 결제가 넘어갈 때 상품의 가격을 페이팔이 지원하는 통화 단위로 환산 해 주는 기능이 필요합니다.
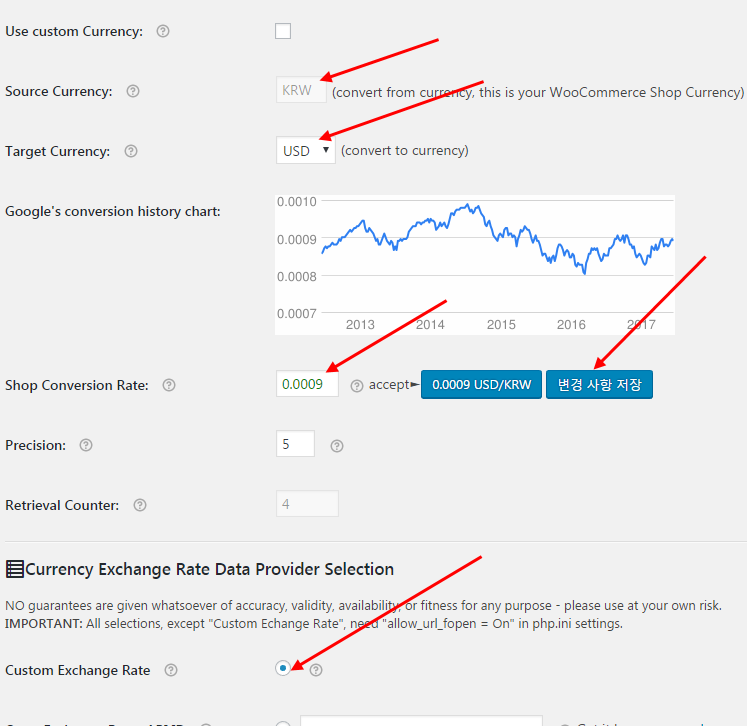
< PAYPAL CURRENCY CONVERTER PRO FOR WOOCOMMERCE 플러그인 설치후 메뉴>
안에서 통화의 환율을 설정해 줍니다.
<페이팔 결제를 위한 통화 환율 설정>
기준이 되는 통화(현재 기본설정 되어 있는 원)를 목표통화(달러)로 환전하기위한 비율을 적용하는 것입니다. 환율은 내가 임의의 값으로 입력해도 되고, 야후 Finance 등의 도움을 받을수도 있습니다.
페이팔 결제의 문제
위에서 처럼 설정하면 페이팔 결제가 가능해 지고 결제시 페이팔에서 지원하는 기본 통화인 달러로 환산된 가격을 결제 받을 수 있게 됩니다.
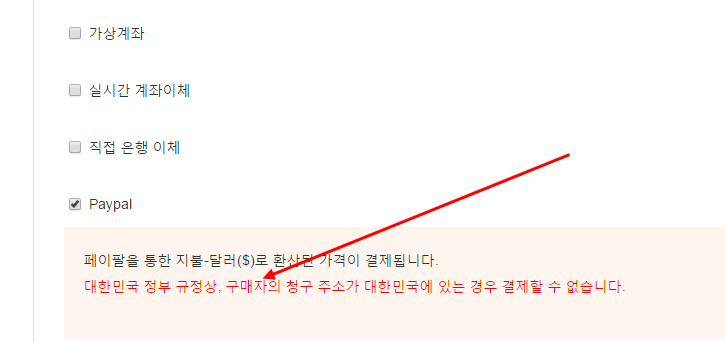
하지만 이 결제 방법은 쇼핑몰의 점주가 페이팔 한국계정을 사용하는 경우, 같은 한국 계정을 가진 사람에게 결제를 받을 수 없습니다. 현재 대한민국에서의 규정이 그렇습니다.(페이팔로 한국인 상호간 거래 불가)
<한국인 상호간 페이팔 결제 수단 사용 불가>
그러므로 해외 거주하는 사람이 한국의 원화 결제 수단이 없는 경우, 페이팔로 결제를 할 수 있도록 할 때 제공 할 수 있는 방법입니다.
참고
이 글에서 소개 한 것 처럼 원화를 달러로 환산해서 결제 받을 수 있도록 하는데 사용 할 수 있는 방법으로WooCommerce Currency Switcher플러그인을 사용 할 수도 있습니다. 이 플러그인은 환율을 변경하는 스위치를 웹사이트에 표시하고, 사용자가 스위치 변경시 선택한 통화로 환전된 가격을 우커머스 상품에 표시하며, 결제시에도 변경된 통화를 사용하도록 해 줍니다. 여러가지 통화를 동시에 제공할수 있어서 필요시에 유용합니다.
Set and Link a Cookie When Editing an Existing Trigger
Set A Browser Cookie When Submitting A Form
Set a Browser Cookie 'On Click' Inside a Popup
Definition of Terms
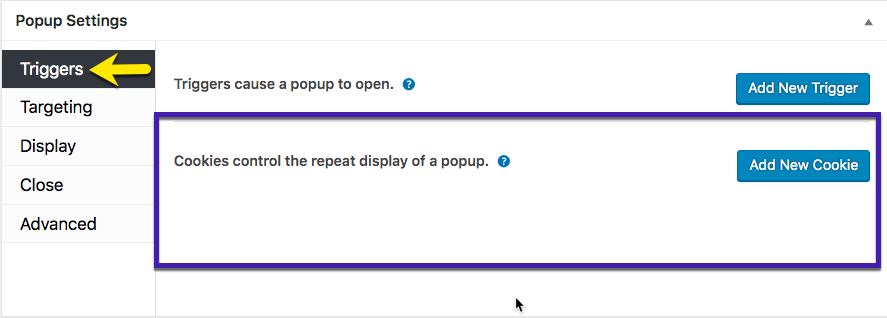
Triggers -- These are 'events' that cause a popup to display in the browser. A popup requires at least one trigger in order to display, and may accept multiple triggers.
Cookies -- These control the repeated display of popups in the browser. To work, they must be set and linked to a popup trigger. Cookies are assigned an identification (ID) number formatted as 'pum-{integer}'.The use of one or more cookies with a trigger is optional, but often recommended.
By default, cookies are valid for a term of 1 month, which can be changed by plugin users to a different value. Popups controlled by a cookie can redisplay before they expireifthe popup cookie is cleared from the visitor's browser.
When the button labeled 'Add New Cookie' is selected, a popup labeled 'When should your cookie be created?' will appear. Five (5) cookie setting options are provided with the base (free) version of Popup Maker. The plugin default is set to the first option value, 'On Popup Close'.
They include:
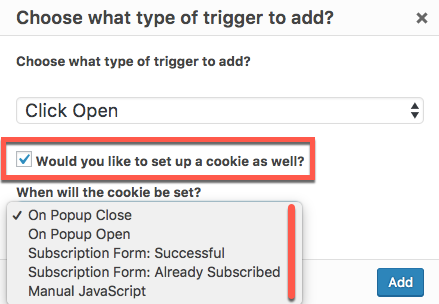
1. On Popup Close --A cookie is set in the browser when the popup is closed (default);
2. On Popup Open --A cookie is set in the browser when the popup is opened;
Plugin users of either Ninja Forms,GravityForms, orContact Form 7should continue to use either of the first 2 cookie options above,plustheir respective Popup Maker 'form submit success' cookies (see 'related article' links below).
This cookie option setting is also available to set a browser cookie when selecting content inside a popup 'on click'. See the section'Set a Browser Cookie 'On Click' Inside a Popup'below for details.
Each of the 5 cookie options listed above is described at length in the related article link below.
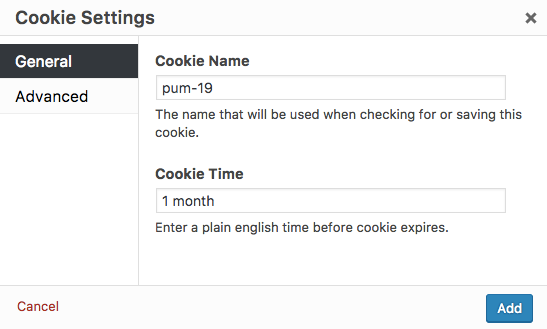
Upon adding a cookie option, the 'Cookie Settings -- General' option settings box will appear.
The custom fields shown include:
Cookie Name-- Popup Maker automatically assigns a cookie an ID number formatted as 'pum-{integer}'. This ID is used to link a cookie to a trigger.
Cookie Time-- By default, cookies are valid for a term of 1 month. This can be changed by plugin users to a different value. Acceptable units of time include:
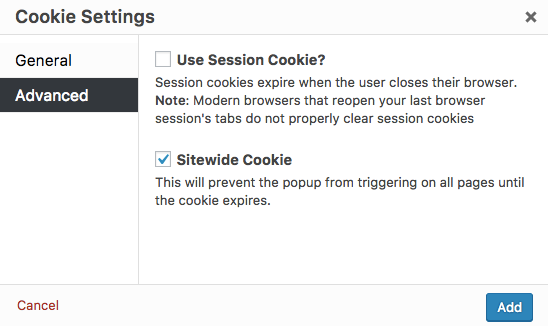
Popup Maker provides some 'advanced' option settings, whose defaults seldom need to be changed.
The custom fields shown include:
Use Session Cookie? -- By default, this option is turned 'off'. Modern browsers can keep web pages (and browser sessions) open indefinitely, even when browsers and devices are not in use. We maintain this option setting for plugin version backward compatibility. Most plugin users have no need to turn the option 'on'.
Sitewide Cookie -- By default, this option is turned 'on'. It applies Popup Maker cookies throughout a site, controlling the repeat display of popups on any site page.
Cookies can be set and linked to a trigger either:
when adding a new trigger, or
by editing an existing trigger.
Set and Link a Cookie When Adding a New Trigger
From the 'Trigger' option settings tab, select the button labeled 'Add New Trigger'.
2. From the popup titled 'Choose what type of trigger to add?', select the checkbox labeled: 'Would you like to set up a cookie as well?'.
3. Choose from among the five (5) cookie options presented below, then select the 'Add' button to add the trigger and link the cookie.The plugin default selection is set to 'On Popup Close'.
4. Depending on which trigger is selected, the matching option setting box will appear:
or Time Delay Settings -- General' option settings.
In the 'Cookie Name' custom field, Popup Maker automatically generates and assigns the trigger a new cookie with an ID of 'pum-{integer}'.
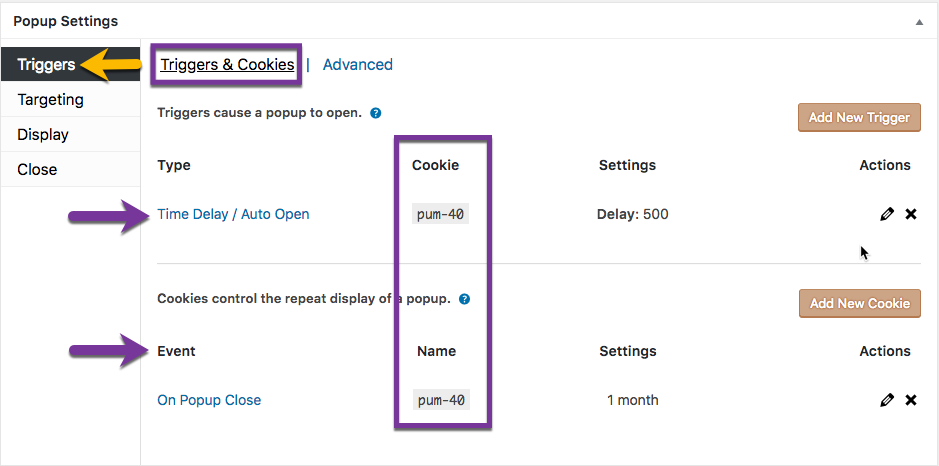
5. The trigger is set and linked to a new cookie. In the example above, a 'Click Open' trigger is set, and linked to a cookie set to launch 'On Popup Close'. The cookie has an ID of 'pum-40'.
Set and Link a Cookie When Editing an Existing Trigger
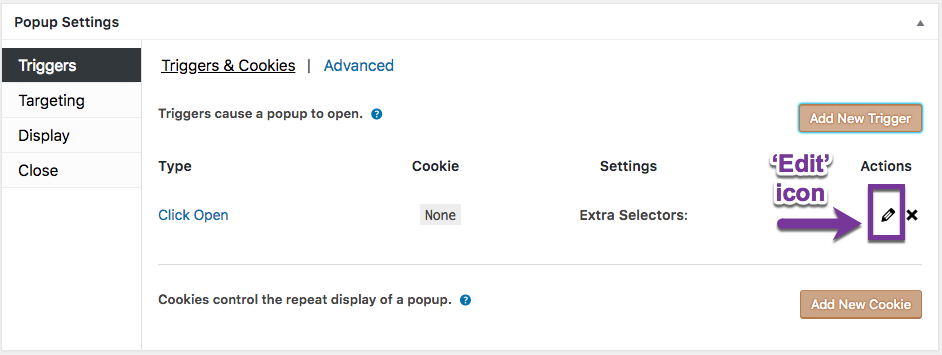
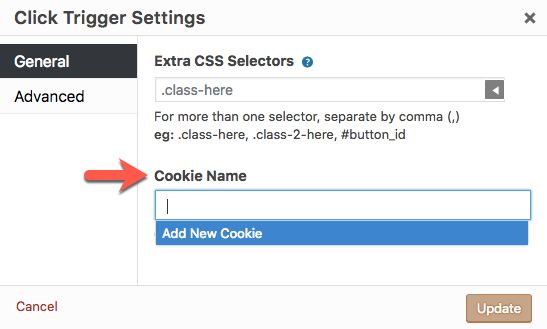
1.To add and link a cookie to a trigger, edit an existing trigger. Select the 'pencil' icon from the 'Popup Settings -- Trigger' option settings tab.
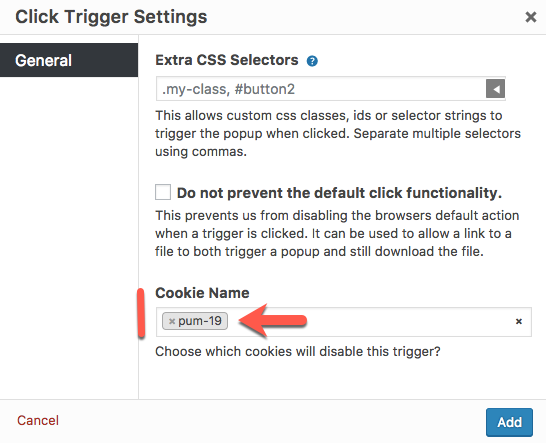
2a. Edit an existing 'Click Open' trigger-- The 'Click Trigger Settings' option settings popup will appear. On the 'General' tab, select the custom field labeled 'Cookie Name'. An 'Add New Cookie' option will appear. Select the option to add it to the custom field, then select the 'Update' button.
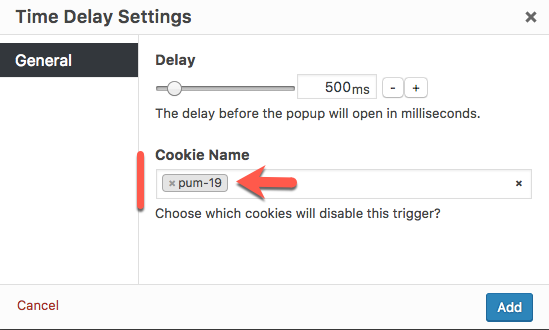
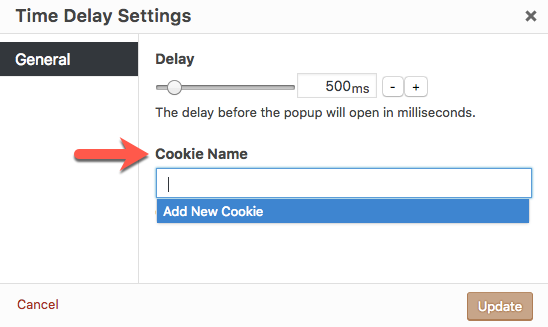
2b. Edit an existing 'Time Delay / Auto Open' trigger-- The 'Time Delay Settings' option settings popup will appear. On the 'General' tab, select the custom field labeled 'Cookie Name'. An 'Add New Cookie' option will appear. Select the option to add it to the custom field, then select the 'Update' button.
Note:The process described above in Step 2 for the 'Click Open' and 'Auto Open / Time Delay' triggers is the same for anypremium trigger available as a plugin extension to Popup Maker.
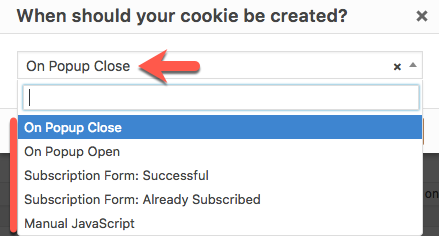
3. The plugin will prompt with a popup labeled'When should your popup be created?'. The plugin default option is set to 'On Popup Close', with four (4) additional option settings available.
Either accept the plugin default option, or select a different option, and then click the button labeled 'Add' to move to the next step.
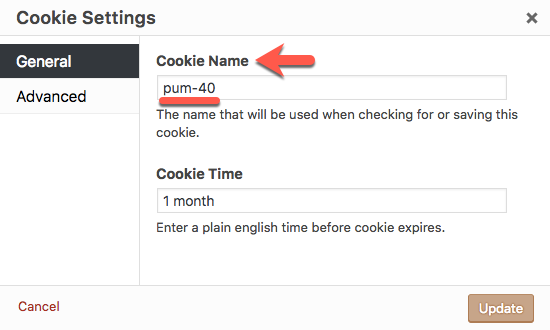
5. The'Cookie Settings -- General'option settings box will appear displaying two (2) custom fields; 'Cookie Name' and 'Cookie Time'.
'Cookie Name' is a cookie with an identification (ID) format of 'pum-{integer}' (for example, 'pum-40').
'Cookie Time' is an expiration term for the cookie. The plugin default value is 1 month, which can be changed to a value that ranges from minutes to years.
To accept the values for 'Cookie Name' and 'Cookie Time', select the 'Update' button.
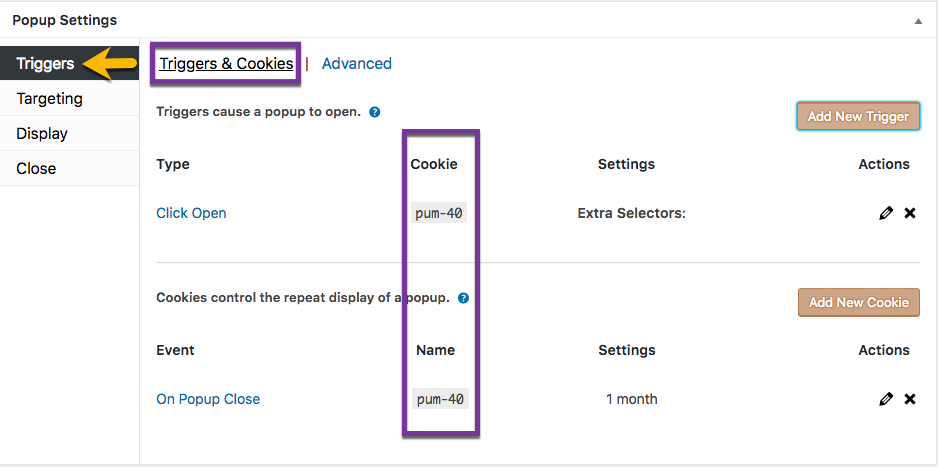
6. In the image above, a 'Time Delay / Auto Open' trigger is now linked to an 'On Popup Close' cookie via the cookie ID of 'pum-40'.
Note:Popup Maker is a Ninja Forms affiliate. We provide support for each other’s products.
Any WordPress form plugin other than those listed above should set a 'form submit success' cookie via the 'Manual JavaScript' option setting. See the related article link below for details.
The 'Manual JavaScript' cookie option was discussed previously in the section titled 'Add a New Cookie'(list item #5). It can be used to set a browser cookie on form submit success with any WordPress form pluginother thanthe 3 plugins with which Popup Maker directly integrates.
This cookie option can also be used to set a browser cookie 'on click' of any content displayed inside a popup. For example, a popup displays by a 'Time Delay / Auto Open' trigger. The popup contain 2 images, and the visitor is encouraged to click on one or the other image.
The 'Manual JavaScript' cookie option can be used to set a browser cookie 'on click' when either popup image is selected. See the related article link below for details, including cookie option setting and custom code.
WPML enables you to translate the texts coming from themes and plugins you use in your sites. This allows you to have a completely translated site. Additionally, it allows the users of your site’s administration area to use the interface in their native language.
Localization options and performance optimization
You can find the settings for theme and plugins localization on theWPML->Theme and plugins localization page.
Main theme and plugins localization options
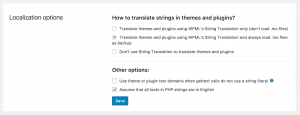
WPML allows you to create translations for texts in themes and plugins in three ways:
Use only String Translation.
Use String Translation but load.mofiles as a backup.
Don’t use String Translation but only load the.mofiles. This is a good option when you already have a theme with the translations you need.
Theme and plugins localization options can significantly impact the performance of your site. WPML version3.8and later automatically suggests the most efficient localization options.
Message prompting to use WPML’s String Translation only
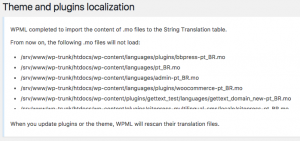
By default, it prompts you to use WPML’s String Translation only, by loading all the translations from the.mofiles into the database. This importing is done once and after it is complete (it can take a while, depending on your site), the performance will be optimal in regards to theme and plugins localization.
String Translation announce that it will start loading all the translations from the .mo files
String Translation is loading all the translations from the .mo files
Finally, String Translation warns you once this process has finished.
String Translation loaded all the translations from the .mo files into the database
Translating the theme and plugins using WPML’s String Translation
This option requires WPML’s String Translation module, available as a part of theMultilingual CMS account type.
As we already mentioned, when using String Translation to translate the theme and plugins texts, you can select to load the.mofiles as a backup or not.
When loading the.mofile as a backup is selected, WPML will fall back to.mofile translations if those exist in your theme and plugins. This means that if you see a translated text string in your site which does not seem to appear under String Translation, it is very likely that the translation comes from a.mofile in your theme or plugin.
When either of these options is used, WPML scans the theme and finds the texts that can be translated. It reports what it finds and let you enter translations, right from within WordPress.
Since version3.8and later, by default, WPML automatically prompts you to scan for new texts in your site whenever a theme or a plugin is activated.
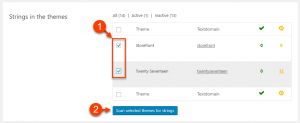
Scanning themes for texts
Scanning themes for strings
You can also manually start the scanning of themes for texts. Select the themes to scan and click onScan selected themes for strings. WPML goes through all the files in the selected themes to extract translatable texts from them (texts that are wrapped withgettext functions).
The scanner shows how many strings were found in the theme and their translation status. You can translate them from theWPML->String Translationpage.
In theLocalization options section, under Other options,you can find an option toUse theme or plugin text domains when gettext calls do not use a string literal. This option might be helpful if you are using a theme whichuses gettext incorrectly.
Scanning plugins for texts
Similarly to scanning a theme for strings, WPML can scan plugins and find translatable strings.
Scanning plugins for texts
Select the plugins to scan and click onScan selected plugins for strings.
Please note that there is a limitation with scanning theMust Use (MU)plugins. Usually,MUplugins consist of a single file and you can translate them normally. However, if the author has included sub folders which are called from theMUplugin, WPML String Translation cannot access them. This means WPML cannot scan and translate files contained in these sub folders.
Translating the strings
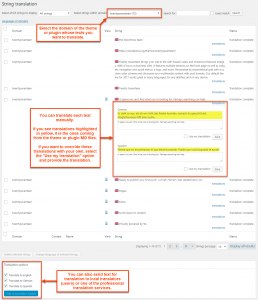
Administrators and Editors can translate theme and plugins texts on the WPML -> String Translation page.
Translating texts via WPML’s String Translation
To translate a text, use the search controls on the top of the page to filter the specific strings. Most importantly, select the domain (it should feature a theme or plugin’s name) whose texts you want to display and translate.
To manually translate listed texts, click the translations link for the text in question, enter the translation, select the Translation is complete checkbox and click Save. If you see translations of the text in question, marked in yellow, this is the translation coming from the theme or plugin’s .mo files. If you prefer, you can override them with your own, by selecting the Use my translation option and providing the translation in question.
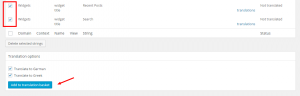
Choose the strings to translate, the languages to translate them into and click on the button toAdd to translation basket.
Selecting text strings to send to translation
From theTranslation Basket tab of the WPML -> Translation Management page, you will then be able to select the translator and send the selected texts for translation.
A locale is a code which determines which language variant to use for different languages. It is comprised of a combination of language and country.
For example “en_US” means American (USA) English and “en_GB” means English used in the UK.
The locales table in WPML is already pre-populated with the correct values for all popular languages. You should edit it only if you want to use a different language/country combination or if you have added your custom languages. For instance, the default locale for Spanish is “es_ES” (for Spain), but you can change it to Mexican Spanish by setting the Spanish locale to “es_MX”.
To edit the locales, go to theWPML->Languagespage and click theEdit Languageslink found in theSite Languages section.
Locale settings
Getting Translation Files for WordPress Itself
In the past, you needed to use the Theme and plugins localization page to download the translations of WordPress core files.
Now, WPML does this automatically any time you add a language on the WPML -> Languages page or during WPML installation.WPML enables you to translate the texts coming from themes and plugins you use in your sites. This allows you to have a completely translated site. Additionally, it allows the users of your site’s administration area to use the interface in their native language.
Localization options and performance optimization
You can find the settings for theme and plugins localization on theWPML->Theme and plugins localization page.
Main theme and plugins localization options
WPML allows you to create translations for texts in themes and plugins in three ways:
Use only String Translation.
Use String Translation but load.mofiles as a backup.
Don’t use String Translation but only load the.mofiles. This is a good option when you already have a theme with the translations you need.
Theme and plugins localization options can significantly impact the performance of your site. WPML version3.8and later automatically suggests the most efficient localization options.
Message prompting to use WPML’s String Translation only
By default, it prompts you to use WPML’s String Translation only, by loading all the translations from the.mofiles into the database. This importing is done once and after it is complete (it can take a while, depending on your site), the performance will be optimal in regards to theme and plugins localization.
String Translation announce that it will start loading all the translations from the .mo files
String Translation is loading all the translations from the .mo files
Finally, String Translation warns you once this process has finished.
String Translation loaded all the translations from the .mo files into the database
Translating the theme and plugins using WPML’s String Translation
This option requires WPML’s String Translation module, available as a part of theMultilingual CMS account type.
As we already mentioned, when using String Translation to translate the theme and plugins texts, you can select to load the.mofiles as a backup or not.
When loading the.mofile as a backup is selected, WPML will fall back to.mofile translations if those exist in your theme and plugins. This means that if you see a translated text string in your site which does not seem to appear under String Translation, it is very likely that the translation comes from a.mofile in your theme or plugin.
When either of these options is used, WPML scans the theme and finds the texts that can be translated. It reports what it finds and let you enter translations, right from within WordPress.
Since version3.8and later, by default, WPML automatically prompts you to scan for new texts in your site whenever a theme or a plugin is activated.
Scanning themes for texts
Scanning themes for strings
You can also manually start the scanning of themes for texts. Select the themes to scan and click onScan selected themes for strings. WPML goes through all the files in the selected themes to extract translatable texts from them (texts that are wrapped withgettext functions).
The scanner shows how many strings were found in the theme and their translation status. You can translate them from theWPML->String Translationpage.
In theLocalization options section, under Other options,you can find an option toUse theme or plugin text domains when gettext calls do not use a string literal. This option might be helpful if you are using a theme whichuses gettext incorrectly.
Scanning plugins for texts
Similarly to scanning a theme for strings, WPML can scan plugins and find translatable strings.
Scanning plugins for texts
Select the plugins to scan and click onScan selected plugins for strings.
Please note that there is a limitation with scanning theMust Use (MU)plugins. Usually,MUplugins consist of a single file and you can translate them normally. However, if the author has included sub folders which are called from theMUplugin, WPML String Translation cannot access them. This means WPML cannot scan and translate files contained in these sub folders.
Translating the strings
Administrators and Editors can translate theme and plugins texts on the WPML -> String Translation page.
Translating texts via WPML’s String Translation
To translate a text, use the search controls on the top of the page to filter the specific strings. Most importantly, select the domain (it should feature a theme or plugin’s name) whose texts you want to display and translate.
To manually translate listed texts, click the translations link for the text in question, enter the translation, select the Translation is complete checkbox and click Save. If you see translations of the text in question, marked in yellow, this is the translation coming from the theme or plugin’s .mo files. If you prefer, you can override them with your own, by selecting the Use my translation option and providing the translation in question.
Choose the strings to translate, the languages to translate them into and click on the button toAdd to translation basket.
Selecting text strings to send to translation
From theTranslation Basket tab of the WPML -> Translation Management page, you will then be able to select the translator and send the selected texts for translation.
A locale is a code which determines which language variant to use for different languages. It is comprised of a combination of language and country.
For example “en_US” means American (USA) English and “en_GB” means English used in the UK.
The locales table in WPML is already pre-populated with the correct values for all popular languages. You should edit it only if you want to use a different language/country combination or if you have added your custom languages. For instance, the default locale for Spanish is “es_ES” (for Spain), but you can change it to Mexican Spanish by setting the Spanish locale to “es_MX”.
To edit the locales, go to theWPML->Languagespage and click theEdit Languageslink found in theSite Languages section.
Locale settings
Getting Translation Files for WordPress Itself
In the past, you needed to use the Theme and plugins localization page to download the translations of WordPress core files.
Now, WPML does this automatically any time you add a language on the WPML -> Languages page or during WPML installation.