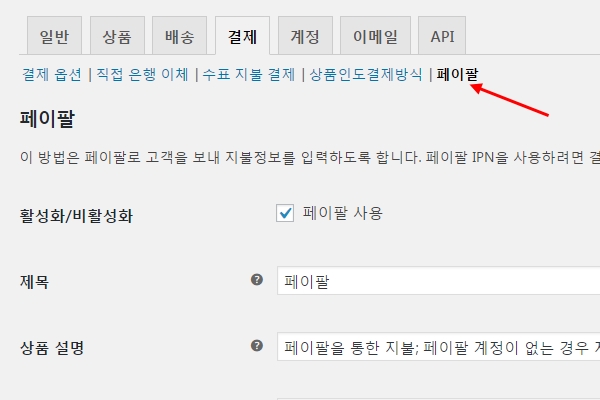
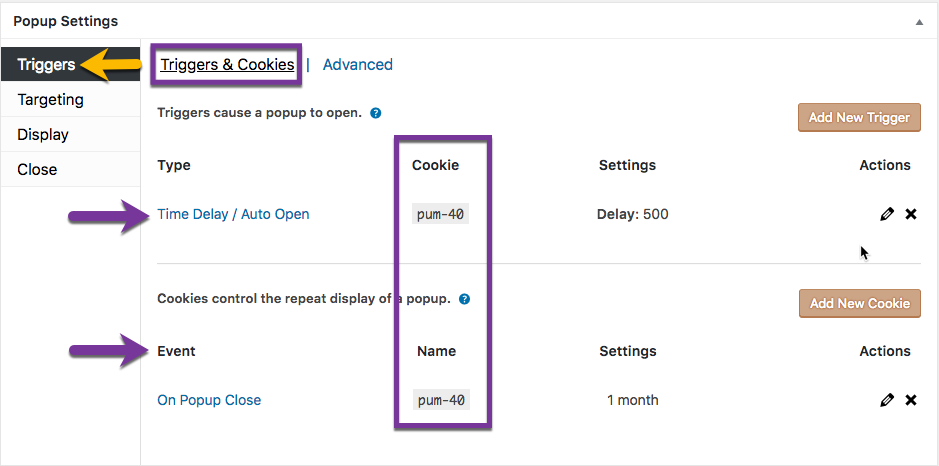
Woocommerce 와 WPML 환경하에서 PG를 갈라서 쓰고싶어서 쓰는 플러그인인데 상당히 융통성이 없는 플러그인이다.
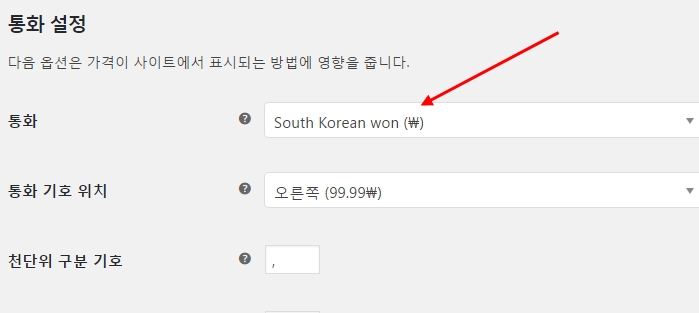
그러니까 말인 즉슨, 무조건 기준이 상점통화를 기준으로 출발한다는 것인데,
USD 1 $ = KRW 1210.00 \
이런 개념이라는 것이다. 변동가능한 값은 기준통화가 아닌 오른쪽의 가변변수로 놓여야 할 통화에 불가능 하다는 것.
얘네가 자동으로 환율전환을 하는 사이트로 2가지를 소개해주고 있는데, 걔네들도 결국은 실시간으로 데몬화시켜서 서버측에서 돌려다 쓰는 것인데다가, 그걸 JSON Format으로 던져다가 업그레이드 하는 수준이고
그거 가지고 달에 10달러 (약 만원) 씩 뜯어먹는다. 오지게 뜯어먹는다.
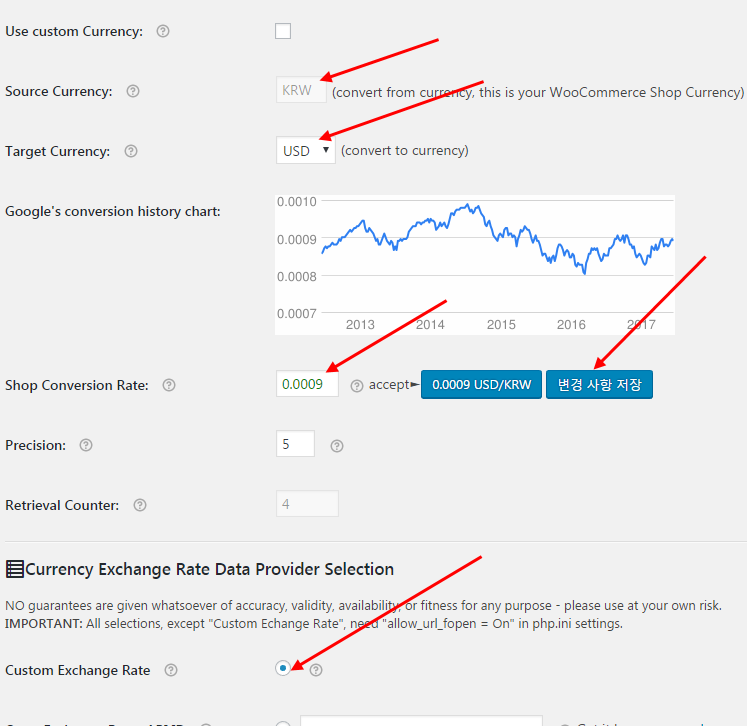
그런데 더 의아한건 거기서는 기준 통화 (Source)를 USD가 아니라 KRW로 바꿀 수 있는 기능을 이미 제공하고 있음에도 불구하고, WPML Multiligual 에서는 해당 부분을 지원하지 않는 다는 것이다.
결국은 쓸려면 커스터마이징을 거쳐야한다.
WooCommerce Multilingual, includes support for running a multilingual e-commerce site with multiple currencies, independent of the site’s languages. You can set pricing using a configurable exchange rates map or per product. On the front-end, users will be able to switch between the different available currencies, like they switch languages.
Configuring currencies per language
It is possible to show specific currencies on specific languages and also configure default currencies for distinct languages. This is done on the WooCommerce -> WooCommerce Multilingual page, under the Multi-currency tab.
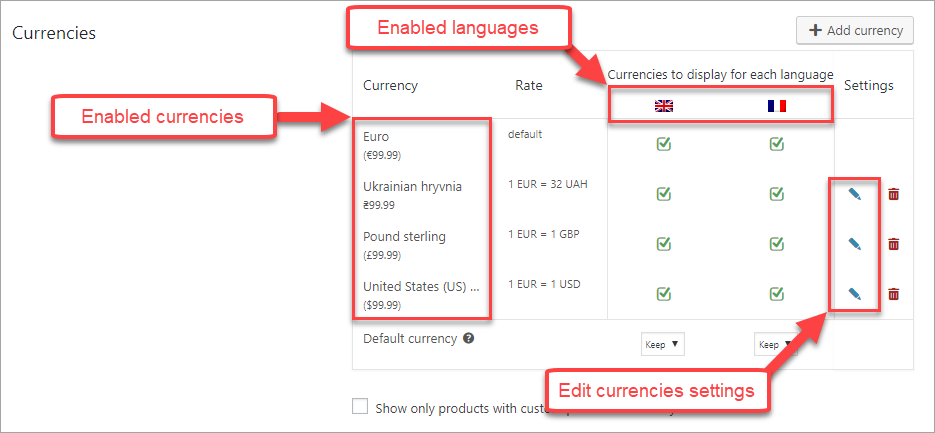
Multi-currency Settings
This helps with situations when products in certain languages need to be ordered only in a precise currency. Additionally, default currencies can be set for specific languages so, by default, the users will see product prices in a given currency when they switch to a different language on the front end. The Keep option means that the currency will not change when the language is being changed.
When a new currency is added it is being included by default on all languages and can easily be turned off using the appropriate checkboxes.
Each custom currency must have an associated exchange rate. This will be relative to the site’s default currency and can be changed anytime. When the exchange rate changes all prices in the custom currencies will change accordingly, except prices included in orders that have already been placed.
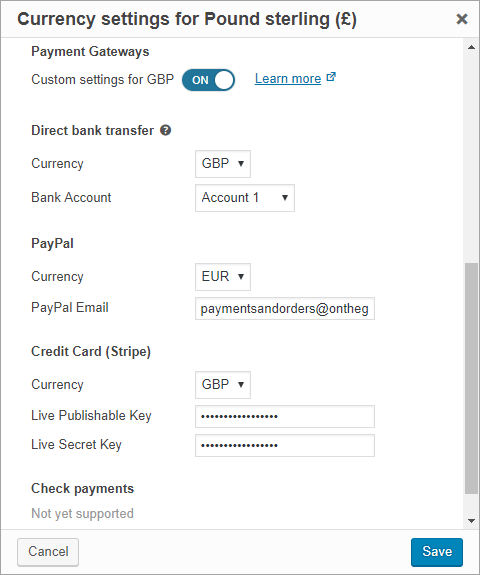
Payment gateways settings
By clicking on Edit currencies settings icon, under the Multi-currency tab, you can access the set of options related to currency display, exchange rate, and Payment Gateways options.
Currently, supported payment gateways are Paypal, Stripe, and BACS.
Since not all payment gateways accept all currencies you can define ways to automatically make a conversion before making the transaction in a supported currency.
Currency settings
On the checkout page, a notice will show what currency will be used in the transaction if it is different than the one already selected by the user. The total amount will also be displayed in the converted currency.
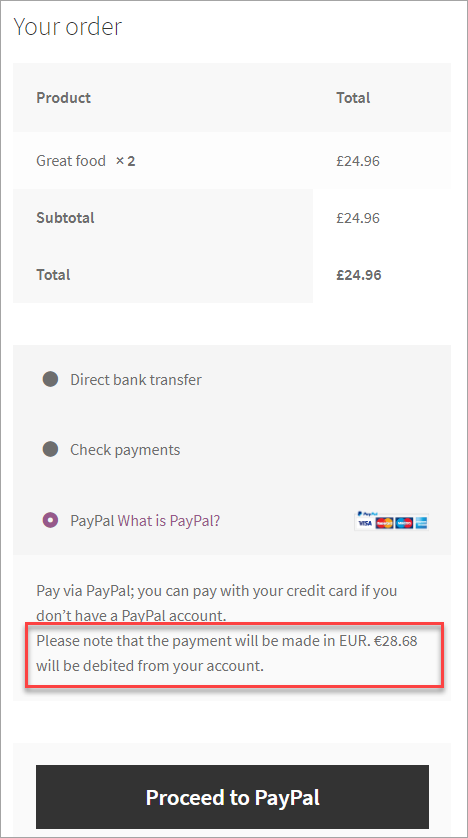
Payment notice on a checkout page
Using automatic exchange rates
WooCommerce Multilingual allows you to set up automatic exchange rates for your store. There are three options to set for this features.
Use the Exchange rates source to select the source of the exchange rates data. You can choose from two renowned services including Fixer.io and currencylayer.
You can set an additional Lifting charge percentage to adjust the final, effective exchange rate. This is useful for international transactions that may add additional charges.
The following is how the effective rate is calculated, based on the set lifting charge:
Effective Rate = Service Rate x (1 + Lifting Charge / 100)
Finally, you can also set how frequently the automatic exchange rates will be updated for your store. Updates can be set to happen on a daily, weekly, or monthly basis. By default, this is set to manual update.
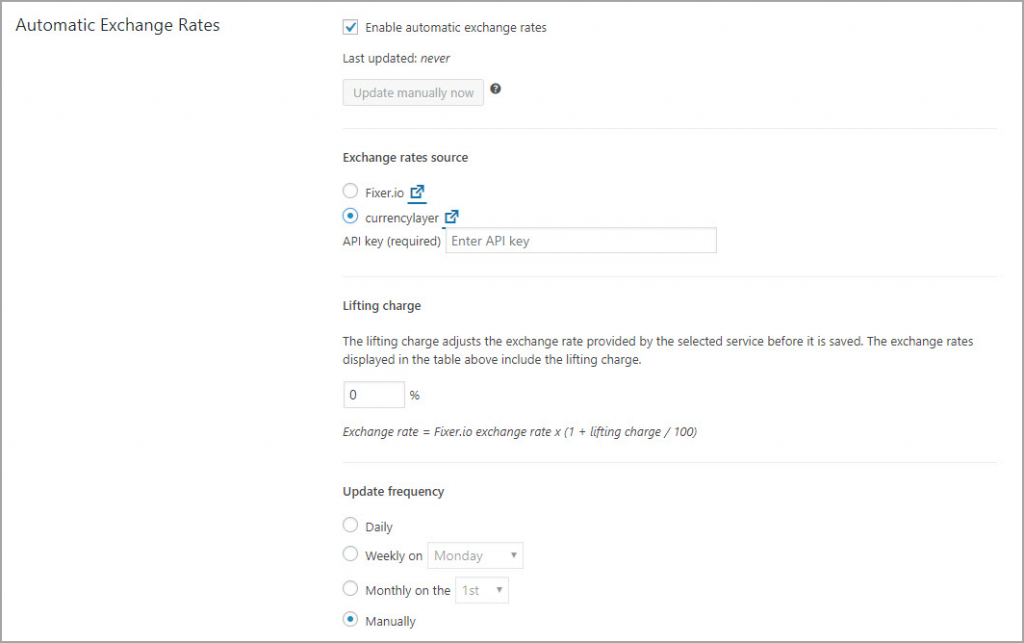
Settings for the automatic exchange rates
Configure distinct prices for different currencies
WooCommerce Multilingual also includes the option to set custom prices in different currencies. These will be fixed and will override the prices automatically determined by the exchange rate.
Setting custom prices in different currencies can be enabled from the post editor, under the fields for Regular Price and Sale Price (for the default currency). These prices will override the prices determined automatically based on the exchange rate. To revert to using the automatic prices you simply have to remove the custom prices and update the product.
These prices will override the prices determined automatically based on the exchange rate. To revert to using the automatic prices you need to remove the custom prices and update the product.
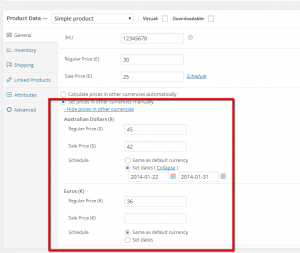
Setting Custom Prices
A similar interface exists on the variable products editing screen with the possibility of adding custom prices for some, or all variations, or for some, or all custom currencies.
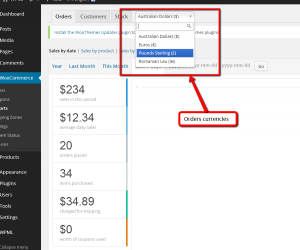
Orders currencies
Orders will have a specific currency associated with them. It is the currency that the user was using when placing the order. This will also be reflected on the back-end, where on the Orderspage, each order shows the total in the corresponding currency. On this page, it is also possible to filter the orders by currency.
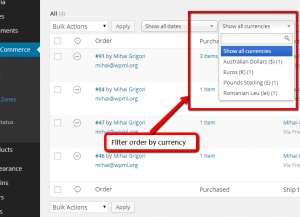
Orders Filtered By Currency
Since all created orders will have a currency associated, the WooCommerce reports will be broken down by currency.
Reports Filtered By Currency
Adding a currency switcher to the front-end
Once you have added the support for multiple currencies, you should display a currency switcher in your site’s theme. You can display the currency switcher with a shortcode or as a hook.
Currency switcher shortcode
Shortcode: [currency_switcher]
Attributes: format (Available tags: %name%, %code%, %symbol%) Default: %name% (%symbol%)
The shortcode version is the most convenient when you display the currency switcher inline with WordPress content, for example in Content Templates, by the Views plugin.
Currency switcher as PHP code
PHP code: do_action('wcml_currency_switcher', array('format' => '%name% (%symbol%)'));
The other available parameter besides “format”:
- switcher_style: wcml-dropdown, wcml-dropdown-click, wcml-horizontal-list, wcml-vertical-list
Outputs a basic drop-down menu with currency codes for option values. The client’s current currency or the configured default currency for a specific language will be auto-selected.
Using custom switchers
Besides these default switcher_style options, you can also use your custom ones, defined by the custom currency switcher you design using template files. In this case, you need to use the correct slug that identifies your custom currency switcher.
The slug for your custom switcher is generated depending on the sanitized name of your template, as defined in its config.json file, and the template’s location:
| Location of the custom currency switcher | How the slug is generated |
| Theme folder | Theme slug + sanitized switcher name |
| Plugin folder | Plugin slug + sanitized switcher name |
| “uploads” folder | “uploads-” + sanitized switcher name |
Let’s consider the following example:
- The name of your custom currency switcher is “My custom switcher”.
- You are using the Twenty Seventeen theme and the template files for your switchers are located in the theme’s folder.
The slug to use with your custom switcher is twenty-seventeen-my-custom-switcher, as shown in the following example.

Using custom currency switcher in PHP templates
|
1 2 3 4 |
do_action('wcml_currency_switcher', array( 'format' => '%name% (%symbol%)', 'switcher_style' => 'twenty-seventeen-my-custom-switcher' )); |
The PHP code version is best when you manually add the currency switcher to PHP templates.
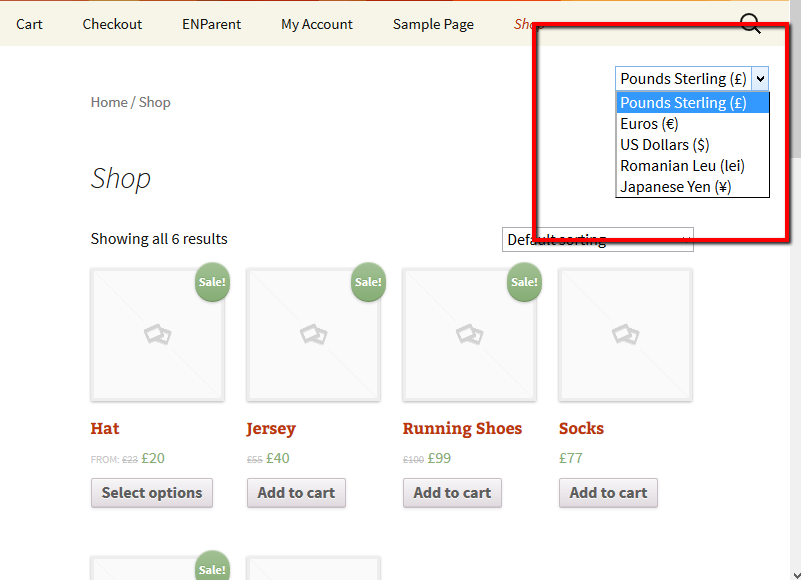
Sample of currencies switcher display on the frontend
Currency switcher widget
The currency switcher can also be added to a template as a standard WordPress widget.
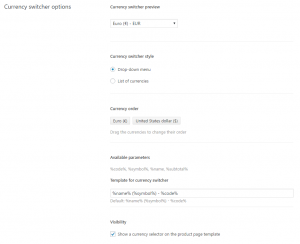
Currency switcher options
Options for the currency switcher can be configured on the Multi-currency tab of WooCommerce Multilingual main settings page.
Currency switcher options allow you to:
- Preview how the switcher will look like on the front-end before applying changes.
- Set the switcher style.
- Arrange the order of currencies in the switcher using drag-and-drop.
- Adjust the output of the switcher.
- Enable or disable the showing of a currency selector on the product page template.
Currency Switcher Options
Adjusting the output of the switcher
You can customize the template used for the currency switcher by using the four parameters:
- %name% – full name of the currency, for example “Euro”
- %symbol% – the standard symbol that represents the currency, for example “$” or “€”.
- %code% – the standard code that represents the currency, for example “USD”, for United States Dollar.
- %subtotal% – total costs of the current order (basket), without shipping costs and additional taxes. Subtotal is the formatted price and includes the currency symbol positioned according to the currency options set in WooCommerce settings.
Starting with version 3.9, WooCommerce Multilingual allows you to use the following HTML tags to customize the output of the switcher: img, span, em, strong and u. Please note that these tags can only be used when the currency switcher style is set to List of currencies. This stems from the official HTML standards for the select tag.
Currencies options and rounding rules
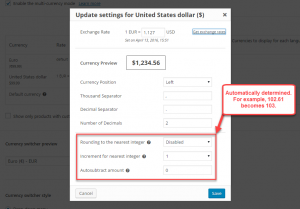
Currency Rounding Rules
Besides the exchange rate, it is possible to configure, for each separate currency, things like the currency position, separator for thousands, decimal separator and number of decimals – similar to how these can be defined for the default WooCommerce Currency in the standard WooCommerce screen.
When you set pricing per currency, you can have WooCommerce Multilingual to auto-convert the prices, while keeping them “elegant”. This is possible with the use of rounding rules that can be configured next to the general currency options.
The prices that are determined automatically can be rounded to the nearest integer.
Increment for nearest integer:
- 1454.07 becomes 1454 when this value is 1
- 1454.07 becomes 1450 when this value is 10
- 1454.07 becomes 1500 when this value is 100
Autosubtract amount: the value to be subtracted from the amount obtained previously.
For 1454.07, when the increment for the nearest integer is 100 and the auto-subtract amount is 1, the resulting amount is 1499.
Developer information – using low-level hooks to setup your own multi-currency logic
WooCommerce Multilingual defines a set of filters and hooks that can be used by 3rd party plugins to implement multi-currency logic when WooCommerce and WooCommmerce Multilingual are set up and running. With this, the users will be able to see prices in their preferred currency (the price amounts are being determined based on the currencies exchange rates map). The orders will be placed in the currency that the user selects on the front-end.
'WEB > WP(WordPress)' 카테고리의 다른 글
| Getting code=EWP_SETTINGS error when trying to connect to PayPal (0) | 2019.08.27 |
|---|---|
| Divi Theme Bug - Default Site Language English Problem (0) | 2019.08.23 |
| 워드프레스 우커머스 원화(KRW) 설정시에도 페이팔 사용하기 (0) | 2019.08.23 |
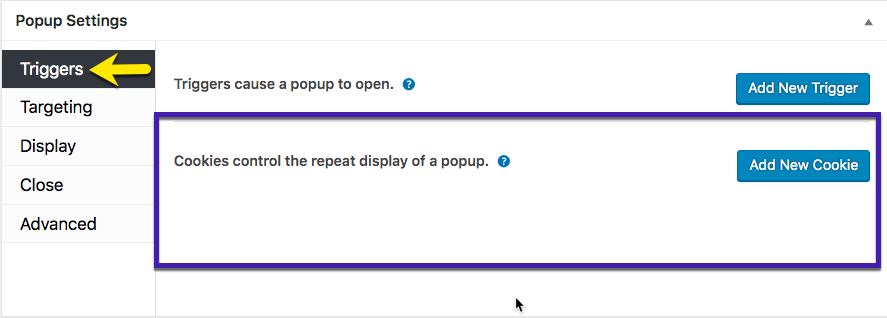
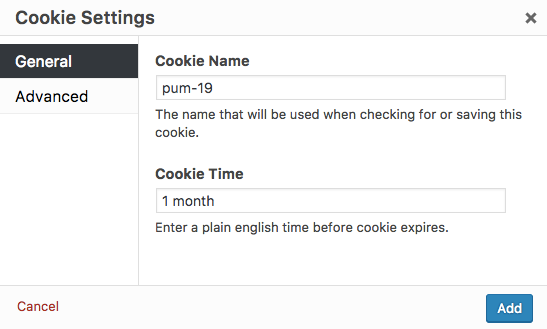
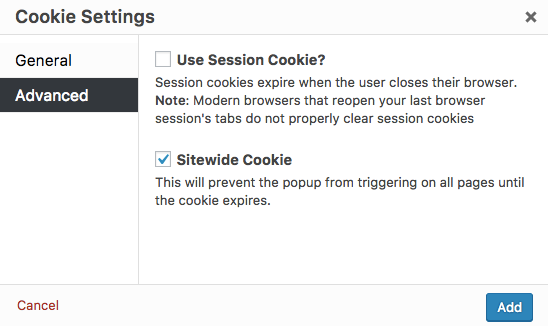
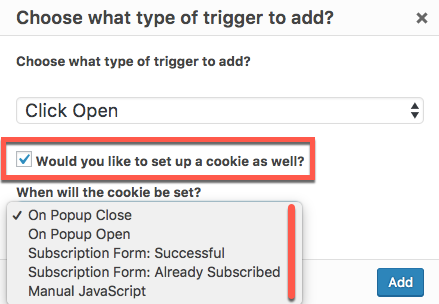
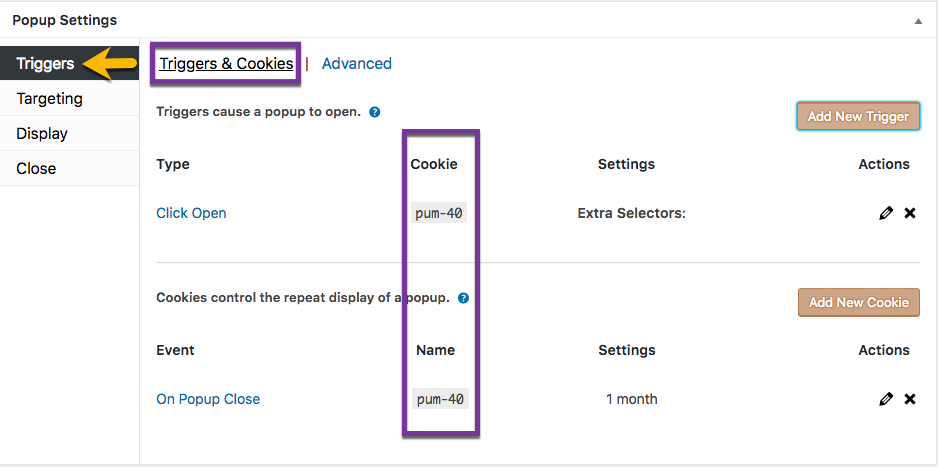
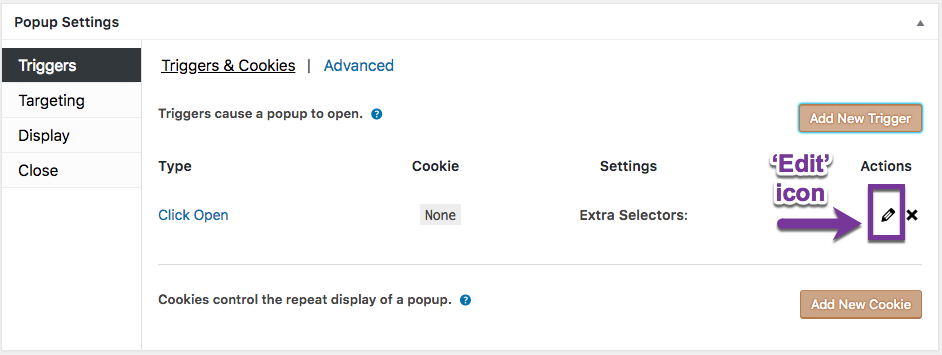
| 'Cookies' option settings (0) | 2019.08.14 |
| Theme and Plugins Localization (0) | 2019.08.09 |