If you have a form with quite a few fields, it can sometimes become a bit daunting for someone filling out the form. Many times, the form can be simplified by spanning it across several pages. Due to less content being displayed at a time, large forms will not only become more pleasant but also load faster on your site because less information is being loaded at a time. In this article, we will show you how to create a multi-page form using Gravity Forms.
Setup
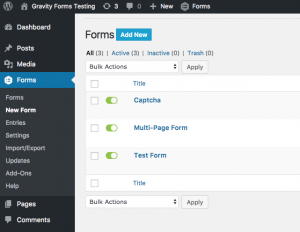
First, you’ll need to access the form editor within Gravity Forms. To do so, click onFormson the left side of your WordPress admin, then click onAdd New.
Next, it’s time to start creating a form by adding fields. This article assumes that you have a basic understanding in creating forms, but if you need more information on how to create a form in Gravity Forms, see ourform creationarticle. Go ahead and add any fields you will need.
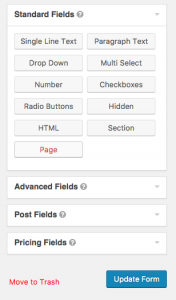
Now that you have your form fields in place, you just need to separate the fields by page. To do this, go to the right of the form editor and look inside theStandard Fieldssection. Inside this section, click on thePagefield type.
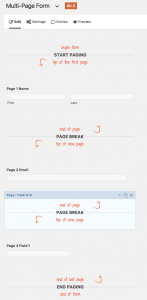
Upon clicking onPage, you should see that 3 items have been added to the form editor. These items allow you to determine where pages begin and end. 2 of these items,Begin PagingandEnd Pagingsimply define that this form is a multi-page form. These items cannot be moved and will always be located at the beginning and end of the form editor when editing a multi-page form. You should also see aPage Breakfield type displayed within the form editor. This item separates the individual pages in a multi-page form. The items above it will be on the first page, and items after it will be on the second page.
If you want to add additional pages to a multi-page form, all you have to do is click on thePagefield type again to add an additional page break, and position it where you would like the previous page to end and the next page to begin. You can add as many page breaks as you want.
Options
To modify the behavior of multi-page forms, options exist within the individual items that are added using thePagefield. For more information on how you can modify settings specific to multi-page forms, take a look at thePage Break field typearticle.
"This page is not working https://~~~~~.~~.~~ redirected you too many times",
usually not work .htaccess files redirect option in WordPress.
If you plugin set, "Enable 301 .htaccess redirect" and "Stop editing the .htaccess file" is On aht the same time.
Notice the message "Https redirect cannot be set in the .htaccess file. Set the .htaccess redirect manually or enable the WordPress 301 redirect in the settings."
The .htaccess is the fastest redirect, so why not enable it by default?
When you enable the setting “htaccess redirect” in settings/ssl/settings, Really Simple SSL detects the most suitable redirect, then opens a testpage to verify if this option won’t result in redirect loops. Even so, the detected redirect can cause a loop: there are a lot of server configurations, and some respond unexpectedly to the proposed rules. If this happens, you get locked out of the back-end, because of the redirect loop. For this reason, this setting is optional. I recommend using it, but you need to know how to remove it just in case.
This only happens on about 1% of the sites and is easily fixed, but make sure you have FTP access.
If you encounter an issue when this setting is enabled, just remove the rewrite rule from your .htaccess file:
Open your ftp client (for example filezilla)
In the root of your website, look for the .htaccess file. If you cannot find it, make surefilezilla shows hidden files
Open it in a texteditor, and look for # BEGIN rlrssslReallySimpleSSL
Remove all lines between # BEGIN and # END (from Really Simple SSL), and save
Prevent Really Simple SSL from editing the htaccess any further:
Look for wp-config.php in the root of your site.
Open the wp-config, and add at the top, but after “<?php": define( 'RLRSSSL_DO_NOT_EDIT_HTACCESS', TRUE );