I want to use a multi-step form where the user enters their name in step one, then on step two the form will say "Hello, [name]" with the rest of the content and steps to follow.
Any ideas?
EDIT: I want to use data entered in step one on step 2. Reading GF documentation I think something like {[Field Name]:[field_id]} should work, but it does not. Digging further I found that this would only work once a form has been submitted already. So my question is, is there a way that will enable me to use the merge tags within the current form from data being submitted in a previous step?
Welcome to WordPress development! Unfortunately it's unclear what you are asking as you didn't tell us what exactly you've tried so far and where you are stuck right now. Please update your question accordingly as otherwise it's just too broad.– leymannxMar 30 '19 at 8:59
That is fair. I am trying to use merge tags in a multi-step form. I want to use data entered in step one on step 2. Reading GF documentation I think something like {[Field Name]:[field_id]} should work, but it does not. Digging further I found that this would only work once a form has been submitted already. So my question is, is there a way that will enable me to use the merge tags within the current form from data being submitted in a previous step?– RowbeeMar 30 '19 at 15:15
If you're looking to get your hands dirty with some code, Gravity Forms has an example of how this might work with a snippet on their docs for thegform_pre_renderfilter:
This example is for a two-page form. The data submitted from the first page is displayed on the second page as a preview. The second page has only one field, an html field that will be populated with the data from the first page.
Gravity Forms uses merge tags to allow you todynamically populate submitted field valuesand other dynamic information in notification emails, post content templates, and more! This article provides a quick grouping for reference, and directs you to the more detailed reference document for each tag.
Make sure you review the detail articles, asnot all merge tags can be used in all the places that merge tags are accepted. For example, a selection of merge tags are not available for use as default values.
Dynamically filter and populate field choicesand valueswith posts, users, taxonomies, terms, Gravity Forms entries, and databases. Pretty much anything!
This plugin is part of Gravity Perks, a suite of 32+ essential Gravity Forms addons with support you can count on.
GF Populate Anything allows you to dynamically filter and populate field choicesand valueswith posts, users, taxonomies, terms, Gravity Forms entries, and databases. Pretty much anything! Choices and values can be filtered based on the values entered/selected in other fields allowing you to fetch and populate fresh, dynamic data as the user interacts with the form.
GF Populate Anything also provides support forLive Merge Tagswhich allows you to display dynamic, filterable data in your field labels, descriptions, and content.
Features
Dynamically populate fieldchoices. Populate any choice-based field (e.g. Drop Down, Radio Buttons, Checkboxes) with dynamic, filterable data.
Dynamically populate fieldvalues. Automatically populate field values with dynamic, filterable data.
Dynamic filtering by user-specified input. Filter and populate fresh, dynamic data based on values/selections made in other fields.
Chain selects, radio buttons & more! Chain the available field choices based on selections in other fields.
Live Merge Tags. Add auto-updating merge tagsanywhereinside your form (e.g. labels, descriptions, choices, values, HTML content).
Specialized, built-in data sources. Populate Posts, Users, Taxonomies, Terms, and Gravity Forms entries with specialized options for each. For everything else, populate directly from the WordPress database.
Flexible choice and input templates. Completecontrol over the populated value and label for choices and inputs.
Results preview. See the exact data that will be populated based on your filters right in the field settings.
Improve data accuracy. Improve accuracy by allowing users to select from an existing datasource rather than entering the information manually.
Automatic updates. Get updates and the latest features right in your dashboard.
Awesome support. We’re here to help! And we mean it.
After GF Populate Anything is installed, you’ll want to enable “Populate Choices Dynamically” or “Populate Value Dynamically” for a given field in the Gravity Forms Form Editor. Here’s what that looks like when populating choices.
Add a field that supports choices such as Drop Down or a text-based field such as Single Line Text.
Enable dynamic population for the fields that you wish to dynamically populate.
Select an object type that you wish to populate the field with.
Optionally add filters to show the desired objects.
Designate what object properties should be displayed by setting the Choice or Value Template.
Feature Details
Populating Choices Dynamically
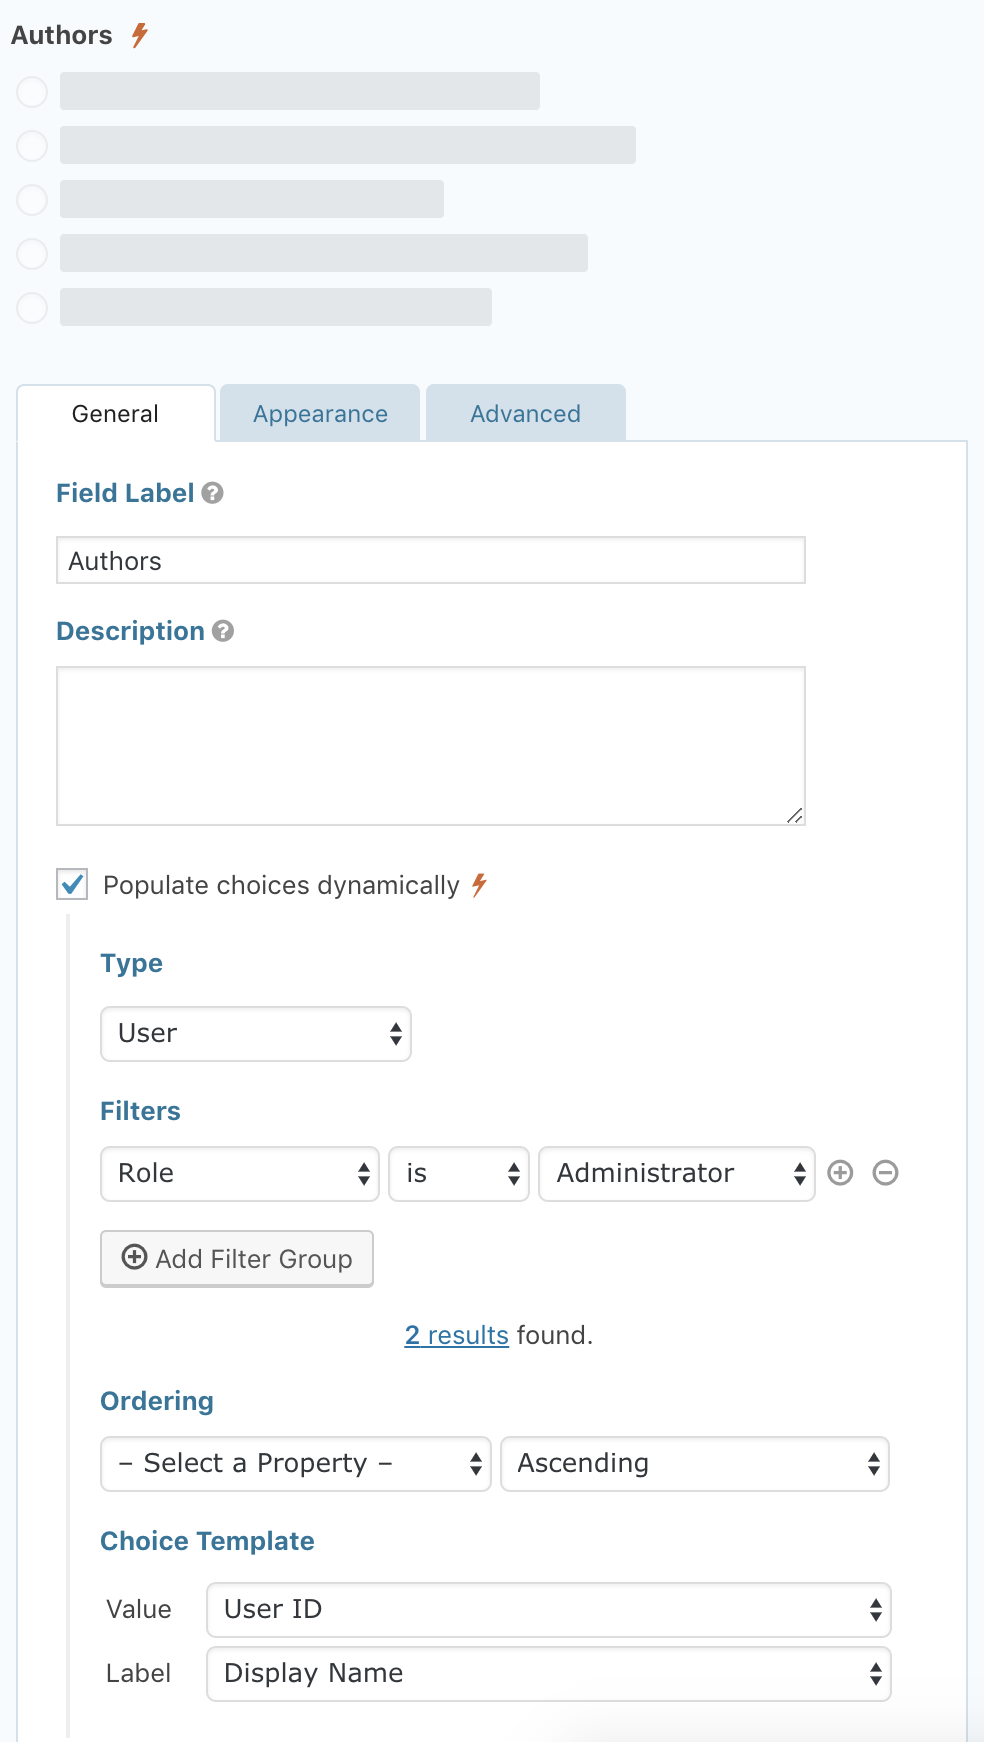
If you wish to dynamically populate a choice-based field’s choices, you can do so by enabling “Populate choices dynamically” in the field’s settings.
Example Configuration
In the example below, we configured a radio button field to have its choices dynamically populated with users who have the “Administrator” role.
Frontend
Here’s what the configured radio button field looks like on the frontend.
Populating Values Dynamically
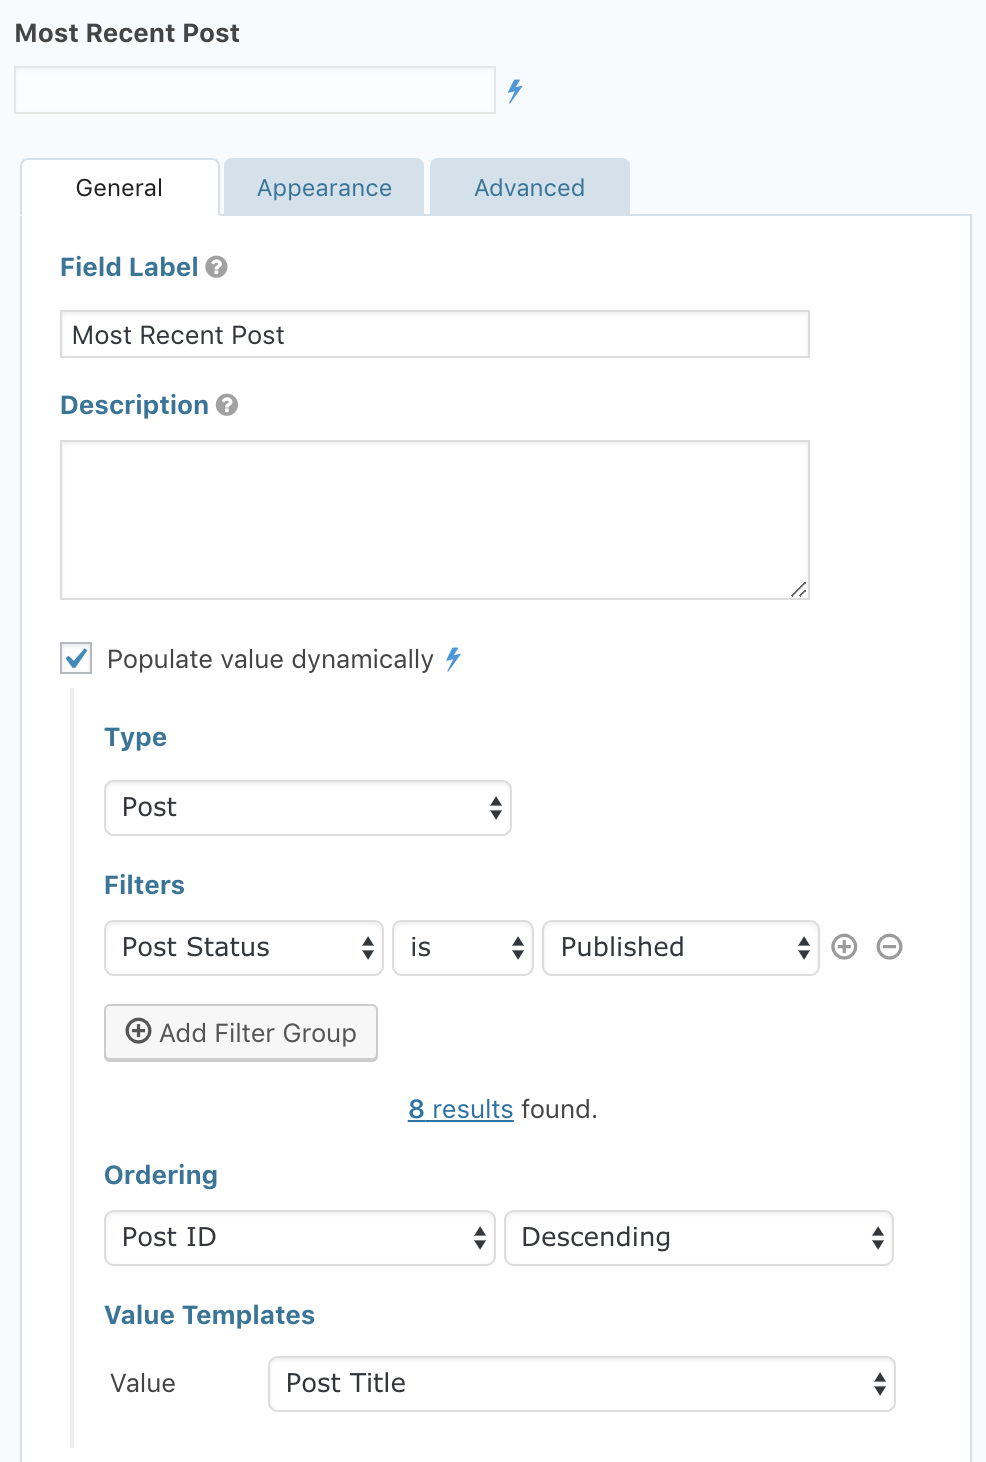
Populating values with GF Populate Anything is similar to how populating choices work. Enable “Populate value(s) dynamically” in the field’s settings and then configure it accordingly.
Example Configuration
In the example below, we configured a single line text field to have its value populated with the post title of the most recently added post.
You can dynamically populate a field’s choicesandvalue(s) if it supports choices!
Frontend
Here’s what the configured single line text field looks like on the frontend.
Filtering ObjectsFilter Groups
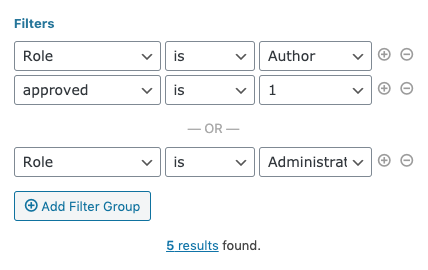
Create groups of conditions that filter which objects are populated into the field. Add a condition to your group with the (+)/(-) icons to the right. All conditions in a group must be true for the group to match. Add another group by clicking the “Add Filter Group”. Objects that match any group will be populated into the field.
You can use the plus icon to add an AND filter condition. Adding Filter Groups creates an OR condition, but multiple filters in a single group are considered an AND condition.
Filter Operators
is
is not
>(greater than)
<(less than) *>=(greater than or equal to)
<=(less than or equal to)
contains
starts with
ends with
is LIKE
Available wildcards
%– Zero, one, or multiple characters
_– Single character
Filter Property
Depending on the object type you select, you will have different properties to select from.
Post
Author
Parent Post
Post Content
Post ID
Post Status
Post Title
Post Type
Post Taxonomies(Dynamic)
Post Meta(Dynamic)
Taxonomy Term
Name
Parent Term
Slug
Taxonomy Term
Term ID
Term Meta(Dynamic)
User
Display Name
Role
User Email
User ID
User URL
Username
User Meta(Dynamic)
Security Note: On multisite installations, the User object type will only search users from the current site.
Gravity Forms Entry
Created by (User ID)
Entry ID
Fields(Dynamic)
Database
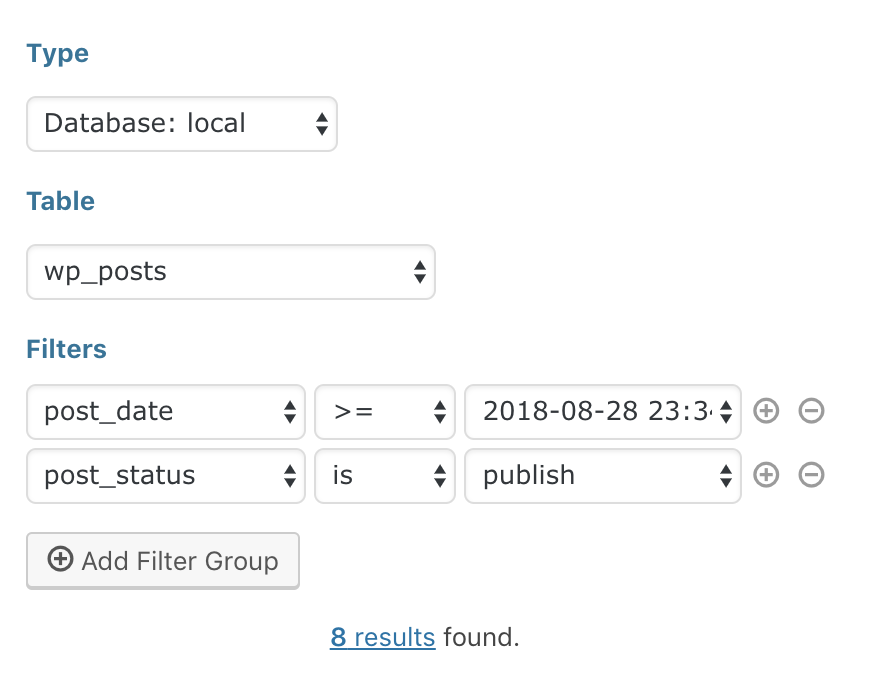
The Database Object Type’s properties are dependent on the table you select. Once you select a table, the properties will be all available columns on the MySQL Table.
Security Note: On single site installations, the Database object type is only available to administrators.
Filter ValuesDefault
After selecting the filter property, the Filter Value dropdown will be populated with a list of values that apply for that property. For example, if you are populating posts into a field and add a filter condition for the “Post Status” property, the Filter Value dropdown would be populated with a list of available post statuses (e.g. Draft, Pending Review, Published).
Form Field Values
Objects can also be filtered by values entered by the user when the form is filled out. After selecting the filter property and operator, select the desired field from the Form Field Values option group. When a user enters a value into the specific field, the objects populated into this field will be filtered by that value.
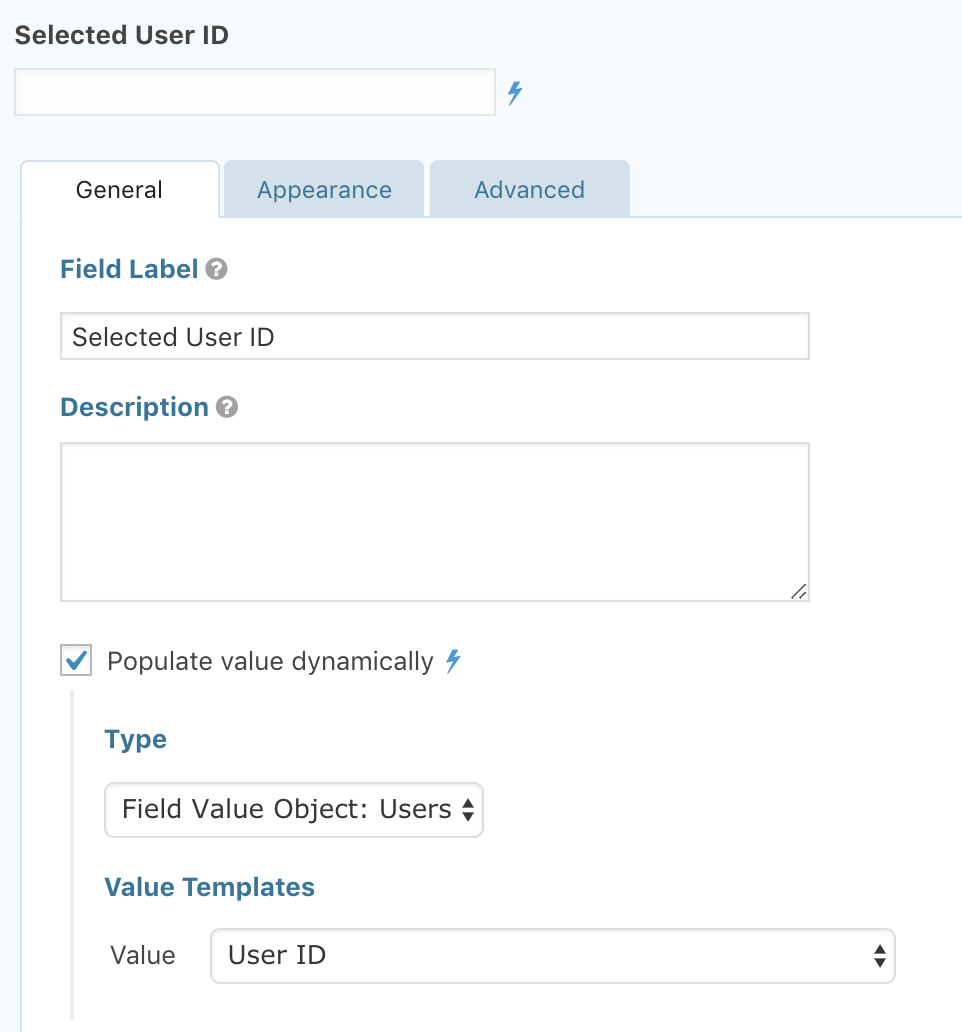
Field Value Objects
One common use case with GF Populate Anything is populating field values from a field with dynamically populated choices. You can do this by manually configuring the Object Type and Filters to use field values, but an even easier way is to use a Field Value Object.
Field Value Objects are available on any field that supports values when there is another choice-based field that has dynamically populated choices on the same form.
Example Field Value Object Configuration
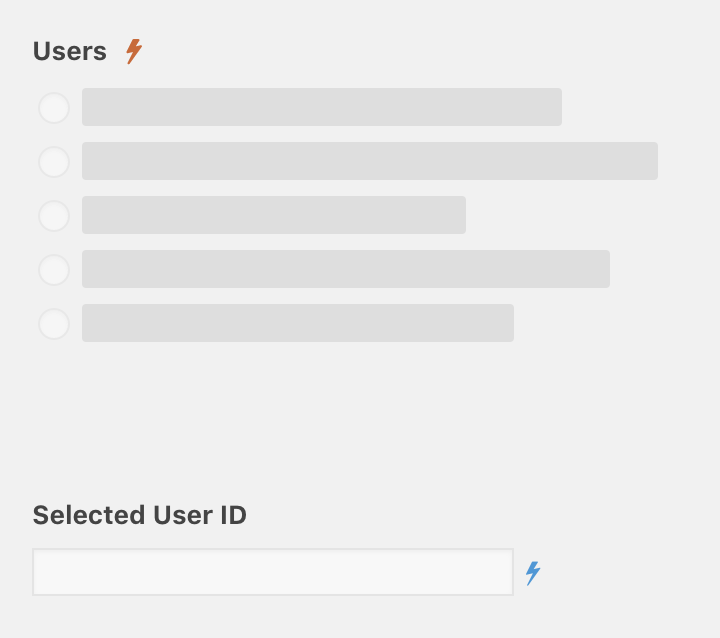
In the example below, we wired up a single text field to display the user ID of the selected user in the radio field above it.
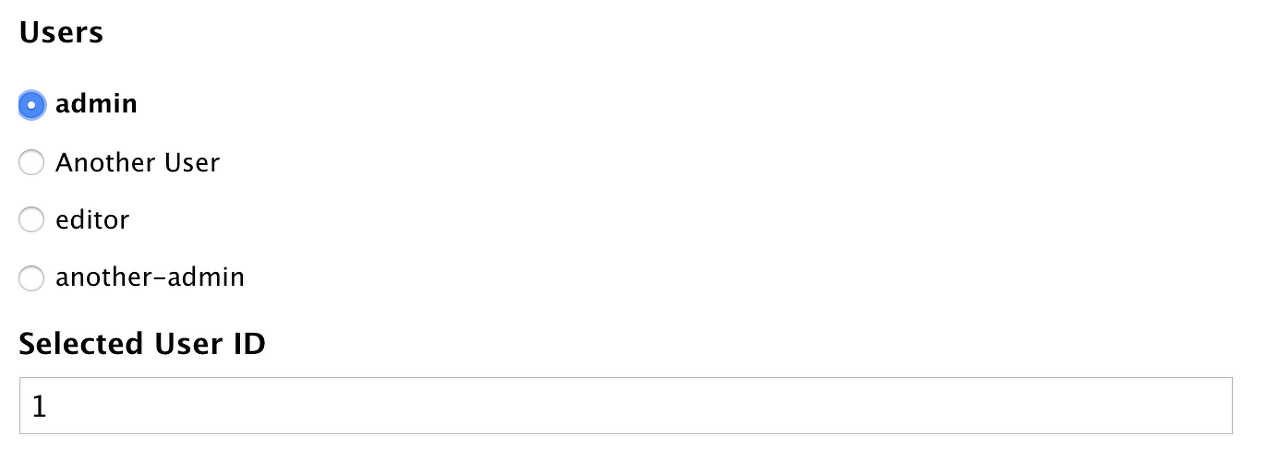
Example Field Value Object Frontend
Live Merge Tags
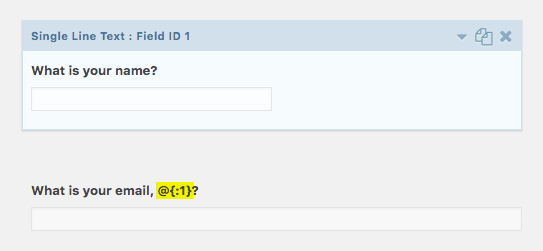
When GF Populate Anything is activated, any merge tag prefixed with an@will be automatically replaced when its associated field is updated. Live Merge Tags can be used anywhere within your form (labels, descriptions, choices, values, and HTML content).
Fallback Modifier
Live Merge Tags support a special modifier:fallbackwhich can be used to display content when the merge tag does not have a value. For example, if the user can optionally provide there name but you want to greet them regardless, you could use,Hello @{Name:1.3:fallback[there]}. If a user entered their name as David, it would readHello Davidbut if the user entered no name, it would readHello there.
Example: Use Field Value in Another Field’s Label
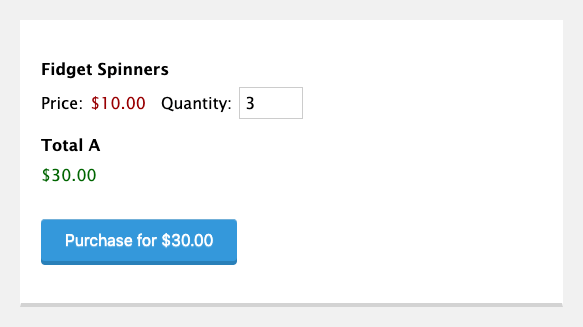
Example: Show Total in Submit Button
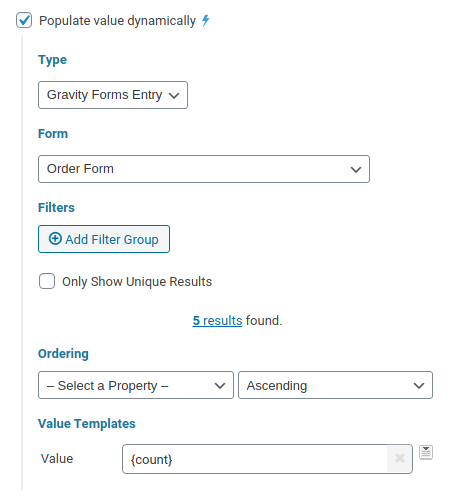
Count the Number of Results
Use the{count}merge tag as a custom Value Template to populate the number of returned resultsinsteadof a value. This is useful for conditional logic where you want to show or hide a field based on how many objects exist.
For example, say you have an order form and the first 50 customers to purchase should receive a discounted price. Populate a hidden number field with the entry count.
That count can be used with conditional logic to show a Discount field to the first 50 customers.
The “Only Show Unique Results” checkbox applies to the{count}merge tag. Uncheck this to countallentries.
Known Limitations
Dynamic choices are not yet available in conditional logic.
Populating to/from List fields is not supported.
Dynamic checkboxes are not available when exporting form data.
When populating from custom database tables, the primary key must be the first column of the database.
FAQs
Why aren’t users created with the Gravity Forms User Registration populating in my multisite?
When a user is created with the GF User Registration Add-On in a multisite install, they aren’t given aprimary_blogmeta key in the database, and Populate Anything specifically looks for that key to determine which site they belong to.
By default, Populate Anything will only display up to 500 entries to guarantee the best performance but we do have a way of increasing this number.
Use thegppa_query_limithook to adjust the maximum number of results that can be returned in your query.
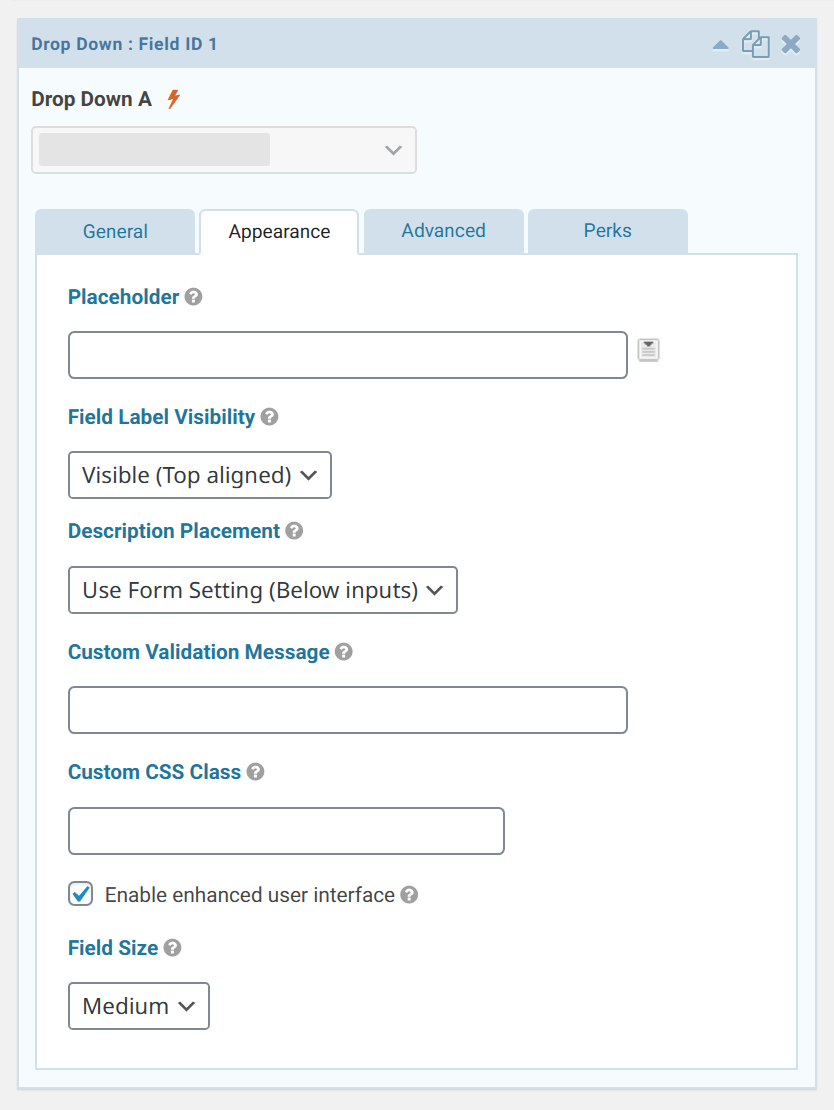
How do I add a placeholder or a blank space to the first populated option in a Drop Down?
You can use the Placeholder setting on the Appearance tab to add a default choice:
Please note that Gravity Forms won’t let you add a space as the placeholder, but you can add a non-breakable space ( ) and it will create a blank choice.
How do I add Checkbox Values as Choices?
By default, Gravity Forms stores checkbox values as arrays separated by commas, and when Populate Anything pulls in those values, it populates them as they are stored. Luckily, we have a snippet that will populate checkboxes from an entry as choices:GP Populate Anything: Checkboxes from an Entry as Choices
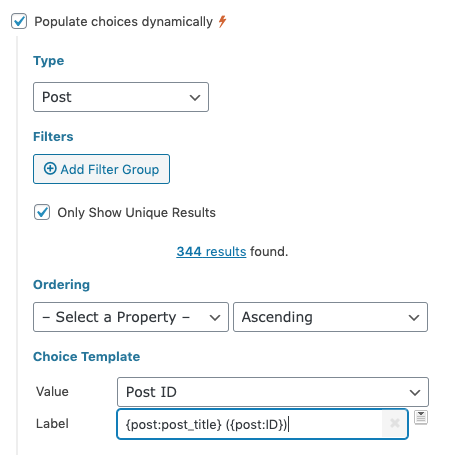
How can I differentiate similar items when populating into a Drop Down?
When populating items with the same or similar choice labels, you can differentiate between the similar items by following these steps:
Set the Choice Template’s Label to a custom value by selecting “Add Custom Value” from the Drop Down and then entering a custom template. For example, this will show the post title and the post ID.
The end result is a searchable Drop Down field with a unique identifier for each choice.
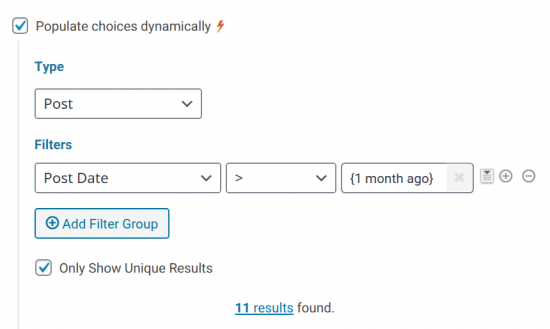
How can I filter Posts those published in the last month?
Populate Anything’s results can be filtered on relative dates withthis snippet. It adds merge tags that can be used as Custom Values in this format:{INTEGER UNIT ago}. For example, to filter Posts from a month ago, use the merge tag{1 month ago}.
Why isn’t my Custom Post metakeyselectable when filtering?
When a meta field is created with a custom field editor, such asAdvanced Custom Fields, the newly created field is simply a placeholder. Until it is used in a post, it won’t be found by Populate Anything.
Some Post metavaluesare missing from the filter drop down.
By default, Populate Anything has a 1000 record limit when accessing meta values for a Post. We havea snippetthat will let you modify that limit. To use it, change1000to whatever limit you’d like to set.
Unless otherwise noted, any code snippet in this post goes in your theme's functions.php file or aplugin for your custom functions.
Need a dynamic form? Here are three useful methods to pre-populate form fields using theGravity FormsWordPress plugin. Sometimes being lazy is a good thing, like creating one form to do three things instead of having three forms to keep track of. What if the form needs to load a different field dependent on which page the user is clicking from? Or dependent on the current page where the form is embedded? In this example, we will pre-populate a form field to conditionally display sections for Billing, Sales, and Support. Thankfully, the folks over at Gravityforms have made this a painless endeavor.
Cue each Section with a Dropdown Field
First, to cue the display of each conditional area, the for, needs an element with multiple options to select from; in this case a dropdown field will be used.
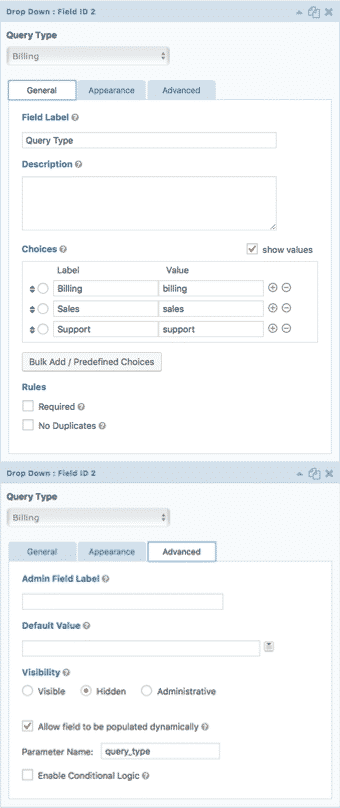
Add a dropdown to the form and in order to keep it unseen by users on the front end, set ‘Visibility’ to Hidden. Next, add Choices for each of the three sections, taking not of the value for each choice. Tickshow valuesif a custom value is preferred. The value will be passed to the front end field and is what we will use to specify which conditional section to display.
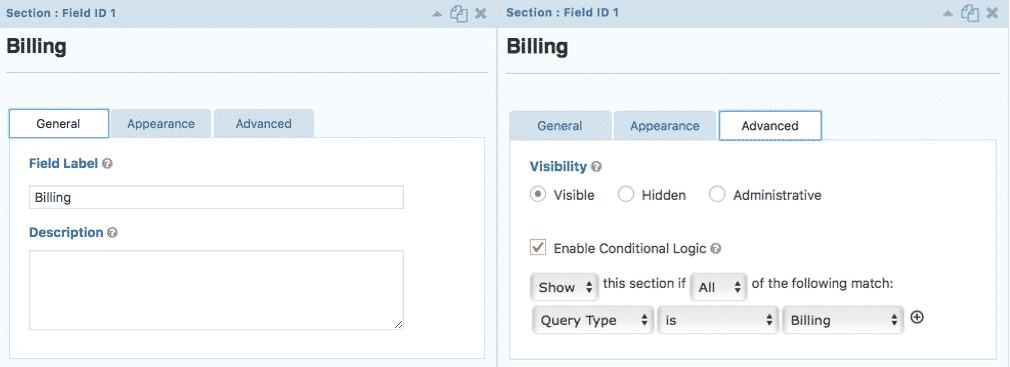
Add Section Field with Conditional Logic
Next, go ahead and create a ‘section’ field for each conditional area: Billing, Sales, and Support. Be sure to check off theAllow field to be populated dynamicallybox, located in the advanced tab. Directly below, set theParameter Namethat will be used to call the corresponding field value. In this example we will usequery_type.
Now, enable conditional logic so each section displays only when the corresponding dropdown choice is selected. Head to the advanced tab for each Section, check Enable Conditional Logic, and configure accordingly to display when the correct dropdown choice is selected.
Apply Parameter Values
The groundwork has been laid, and it is time to put this form to work. Here are three different ways to pre-populate, with a use case for each method.
Pre-Populate by Query String
After appending a query string to the page URL, we can cue thequery_typeparameter to deliver a default field value for the dropdown on our destination page. Going along with our example, let’s say we want to load the sales section any time the user is clicking from the Services page. On the Services page, we must build each destination link to call the ‘sales’ value for the previously set custom parameter:
So what if we want to set the form to display the Billing section by default on our Billing page? One option is to include the standardGravity Formsshortcode on the billing page, addingfield_valuesand setting query_typeequal to the designated dropdown value: [gravityforms id=1field_values='query_type= billing']
Pre-Populate by Hook
Time to hook it up. Here is the most recommended, versatile way to pre-populate Gravity Form fields, extending control of how and where field values will be pre-set. In this example, a conditional hook can be used infunctions.phpto look for the custom parameter and fills it with the desired value.
What if the form needs to display the Support section when it is located on the Support page? First, add a filter that includes the previously setquery_typecustom parameter:gform_field_value_query_type. This enables a custom_function to conditionally return the valuesupportonly if the page is titled Support: add_filter( 'gform_field_value_query_type', 'custom_function' ); function custom_function( $value ) { if( is_page('Support') ) { return 'support'; } }
Time to Get Nifty
There aretons of ways to extend Gravity Forms and create dynamic WordPress forms, making the plugin’s versatility a must-have. For a full scoop on usinggform_field_value_$parameter_nameGravity Forms has put together ahelpful guide.


