A client recently wanted to customize the product sort order of their WooCommerce products on the product category archive page. The archive used the default alphabetical sorting, but they had a few products that they wanted to be listed at the top of the category listing. Here’s how we did it.
Product Sorting Options
WooCommerceoffers the ability to customize the sorting order of products with a few settings changes.
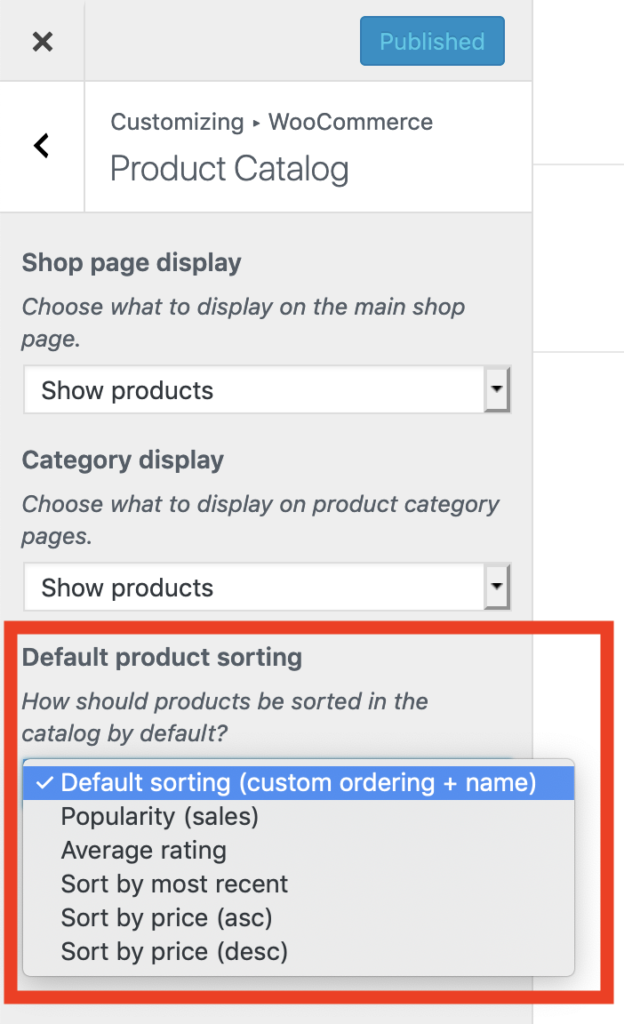
Go to Appearance > Customize in your WordPress admin. Once the Customizer opens, go to WooCommerce > Product Catalogue. This is where you will find your options for sorting products. Ensure that Default Product Sorting is set to “Default sorting (custom ordering + name)”. Publish the new settings and then go to edit an individual product.
[In previous versions of WooCommerce, this is how you would get to that setting: Go to WooCommerce > Settings in your WordPress admin. On the Products tab, click on the Display settings.]
Custom Sorting
All custom sorting is applied against all items and not against separate categories. Keep this in mind if you have a page that displays all products. For this particular project, the product pages were separated by category, so the sorting options didn’t need to be as detailed as others may need.
From the Products admin panel, you can select Sorting and then drag and drop your products in the specific order that you’d like. You can also order the products in the Quick Edit menu by changing the “Order” value. All items default to the value zero.The custom order displays the lower numbers first. You can also edit the order value in the Product Data > Advanced tab on the product edit page.
Move Specific Products to the Top
If you want to custom sort each and every product, you may do so. If you simply want to move a few select items to the top of the list, there is an easy way to do that.
Enter a negative number in the “Order” field of the product. By using a negative number, the item will have a lower value than the default “0” and therefore will show above those items. If you want to lump a group of products together and have WooCommerce sort them alphabetically, just use the same “order” value.
Conclusion
WooCommerce is a powerful e-commerce solution for WordPress and provides lots of ways to customize your online store.
Need Help with WooCommerce?
We offer web development services for WooCommerce and can build a custom WooCommerce extention that meets your exact needs.
In Gravity Forms 1.5 we're adding some new "Ready Classes". Using these new classes, you can easily create more advanced alternative layouts for the fields in your forms.
Essentially, Ready Classes are class names that you can add to the parent element surrounding each field to take advantage of pre-defined styles included in the default form stylesheet.
How to Use Ready Classes
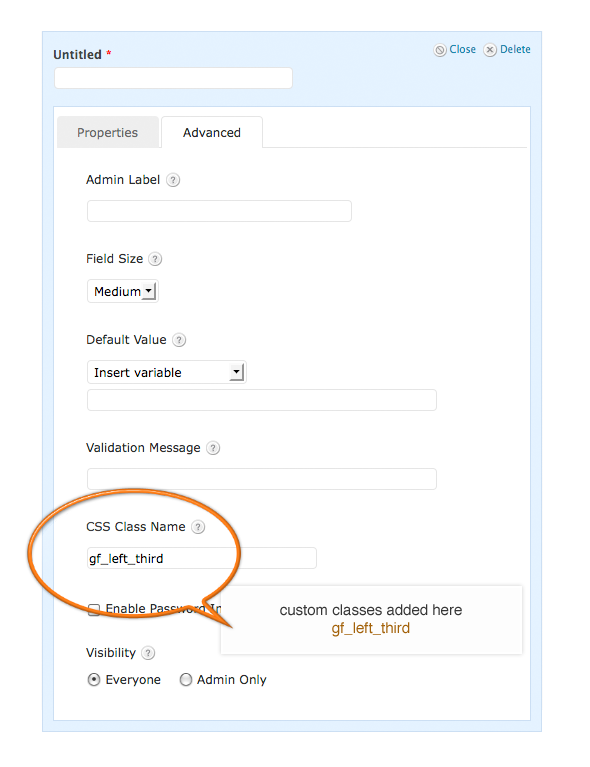
To add a Ready Class to a field, just edit your form in the Form Builder and then select the field you want to add the classes to. Under the "Advanced" tab, you’ll see an input called "CSS class name". Add the Ready Class name or names you want to add to the field here and then save the form.
Please note that this feature does NOT update live in the Form Builder. After you specify your Ready Class names, just save the form and you’ll see the classes being applied to your form in the preview window and on the live site.
The Ready Class Names
Here are the Ready Classes that are built in the Gravity Forms default stylesheet that you can use right away without having to write any of your own CSS.
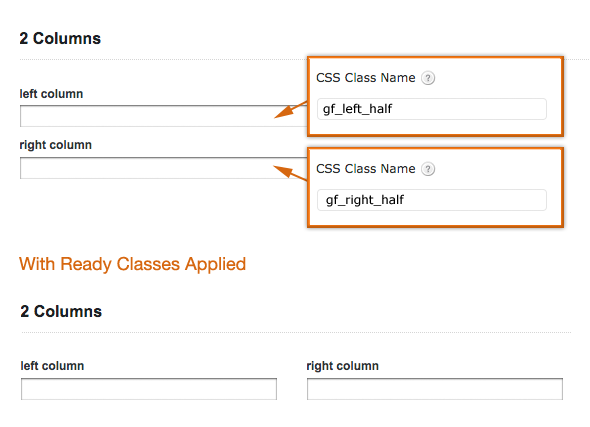
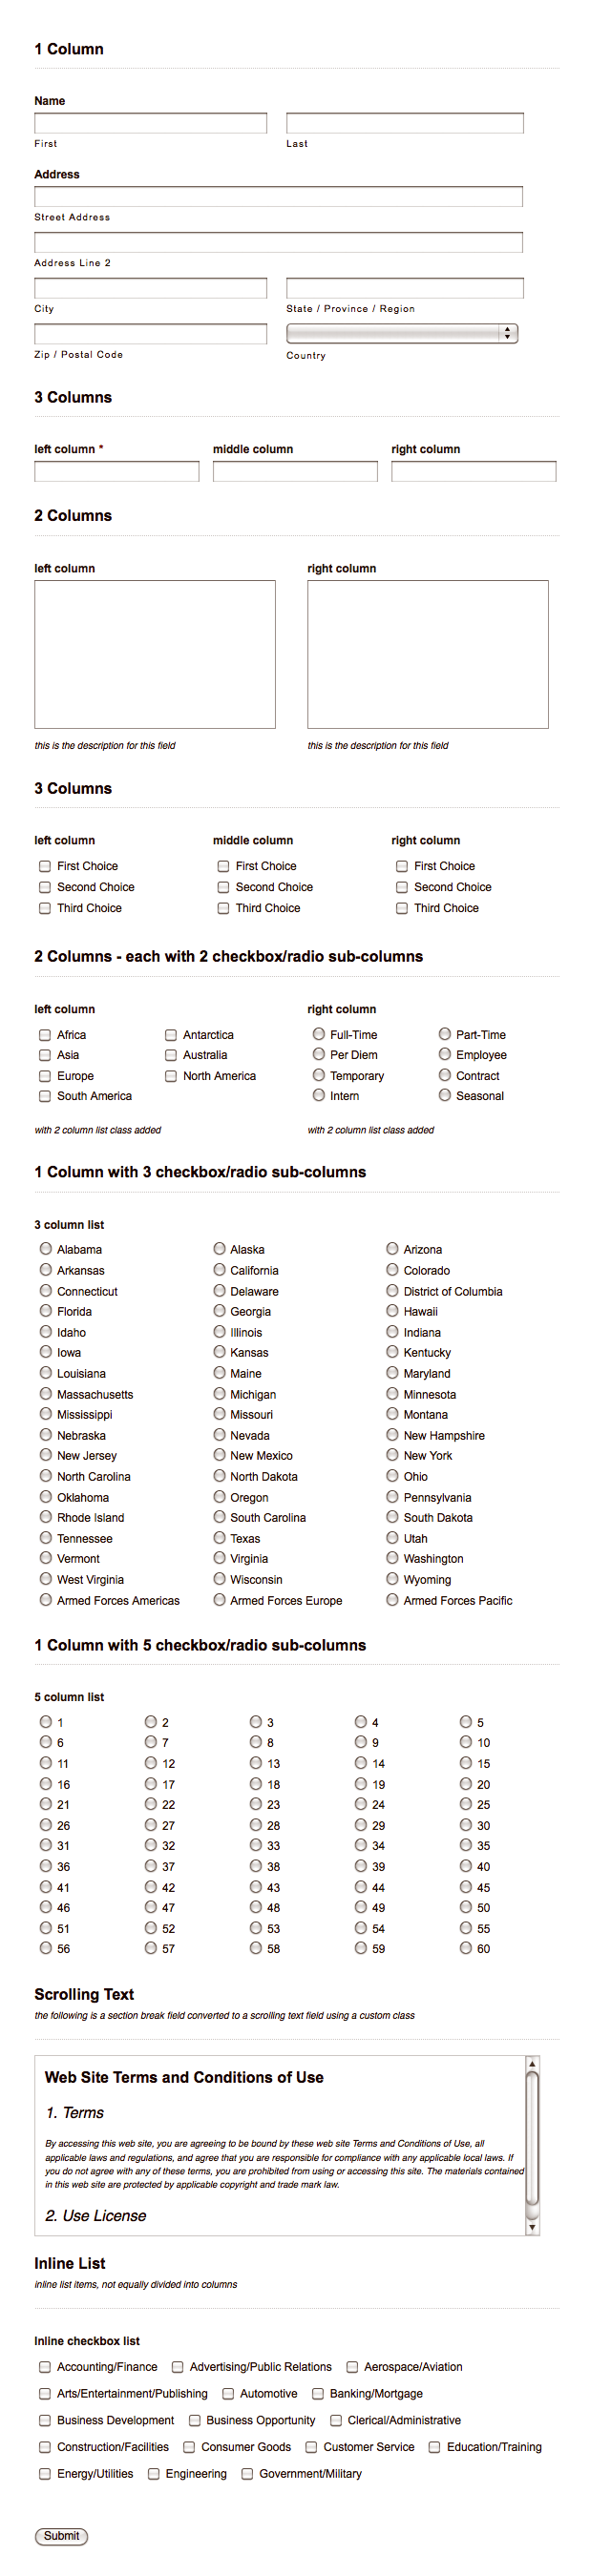
Halves (2 Columns)
Note: These only work with the "top label" form layout option.
gf_left_half
This places the field in the left column (left half) of a 2 column layout. This only work with the "top label" form layout option.
gf_right_half
This places the field in the left column (right half) of a 2 column layout. This only work with the "top label" form layout option.
To align two fields side by side (2 equal columns) you can add these classes. The two fields have to be adjacent to each other in the Form Builder. The gf_left_half class has to be added to the first field and the gf_right_half class to the second field.
Example:
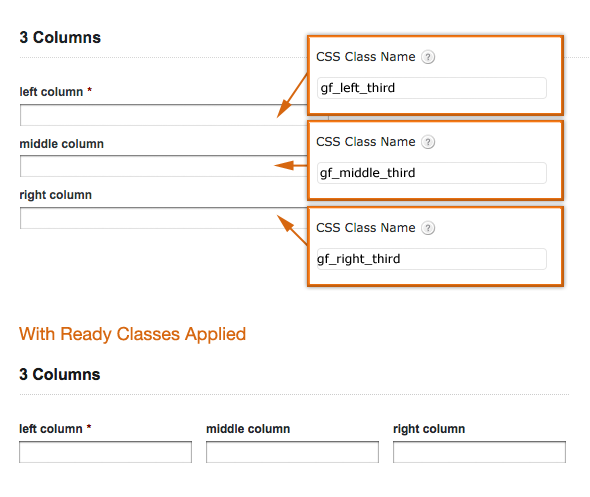
Thirds (3 Columns)
gf_left_third
This places the field in the left column (left third) of a 3 column layout. This only work with the "top label" form layout option.
gf_middle_third
This places the field in the middle column (middle third) of a 3 column layout. This only work with the "top label" form layout option.
gf_right_third
This places the field in the right column (right third) of a 3 column layout. This only work with the "top label" form layout option.
To align three fields side by side (3 equal columns) you can add these classes. The three fields have to be adjacent to each other in the Form Builder. The gf_left_third class has to be added to the first field, the gf_middle_third class to the second field and the gf_right_third class to the third field.
Example:
List Classes
gf_list_2col
This turns a multiple choice/checkbox list into an equally-spaced 2 column format. This only applies to multiple choice/checkbox lists and work with any of the form label position settings.
gf_list_3col
This turns a multiple choice/checkbox list into an equally-spaced 3 column format. This only applies to multiple choice/checkbox lists and work with any of the form label position settings.
Example:
gf_list_4col
This turns a multiple choice/checkbox list into an equally-spaced 4 column format. This only applies to multiple choice/checkbox lists and work with any of the form label position settings.
gf_list_5col
This turns a multiple choice/checkbox list into an equally-spaced 5 column format. This only applies to multiple choice/checkbox lists and work with any of the form label position settings.
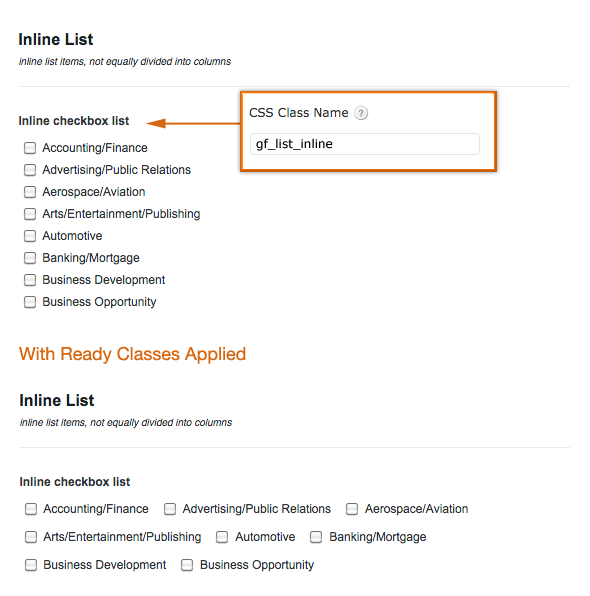
gf_list_inline
This turns a multiple choice/checkbox list into an inline horizontal list (not evenly spaced columns). This only applies to multiple choice/checkbox lists and work with any of the form label position settings.
Example:
gf_list_height_25
This applies a 25px height value all multiple choice/checkbox items in that list. This can be useful to avoid "hanging floats" caused by list items of unequal height. This only applies to multiple choice/checkbox lists and work with any of the form label position settings.
gf_list_height_50
This applies a 50px height value all multiple choice/checkbox items in that list. This can be useful to avoid "hanging floats" caused by list items of unequal height. This only applies to multiple choice/checkbox lists and work with any of the form label position settings.
gf_list_height_75
This applies a 75px height value all multiple choice/checkbox items in that list. This can be useful to avoid "hanging floats" caused by list items of unequal height. This only applies to multiple choice/checkbox lists and work with any of the form label position settings.
gf_list_height_100
This applies a 100px height value all multiple choice/checkbox items in that list. This can be useful to avoid "hanging floats" caused by list items of unequal height. This only applies to multiple choice/checkbox lists and work with any of the form label position settings.
gf_list_height_125
This applies a 125px height value all multiple choice/checkbox items in that list. This can be useful to avoid "hanging floats" caused by list items of unequal height. This only applies to multiple choice/checkbox lists and work with any of the form label position settings.
gf_list_height_150
This applies a 150px height value all multiple choice/checkbox items in that list. This can be useful to avoid "hanging floats" caused by list items of unequal height. This only applies to multiple choice/checkbox lists and work with any of the form label position settings.
Other Classes
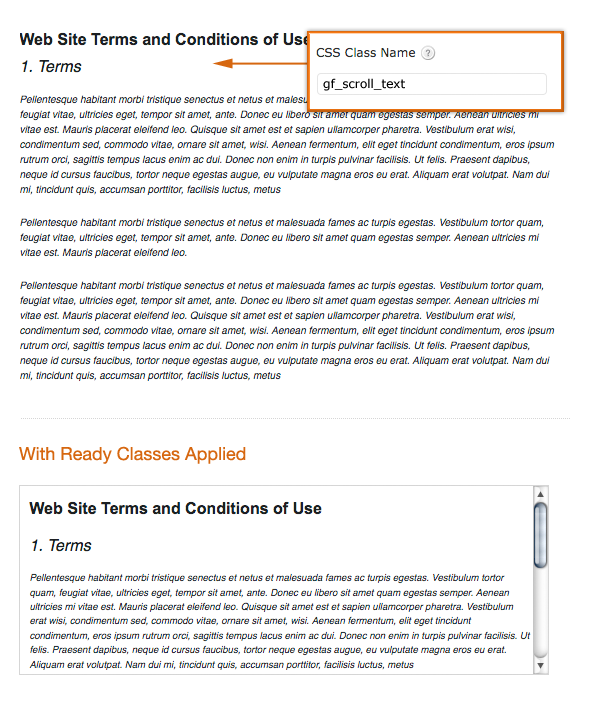
gf_scroll_text
This converts a section break field into a box with a fixed height that will automatically show a scroll bar if there’s a large amount of text. This is useful if you’re wanting to show large amounts of content to the user, but don’t want to have to link to it or make the form very long to show it (Terms of Service Agreements, etc). This class only works on section breaks and works with any of the form label position settings.
Example:
gf_hide_ampm
This hides the am/pm selector in the time field- this only hides the field on the form, not in the form entry table. This works with any of the form label position settings.
gf_hide_charleft
This hides the characters left counter beneath paragraph text fields when using the maximum characters option. This works with any of the form label position settings.
Q & A
Can I use multiple classes on the same field?
Yes, you can use multiple classes together. Just separate each class name by a space. Note: This doesn't work for all of the styles, but many can be combined if they're applicable to the field type. For example, you may have a 2 column primary layout, and want to use 2 column list layouts within the columns.
Can I create my own classes?
Yes, the classes are added to the parent <li> element surrounding a field so you can define your own class name and add your own rules to your theme stylesheet based on that class name being added to the field.
Notes
You can also see anexampleof several of these classes applied in one formhere.
One final note. As with any CSS rules, your particular theme CSS may override or supersede some of these styles. They've been tested in a variety of themes and work well, but you may have to make some adjustments to your theme styles for everything to work properly.
With theGravity Forms Product Add-Onsextension, advanced product configuration forms can be built and linked to any product in WooCommerce. Forms that contain conditional logic, pricing fields, user input prices, conditional-pricing fields, conditional submit button logic can all be created for your products.
Additionally, any product that contains a Gravity Form is tracked in the cart to ensure, no matter how complex your product form, only unique configurations are added to the cart and duplicates are incremented in quantity.
Gravity Forms Product Add-Ons gives you full control over the display of prices in the store. You can use the default price displays provided by WooCommerce, or set the price to ‘As Low as $1000’ in the case of a configurable product containing pricing fields.
You also have control over when the built-in automatic price calculation is displayed, if at all, and can configure each label individually.
Required Configuration The plugin does not require any manual configuration after activation.
Optional Configuration A setting you might change is how HTML is formatted from specific Gravity Forms field types. A common request is to have HTML from the List type field show as HTML and not as a CSV list of data. To do this, you can use a filter to turn off HTML stripping in the plugin.
To turn off HTML stripping, add the following to the functions.php file in your theme:
Build a Gravity Form that contains any of the supported field types. Be sure to leave the Confirmation settings as default text with an empty message. Configure any conditional logic, and optionally submit button logic.
Gravity Forms Product Add Ons does not change or add anything to the actual configuration of the form itself. The extension will use the form you have already built using the standard method tobuild a Gravity Form.
To configure the form, do so as though you were creating a form with no connection to WooCommerce.
I recommend adding the form to a temporary post or page, or using the Form Preview to get it working properly.
Make sure that you submit an entry so you can validate that a regular Gravity Forms submission creates the entry with the correct information
Once you have the form configured as required, and after it is attached to a product it will be displayed as you require.
If you need additional assistance with setting up the Gravity Form itself you could check the Gravity Forms Documentation or contact their support team for further assistance on that part.
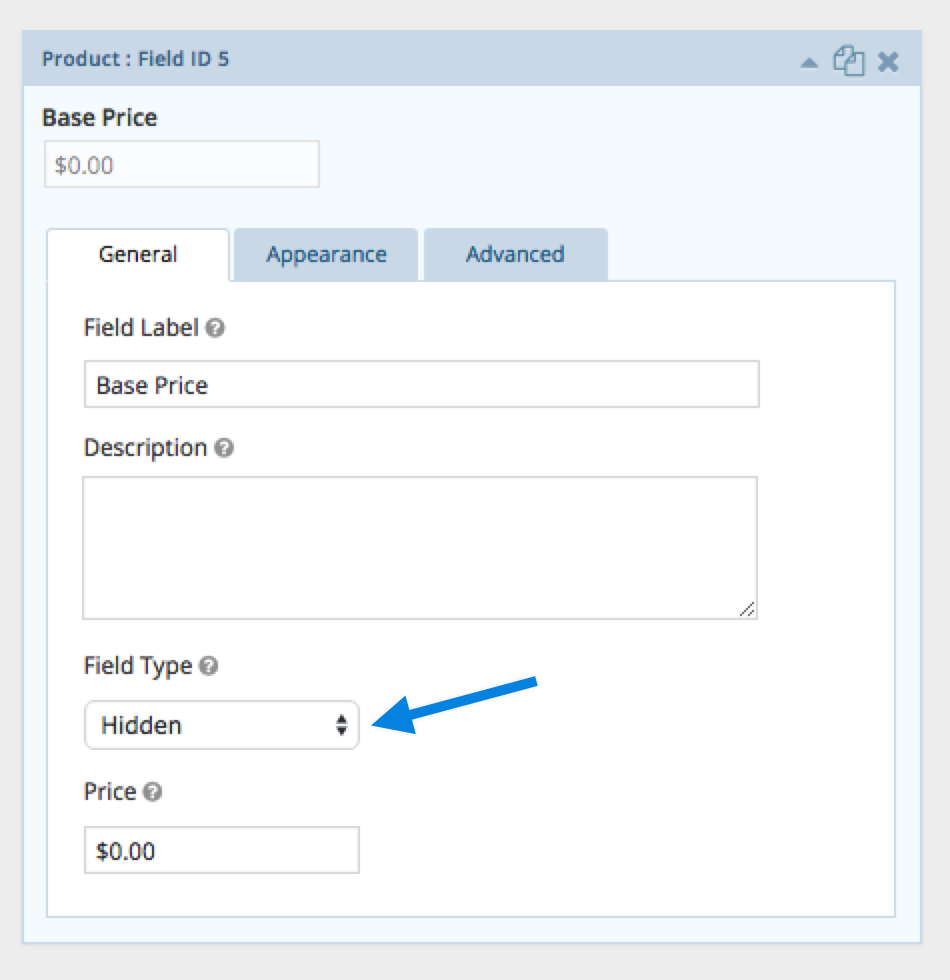
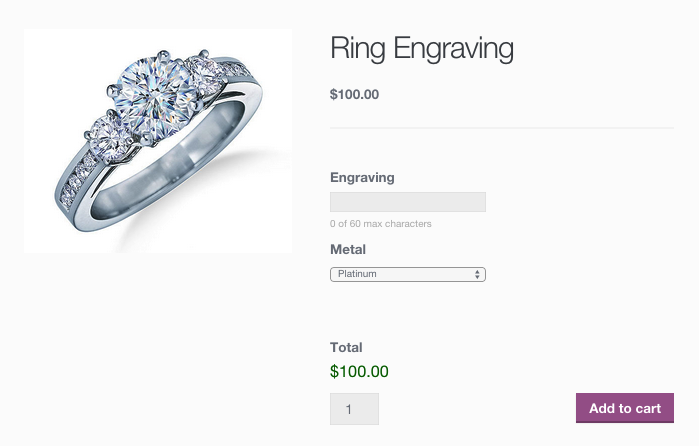
In the example below, the form is configured to use pricing fields. When using pricing fields, Gravity Forms requires a product and total field. Typically you add a hidden product field to the form and set its price to the price at which you require customizations.
Add aProductfield (from the Pricing Fields section) to the form in order to configure the base customization price and set it to $0.00:
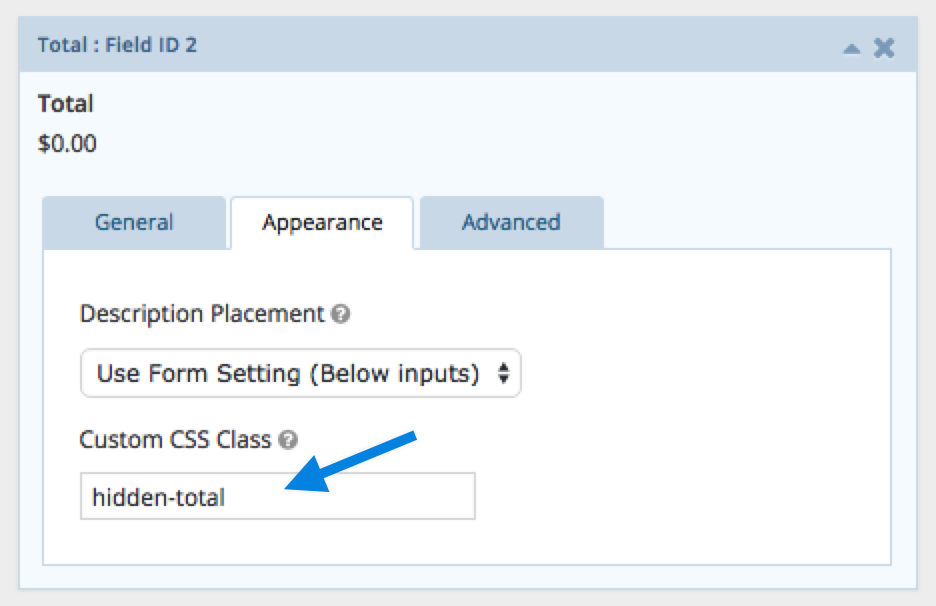
Gravity Forms Product Add-On requires that at least oneTotalfield (from the Pricing Fields section) be present on the form. Add a total field to the form. In this example, we are using the built-in dynamic price calculations on our single product page. To prevent the customizations total from being displayed twice on the single product page (once in the dynamically calculated price area and once in the gravity form itself), add a class of “hidden-total” to CSS Class Name under the Appearance tab in the field configuration:
To add options to your form, use the Option field type from Gravity Forms. You can use other controls, such as the standard dropdown, but you must use the option field if your option has a cost associated.
Note: If you have options that have a cost associated, you must use the Product Option field type, not standard drop-down fields, radio buttons, checkboxes, etc. This is standard for how Gravity Forms works. If you have trouble creating the product form,Gravity Forms documentationhas several good examples.
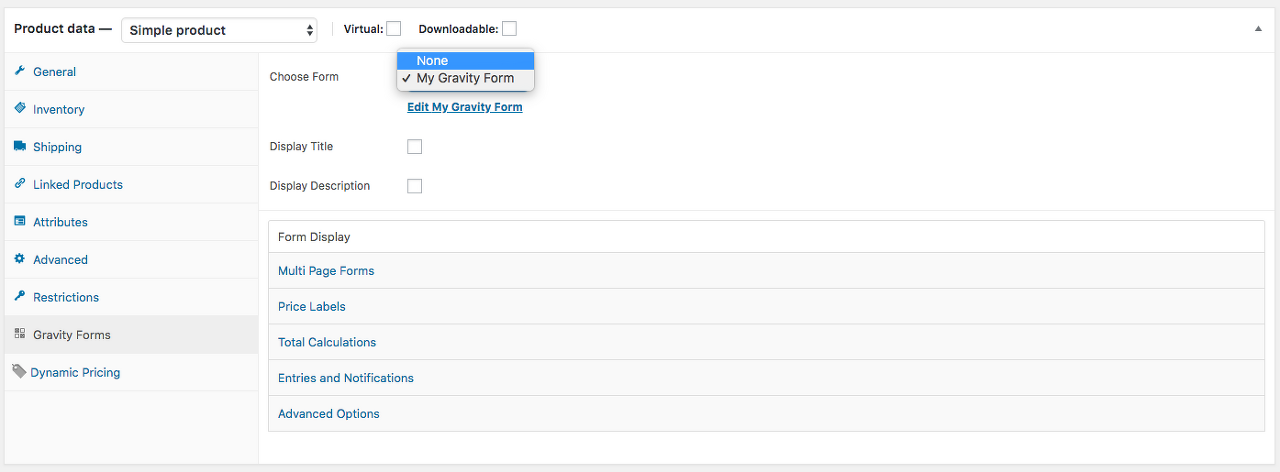
Once you have built your form and are satisfied with the functionality, create or edit an existing WooCommerce product. Please note that in order for the form to display on the front end, you will need to have either a price or a 0 in the Regular Price field (for more information, seeFAQ below).
Select the form you wish to use.
With Gravity Forms Add-On enabled, you have options for linking the form, displaying the Gravity Form title and description, and displaying alternative price titles throughout the store. You also have the ability to control how the dynamically calculated price is displayed on the single product page.
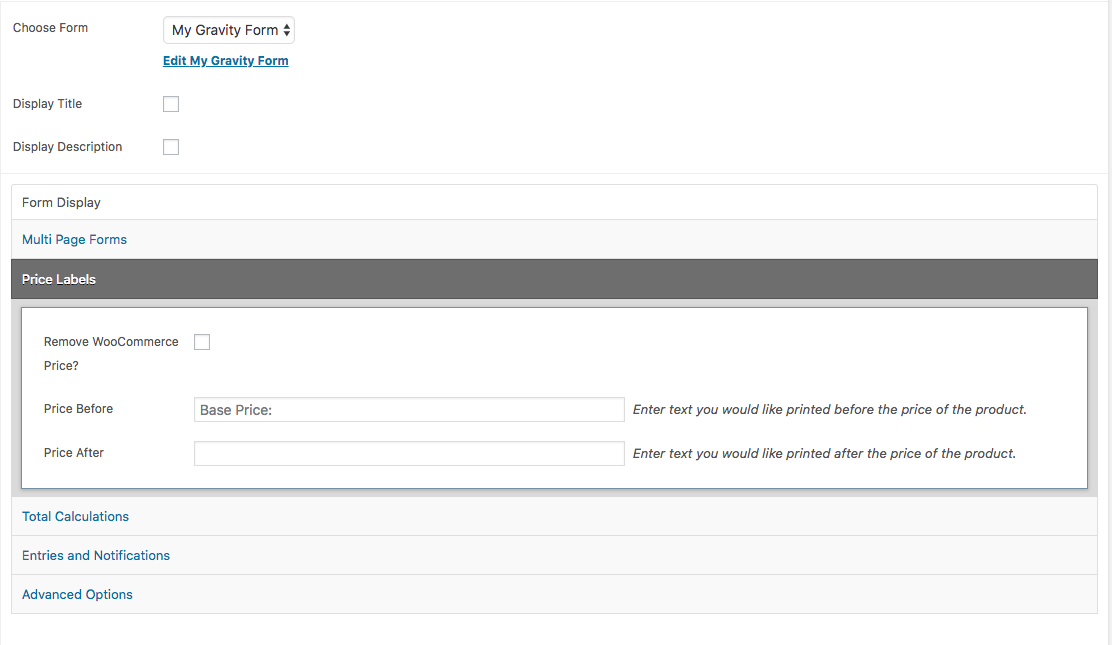
Price Labels
Remove WooCommerce Price
This will remove the price html from the store when viewing the product. Use this option if you are doing all calculations in the form and do not want 0 or Free to display as the products regular price.
Price Before
A label which can be added before the price. Useful for adding information to the price section on the product letting your customers know the price is the base price, and additional form options will add to the total cost.
Price After
A label to display after the regular price in your store.
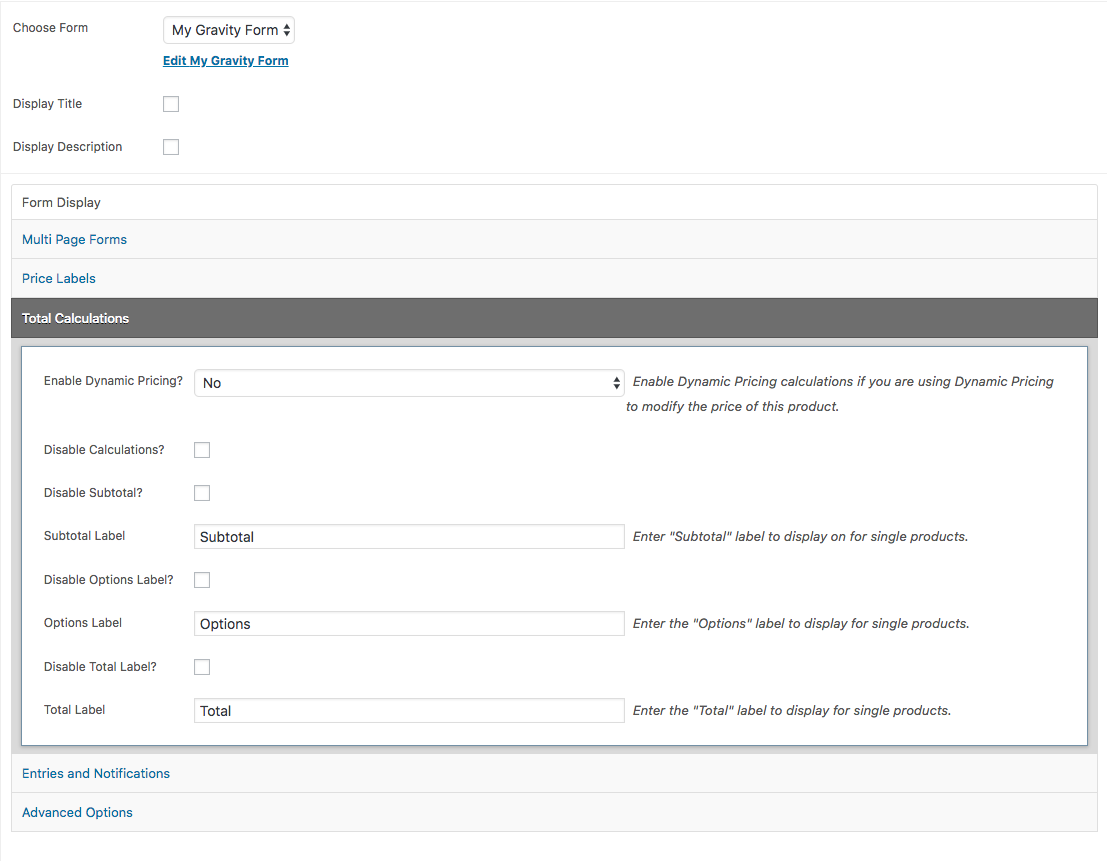
Total Calculations
Enable Dynamic Pricing
This option will be visible if you have the WooCommerce Dynamic Pricing plugin active. By setting this to Yes, the price visible to your customers will automatically update based on pricing rules and the cost of the customers selected options.
Disable Calculations
To completely remove the Subtotal, Options Total and Grand Total section from your products. Useful if you are not performing any calculations and have no fields on your form which add to the products cost.
Disable Subtotal
Will remove the Subtotal line from the totals section on your product page.
Subtotal Label
The label to display for the Subtotal line item.
Disable Options Total
Will remove the Options total, the price added to the product by your form options, line from the totals section on your product page.
Options Label
The label to display for the Options line item.
Disable Total Label
Will remove the Total, the price of your product plus the price added to the product by your form options, line from the totals section on your product page.
Total Label
The label to display for the Total line item.
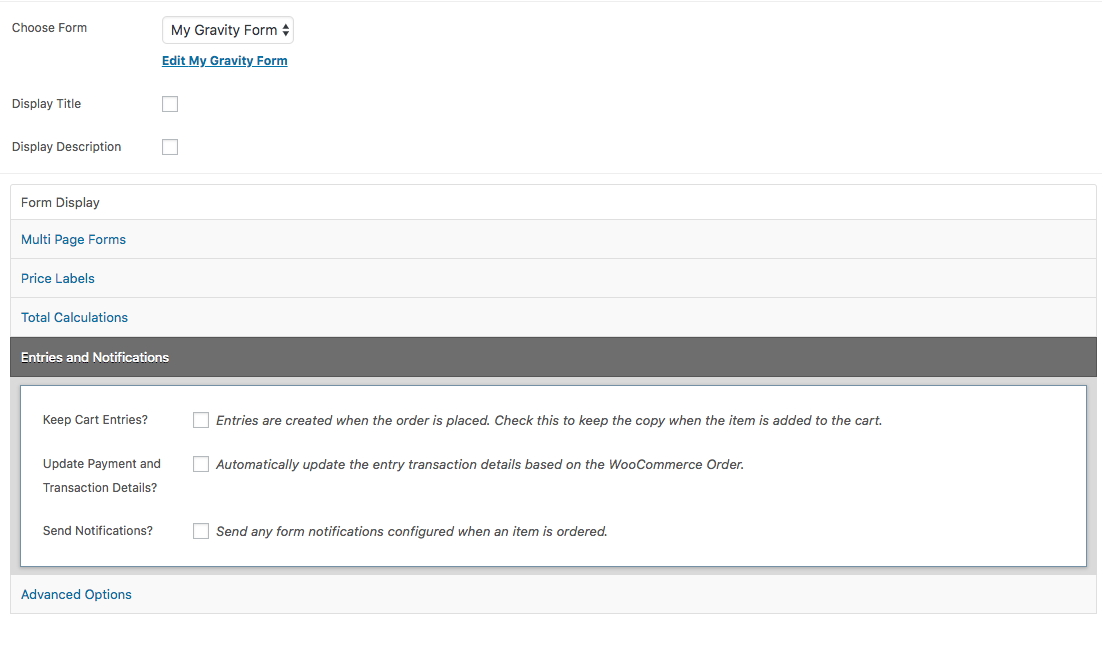
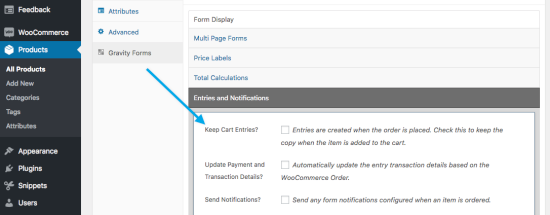
Entries and Notifications
Keep Cart Entries
As of Gravity Forms 3.3, entries are only created when the order is placed. In previous versions entries were created as a side effect of creating the cart item. These entries are now removed by default automatically. If you would like to track both the entries created when someone is adding an item to their cart checkKeep Cart Entries.
Note, normally this is not very useful since you have no link between the entry and the cart to which it was added.
The entries created during the actual checkout process are properly linked to their associated order items.
Update Payment and Transaction Details
Check this box to enable the transactional data link between the Gravity Form entry and the WooCommerce order. When enabled transaction information, such as payment status and order details, will be linked to the entry automatically. The information will update as the order and payment status change in WooCommerce.
Send Notifications
Gravity Forms Product Addons automatically disables any notifications from being sent when items are ordered and entries are created.
If you would like to process your notifications, enable this option. When orders are created you will receive the notifications you have configured for each cart item which has a form attached to it.
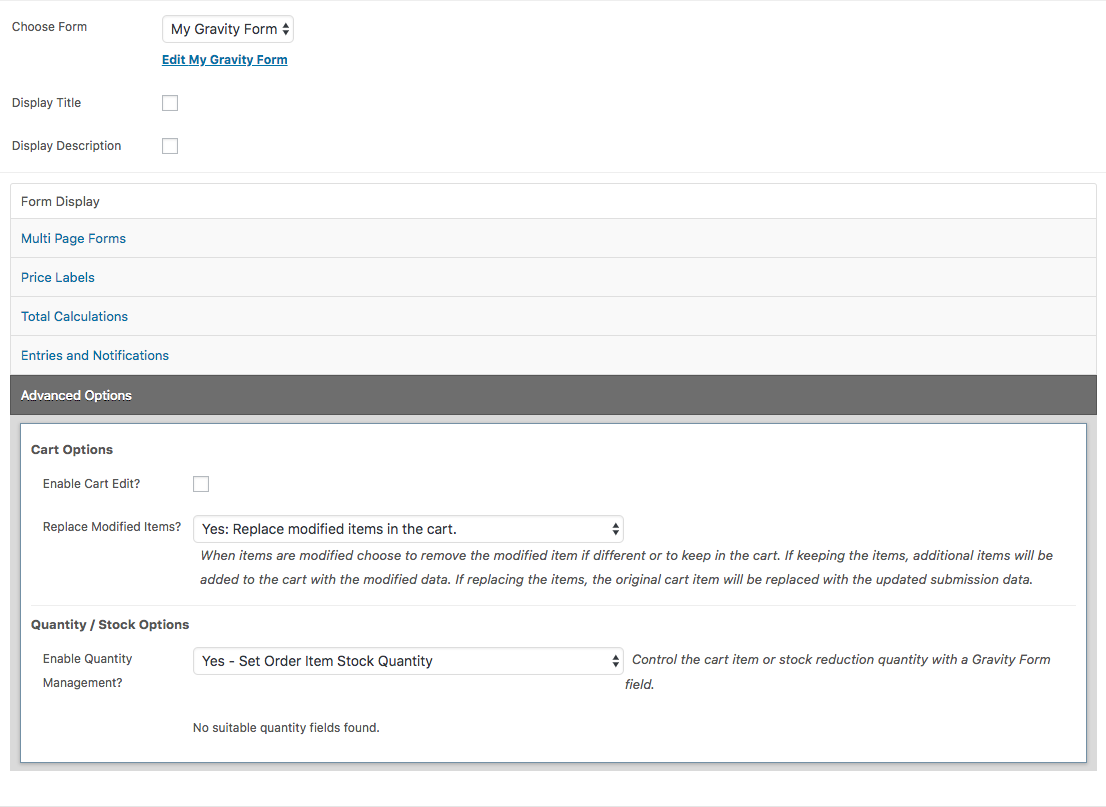
Advanced Options
Enable Cart Edit
Enable this to allow users to edit items they have added to their cart. The default would be the user would need to fill out a form and add it to the cart, and manually remove any items on which they want to change. If you enable cart edit users can click on the item in the cart to be taken back to the product page with their details pre-filled out.
Replace Modified Items
Choose to Replace the edited item or to add a new item to the cart. Normally you would want to replace the modified item, since the user is editing it, however the option now exists to append the modified item.
Quantity / Stock Options
If your form has the right type of fields you can enable the form to be linked to either the Cart Quantity or the final Order Item Quantity. This could be useful if you have quantity fields on your form itself and want to use that value when the customer adds the item to the cart.
If you would just like to reduce the stock quantity of your WooCommerce product based on a field on the form, choose Order Item Quantity. The cart quantity will remain 1 but when the order is placed the stock quantity of the product will be reduced by the value of the field you choose.
After your options have been configured, publish or update your product. Navigate to the product in the store and see how your form has been linked to the product:
When a customer purchases a product linked to a Gravity Form, here is how the add-on information displays:
Cart View
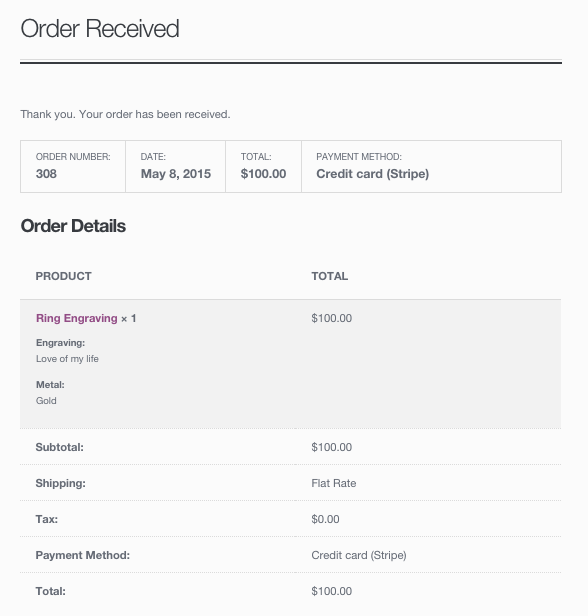
Order Confirmation
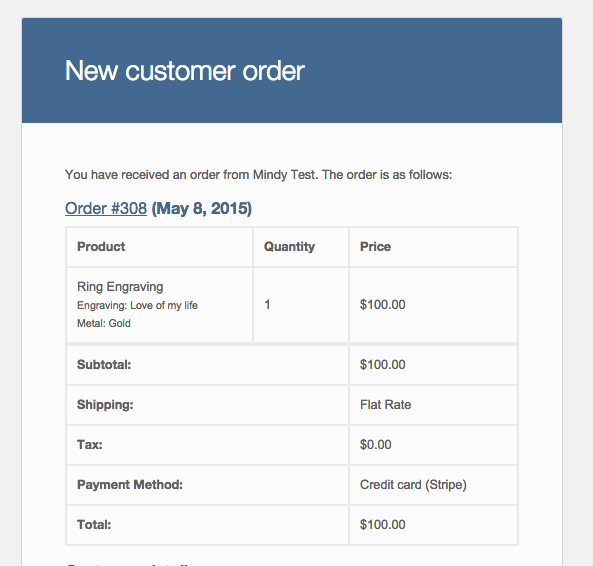
Admin Email – New Order Notification
WooCommerce Order Information
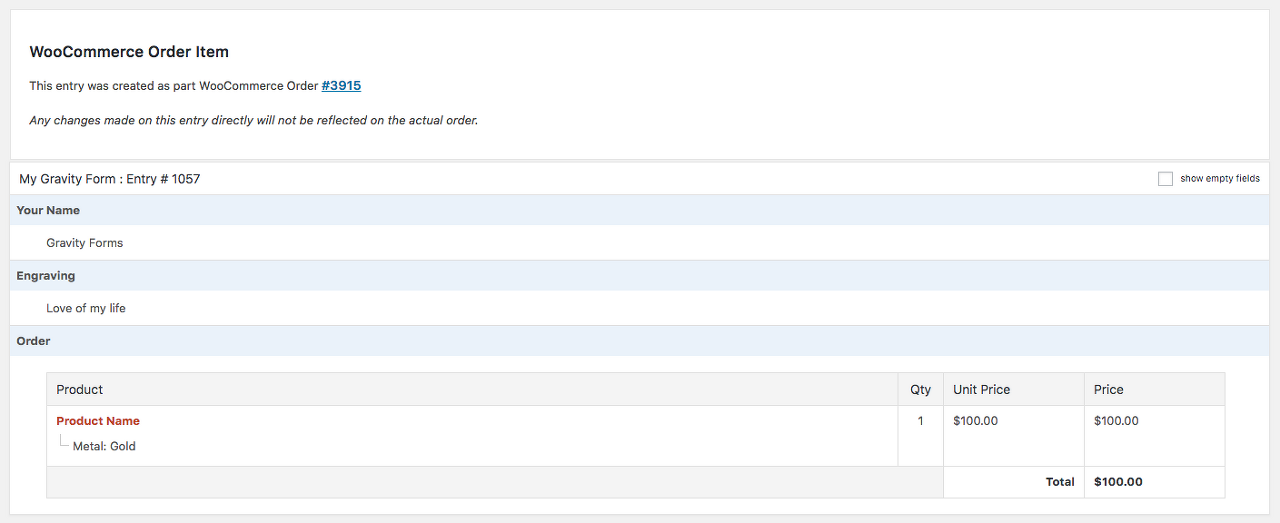
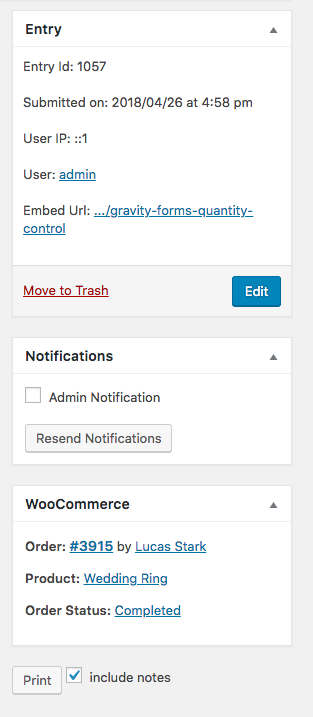
Gravity Forms Product Addons 3.3 now links each order item to the Gravity Form entry created during the checkout process. Once the order is placed you can quickly jump from the WooCommerce order to the associated entry.
Gravity Form Entry Information
Gravity Forms Product Addons 3.3 adds additional information to the entries inside of Gravity Forms itself. This allows you to quickly see the associated WooCommerce order information.
Each cart item ordered will have a 1-1 relationship to it’s entry.
The entries themselves will have additional data provided by the parent WooCommerce order.
Gravity Form Entry Transaction Information
The entries are linked to their respective WooCommerce order item and will update it’s status and transaction information as the order proceeds through the order and payment process. This is useful if you want to export your entries and only work with items with a specific order status.
Supported Gravity Form Fields and Features
Standard Fields
Single Line Text
Drop Down
Number
Radio Buttons
HTML
Paragraph Text
Multi Select
Checkboxes
Hidden
Section Break
Advanced Fields
Name
Time
Address
Email
Date
Phone
Website
File Upload
List ( Partial support, the column values are stored in WooCommerce as a CSV list of data, not the raw HTML )
Pricing Fields
Product
Option – Drop Down
Option – Check-boxes
Option – Radio buttons
Total
Quantity
Shipping
Forms that are AJAX-enabled are not currently supported with Gravity Forms Product Add-Ons
Quick Tips
Any license level of Gravity Forms will work with this extension.
If you are having trouble with a form, calculations or conditional logic, ensure that the form works as expected on a regular post or page. Often times, calculated fields or conditional logic is not configured as expected and it’s easier to track this down when using the gravity form alone and without an attached product.
Ensure that you avoid using custom confirmation settings on the form. Leave the default confirmation set to text with an empty message.
FAQ
What is the best way to use these forms while keeping my website fast?
Make each individual product into a separate Gravity Form Page. Using conditional logic on each separate product page (rather than providing every variable possible on one page) will keep your website fast. Each field that has conditional logic requires an AJAX post back, so there will be only five rather than 25 fields with conditional logic. Using the multipage approach should take care of lag issues.
Why are duplicate entries created?
Gravity Form Add-Ons no longer creates duplicate entries. Entries are created during the add to cart process, however they are automatically removed. Once the actual order is completed an entry will be created and will be linked to the ordered item. When viewing the order you will see a link to the entry and when viewing the entry you will see a link to the WooCommerce Order.
Why won’t Gravity Forms show on the front end?
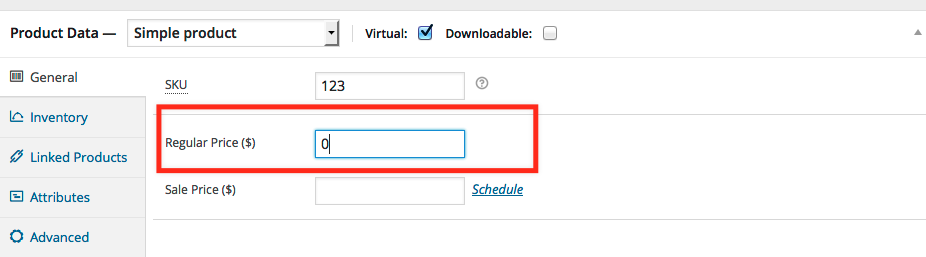
Products that have an empty ‘price’ field won’t display Gravity Forms Add-Ons. Enter a value as shown:
The Gravity Form will also not display if you have any fatal JavaScript errors on your site caused by your theme or other plugins. Gravity Forms itself uses JavaScript to display the form, and if there is a fatal script error before the form is completely rendered it won’t be displayed. You can check for this condition by using Google Chrome Developer Tools and checking the Console to see if there are any errors. If there are you should contact the Theme or Plugin Author to help resolve those.
Can I use Gravity Forms Add-Ons to send emails?
Gravity Forms will not send notifications you have configured once the order is completed. This is a recent change as of version 3.3. If you want to receive Admin Notifications you can enable those when configuring the form options on your WooCommerce product.
Why do my forms redirect to a page URL that ends with /:/?
Ensure that you are running the latest version of Gravity Forms and Gravity Forms Product Add-Ons. If this is still an issue, delete the problematic form and create it again from scratch. Use the new form.
Why are my Options and Totals not correctly adding costs?
There are a few possibilities. The first is that you must check that you are assigning each option field to a product field. Next ensure that you have Disable quantity fieldchecked for the product field if this option is not used.
Why doesn’t this work with the Gravity Forms Partial Entries add-on?
Partial Entriesis a 3rd party add-on for Gravity Forms, which collects data for partially completed, but not submitted, forms. Since the actual form entries for Gravity Forms are not important to the WooCommerce cart / order process (see FAQ re: duplicate entries), this add-on is not compatible with our Gravity Forms Product Add-ons extension.
Why are my calculations not showing?
In some cases it may be due Ajax being disabled. It may also be a plugin/theme conflict. More at:WooCommerce Self-Service Guide.
Can I use the form fields to change the product’s featured image like I do with product variations?
No, Gravity Forms does not allow to link fields and their values with product variations.
Where can I see Gravity Forms Product Add-Ons in action?
Many users find it helpful to export their Gravity Forms entries as a PDF for better ability to print them as well as attach them within an email. In this article, we will show you how to use a 3rd party plugin to easily export your Gravity Forms entries as a PDF.
Downloading the Gravity PDF Add-On
While Gravity Forms does not have the ability to natively export entries as a PDF, another developer has developed a solution that works quite well.
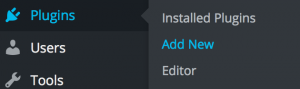
First, log into your WordPress admin dashboard.
Next, hover overPluginsand click onAdd New.
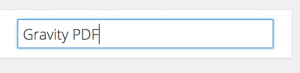
On the top right of the page, search forGravity PDF.
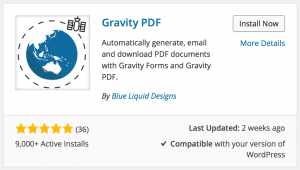
Upon searching, your first result should be Gravity PDF from Blue Liquid Designs. Simply click theInstall Nowbutton.
WordPress will now handle the download and installation of the Gravity PDF plugin for you. Be sure to activate the plugin once complete.
Exporting Entries as PDF
First, click onFormson the left side menu.
Next, hover over the form that you want to view entries for. Upon doing so, you will see additional options appear. Click onEntries.
You should now be looking at a list of your entries. Hover over your desired entry, and click onView PDF.
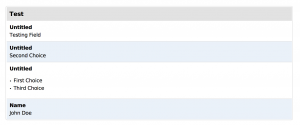
You will now be presented with a PDF of your Gravity Forms entry.
Questions & Support
The Gravity PDF Add-On is created by a third-party developer and as such is not supported by our team, please contact the plugin developer if you have any questions about its features or require support for any issues.


